Vintage Mint Moka Express Italian Coffee Pot Plastic Bag Dispenser — Free Crochet Pattern
Advanced intermediate
A great pattern for all skill levels.
Multi-Day Project
A rewarding 12+ hour journey — perfect for dedicated crafters who love detailed work.
Handmade Gift
A beautiful keepsake — free forever. Read online or print at home.
About This Vintage Mint Moka Express Italian Coffee Pot Plastic Bag Dispenser — Free Crochet Pattern
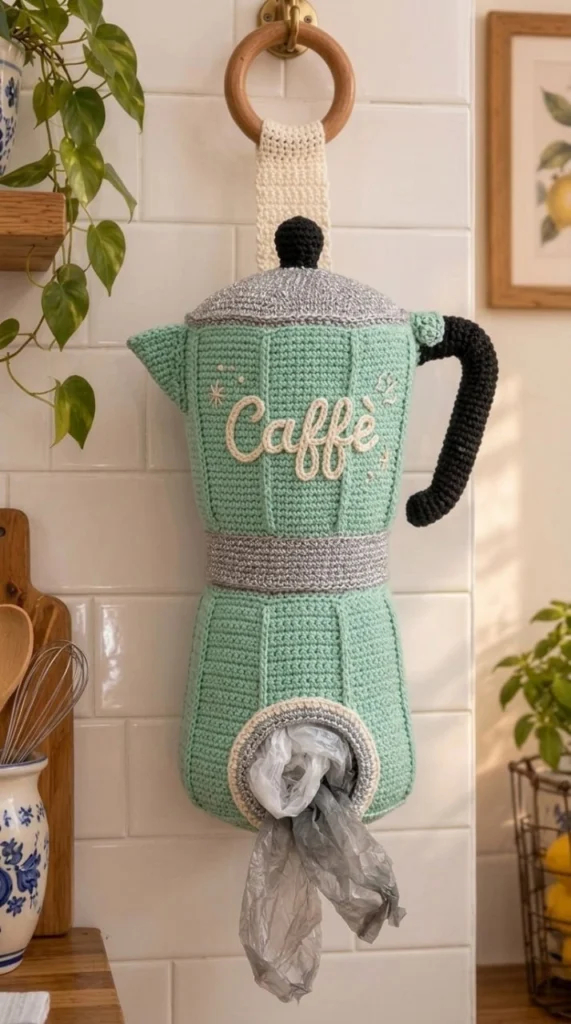
The Vintage Mint Moka Express Plastic Bag Dispenser turns an iconic Italian coffee classic into a highly functional, whimsical piece of kitchen wall art[cite: 15]. Modeled after the legendary octagonal Bialetti Moka pot, this structured wall-hanging organizer features a mint green body with distinctive vertical ribbed facets, a metallic silver safety valve band, an angled pouring spout, a curved jet black handle, and a top lid knob suspended from an elegant wooden ring strap[cite: 15]. The front chamber is adorned with delicate cream cursive surface embroidery reading “Caffè” surrounded by sparkling accent stars[cite: 15]. Designed to store and dispense standard plastic grocery bags, the lower octagonal chamber incorporates a reinforced circular opening framed in silver, providing easy bottom-pull bag access while keeping your kitchen clutter-free[cite: 15].
Constructing this masterclass functional piece combines structured 3D amigurumi techniques, flat surface ribbing, embroidered lettering, and structural hardware integration[cite: 15]. To achieve the sharp 8-sided geometry of a real Moka pot, the upper and lower mint chambers are constructed using alternating back-loop single crochet ribs and front-post accent ridges. A sturdy plastic canvas insert or heavy starch blocking is used to maintain its crisp architectural form under load. Below, you will find exhaustive step-by-step directions, exact stitch counts, assembly guidelines, and embroidery schematics to create your own Italian coffee pot dispenser[cite: 15].
Materials & Specialized Tools
- Yarn: Worsted weight (Category 4) 100% cotton (e.g., Lily Sugar’n Cream or Dishie)[cite: 15].
- Color A (Mint Green / Sage Teal): ~320 meters (~350 yards) for the upper and lower octagonal chambers, spout, and body facets[cite: 15].
- Color B (Metallic Silver / Heather Grey): ~100 meters (~110 yards) for the middle waist band, lid trim, and dispenser ring trim[cite: 15].
- Color C (Jet Black): ~80 meters (~88 yards) for the curved side handle and top lid knob[cite: 15].
- Color D (Natural Cream): ~20 meters (~22 yards) for the cursive “Caffè” embroidery and hanging loop[cite: 15].
- Crochet Hooks:
- 3.5 mm (US E/4) hook for all Moka pot body parts, handle, and spout to ensure an extra-tight, rigid gauge[cite: 15].
- 4.0 mm (US G/6) hook for the cream hanging strap.
- Hardware & Structural Notions:
- One 7 cm (~2.75 inch) natural wooden ring for wall hanging[cite: 15].
- One seamless elastic hair tie (~5 cm / 2 inches) for structuring the bottom dispenser opening.
- Flexible plastic canvas sheets (or heavy craft felt) for lining the interior octagonal walls to prevent bulging when stuffed with bags.
- Polyester fiberfill stuffing (small amount for handle and lid knob).
- Tapestry needle, stitch markers, precision scissors, and water-soluble fabric marker for embroidery tracing.
Special Stitch Definitions & Abbreviations
- ch = chain[cite: 1, 15]
- sl st = slip stitch[cite: 1, 15]
- sc = single crochet[cite: 1, 15]
- hdc = half double crochet[cite: 1, 15]
- dc = double crochet[cite: 1, 15]
- FPsc = Front Post Single Crochet (insert hook from front to back to front around post of designated st, yarn over, pull up loop, yarn over, draw through 2 loops)[cite: 8, 15].
- BLO = back loop only[cite: 1, 12, 15]
- FLO = front loop only[cite: 1, 12, 15]
- inc = increase (2 sc in designated st)[cite: 1, 15]
- dec = single crochet 2 together (sc2tog)[cite: 1, 15]
- Surface Slip Stitch (Surf-sl-st): Inserting hook through fabric from front to back, pulling loop from working yarn held behind, and pulling through active loop on hook to form flat embroidered chain lines[cite: 13, 14, 15].
Instructions
Part 1: Lower Octagonal Chamber & Dispenser Port (3.5 mm hook)
The lower chamber begins at the bottom opening, incorporating an elastic ring for smooth bag dispensing, and builds upward through 8 ribbed vertical facets[cite: 15].
Dispenser Opening & Base
- Round 1 (Elastic Foundation Ring – Color B Silver): Hold the seamless elastic hair tie. With 3.5 mm hook and Color B (Silver), work 36 sc completely encapsulating the elastic ring. Join with sl st to first sc. [36 sc]
- Round 2 (Silver Rim Expansion – Color B Silver): Ch 1, *1 sc in next 2 sts, inc in next st; repeat from * 11 more times. Join with sl st. Fasten off Silver. [48 sc]
- Round 3 (Switch to Mint Green – Color A Mint): Attach Color A (Mint Green) in BLO of any st. Ch 1, work 1 sc in BLO of each st around[cite: 12, 15]. Join with sl st. [48 sc]
- Round 4 (Establishing 8 Facet Ridges): Ch 1, *sc in next 5 sts, FPsc around next st (facet ridge); repeat from * 7 more times around[cite: 15]. Join with sl st. [8 FPsc ridges, 40 sc; 48 sts total]
- Rounds 5–18 (Lower Faceted Chamber): Ch 1, *sc in next 5 sts, FPsc around FPsc st of previous round; repeat from * 7 more times around[cite: 15]. Join with sl st. (This establishes the 8 flat panel facets of the Moka base[cite: 15]). [48 sts per round]
- Rounds 19–22 (Lower Taper Expansion):
- Round 19: Ch 1, *inc in next st, sc in next 4 sts, FPsc in FPsc st; repeat from * 7 more times. Join. [56 sts]
- Rounds 20–22: Ch 1, *sc in next 6 sts, FPsc in FPsc st; repeat from * 7 more times. Join. [56 sts]
Waist Safety Band (Color B Silver)
- Round 23 (Waist Transition): Fasten off Mint Green. Attach Color B (Silver) yarn. Ch 1, work 1 sc in each st around[cite: 15]. Join. [56 sc]
- Rounds 24–26 (Silver Safety Valve Ring): Ch 1, work 1 sc in each st around[cite: 15]. Join. Fasten off Silver at end of Round 26. [56 sc]
Part 2: Upper Octagonal Chamber & Spout (3.5 mm hook)
Upper Mint Chamber
- Round 27 (Upper Chamber Attachment – Color A Mint): Attach Color A (Mint Green) to BLO of Round 26[cite: 12, 15]. Ch 1, *sc in next 6 sts, FPsc around FPsc line from below; repeat from * 7 more times. Join. [56 sts]
- Rounds 28–46 (Upper Faceted Body): Ch 1, *sc in next 6 sts, FPsc in FPsc st; repeat from * 7 more times around[cite: 15]. Join with sl st at end of each round. [56 sts per round; height = ~12 cm]
- Rounds 47–50 (Upper Collar Taper):
- Round 47: Ch 1, *dec, sc in next 4 sts, FPsc in FPsc st; repeat from * 7 more times. Join. [48 sts]
- Rounds 48–50: Ch 1, *sc in next 5 sts, FPsc in FPsc st; repeat from * 7 more times. Join. [48 sts]
Top Silver Lid & Angular Crown
- Round 51 (Lid Trim – Color B Silver): Fasten off Mint. Attach Color B (Silver)[cite: 15]. Ch 1, work 1 sc in BLO of each st around[cite: 12, 15]. Join. [48 sc]
- Round 52 (Lid Bevel Decrease): Ch 1, *sc in next 4 sts, dec; repeat from * 7 more times. Join. [40 sc]
- Round 53 (Lid Dome Taper): Ch 1, *sc in next 3 sts, dec; repeat from * 7 more times. Join. [32 sc]
- Round 54 (Lid Crown Closure): Ch 1, *sc in next 2 sts, dec; repeat from * 7 more times. Join. [24 sc]
- Round 55: Ch 1, *dec; repeat around. Join, fasten off, leaving a 20 cm tail. Thread needle through remaining 12 sts, pull tight to close top lid[cite: 1, 15].
Pouring Spout (Color A Mint Green)
- Row 1: On the upper chamber (around Round 42), locate the middle panel opposite where the handle will go[cite: 15]. Attach Color A (Mint Green) across 8 sts[cite: 15]. Ch 1, sc in same 8 sts. Turn[cite: 15]. [8 sc]
- Row 2: Ch 1, dec, sc in next 4 sts, dec. Turn. [6 sc]
- Row 3: Ch 1, dec, sc in next 2 sts, dec. Turn. [4 sc]
- Row 4: Ch 1, dec twice. Turn. [2 sc]
- Edging: Sc evenly down side of spout, across base, and up opposite side to form a crisp triangular pouring spout[cite: 15]. Fasten off, leaving tail for securing[cite: 1, 15].
Part 3: Handle, Top Knob & Hanging Hardware
Curved Moka Handle (3.5 mm hook, Color C Black)
- Round 1: With Color C (Jet Black), make a magic ring, ch 1, work 8 sc into ring[cite: 1, 15]. Do not join; work in continuous spirals[cite: 15]. [8 sc]
- Rounds 2–35: Work 1 sc in each st around to create a long black tubular cord (~18 cm / ~7 inches long)[cite: 15]. Stuff lightly with fiberfill as you progress to keep tube firm.
- Shaping & Attachment: Bend tube into an angular “C” shape mimicking a traditional Moka pot handle[cite: 15]. Sew upper end to Round 46 on side of upper chamber, and lower end to Round 28[cite: 15].
Top Lid Knob (3.5 mm hook, Color C Black)
- Round 1: With Color C (Black), work 6 sc in magic ring[cite: 1, 15].
- Round 2: Work 2 sc in each st around[cite: 1, 15]. [12 sc]
- Rounds 3–4: Sc in each st around[cite: 1, 15]. [12 sc]
- Round 5: *Dec; repeat around[cite: 1, 15]. [6 sc]
- Stuff lightly and sew securely to center apex of top Silver lid[cite: 15].
Cream Hanging Strap & Wooden Ring (4.0 mm hook, Color D Cream)
- Row 1: With Color D (Natural Cream) yarn and 4.0 mm hook, attach around top section of the wooden ring with 8 sc[cite: 15]. Turn[cite: 15]. [8 sc]
- Rows 2–20: Ch 1, sc in each of the 8 sts across. Turn. (Creates a dense, non-stretch strap ~12 cm long)[cite: 15].
- Attachment: Loop strap through top handle junction / lid back, fold end over, and whipstitch securely to back of lid[cite: 15].
Part 4: Surface Embroidery & Assembly
“Caffè” Script Embroidery
- Using a water-soluble marker, trace the cursive word “Caffè” neatly across the middle 3 front panels of the upper Mint chamber[cite: 15].
- Thread tapestry needle with 2 strands of Color D (Natural Cream) yarn[cite: 15]. Work a neat stem stitch or chain stitch directly over marked lines[cite: 15].
- Embroider small 4-point starburst accents around script using single cream straight stitches[cite: 15].
Internal Canvas Reinforcement & Finishing
- Cut two pieces of flexible plastic canvas into octagonal cylinders matching inside dimensions of upper and lower chambers (leaving a hole for dispenser opening).
- Insert canvas liners inside Mint body. This prevents the coffee pot walls from bulging out of shape when stuffed tightly with plastic grocery bags[cite: 15].
- Steam exterior lightly with iron held 3 inches away to set stitches and crisp up the 8 FPsc vertical panel ridges[cite: 15].
Tips for Success
- Maintain Rigid Gauge: Use a 3.5 mm hook with 100% kitchen cotton to ensure the 8 panel ridges stay stiff and structured[cite: 15].
- Keep FPsc Ridges Straight: Ensure Front Post Single Crochets align vertically directly above one another every round to achieve sharp, clean octagonal facets[cite: 15].
- Use Plastic Canvas Liners: Lining interior with plastic mesh keeps the Moka pot silhouette perfectly straight on your kitchen wall regardless of how many bags are stuffed inside[cite: 15].
- Secure Handle Firmly: Anchor both ends of the black handle deeply into internal canvas lining to withstand repeated downward pulling forces[cite: 15].
Common Mistakes to Avoid
- Using Soft Acrylic Yarn — Acrylic stretches under load, causing the coffee pot to sag into an amorphous shape[cite: 1, 15].
- Misaligning Panel Ridges — Shifting FPsc stitches by even 1 stitch ruins the iconic octagonal symmetry[cite: 15].
- Omitting Plastic Canvas — Unreinforced crocheted walls will bulge awkwardly into a round ball when filled with plastic bags[cite: 15].
Ways to Customize This Pattern
- Classic Red Moka Palette: Swap mint green for bright scarlet red for a bold vintage Italian look[cite: 15].
- Yellow Espresso Theme: Work body in pastel yellow with dark espresso brown handle and trim[cite: 15].
- Custom Lettering: Replace “Caffè” with “Espresso”, “Bialetti”, or your family surname[cite: 15].
Frequently asked questions
This pattern is rated as advanced intermediate[cite: 1, 15]. It requires familiarity with front-post stitches (FPsc), working in continuous spirals, structural hardware integration, and surface embroidery[cite: 15].
How long does it take to complete this dispenser?
Constructing the Moka pot dispenser (including upper/lower chambers, spout, handle, embroidery, and hardware assembly) typically takes between 10 and 12 hours[cite: 15].
100% kitchen cotton yarn (Worsted weight Category 4) is strongly recommended[cite: 15]. Cotton provides zero unwanted stretch, crisp stitch definition for octagonal facets, and easy machine washability[cite: 1, 15].
How do I care for and wash this handmade item?
Remove plastic canvas liners, machine wash on a gentle cool cycle inside a laundry mesh bag, and air dry flat[cite: 15]. Reinsert canvas liners once fully dry[cite: 15].
Yes, you are permitted to sell physical finished items created using this pattern[cite: 1, 15]. We kindly ask that you credit patterns.noobcooks.com as the original designer in your listings[cite: 1, 15]. Reselling, copying, or redistributing the written pattern text or images is strictly prohibited[cite: 1, 15].
The finished Vintage Mint Moka Express Italian Coffee Pot Plastic Bag Dispenser — Free Crochet Pattern