Tropical Pineapple Plastic Bag Dispenser — Free Crochet Pattern
Intermediate
For crocheters comfortable with the basics, ready to try new shaping and assembly techniques
Weekend Project
A satisfying weekend make — start Friday, finish Sunday, enjoy forever.
Handmade Gift
A beautiful keepsake — free forever. Read online or print at home.
About This Tropical Pineapple Plastic Bag Dispenser — Free Crochet Pattern
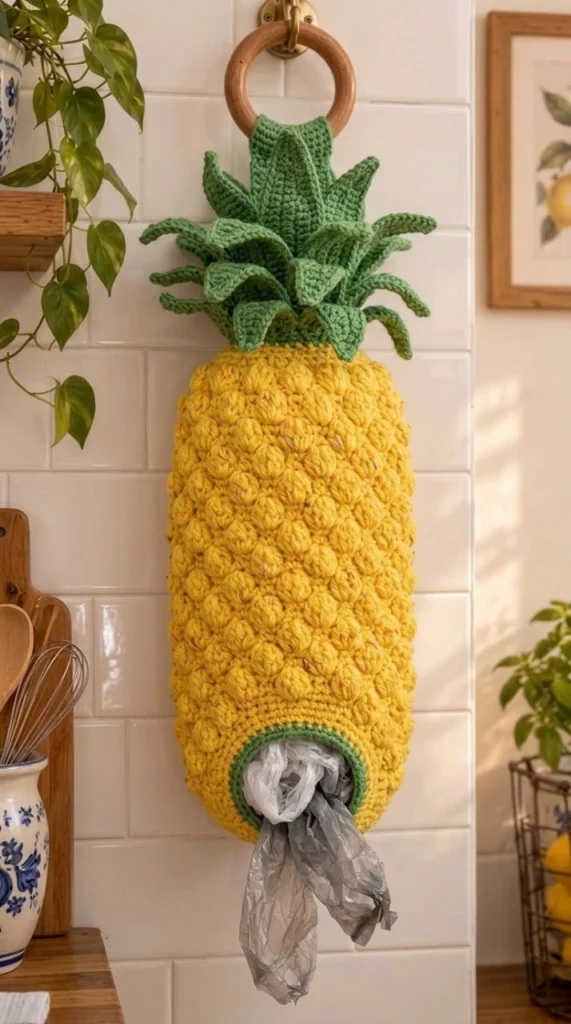
The tropical pineapple plastic bag dispenser merges functional kitchen organization with vibrant, fruit-themed decor[cite: 14]. Designed to eliminate the clutter of loose grocery bags, this dispenser features a bright yellow, elongated cylindrical body crafted with deeply textured dimensional stitches—such as bobbles or popcorns—to closely mimic the rough, geometric rind of a natural pineapple[cite: 14]. A contrasting green trim finishes the bottom dispensing hole, which securely holds standard plastic grocery bags until pulled from the bottom[cite: 14].
A lush crown of long, layered green leaves tops the fruit, adding three-dimensional foliage that spills over the top edge, concealing the opening where bags are loaded[cite: 14]. The entire organizer is suspended from a smooth natural wooden ring secured by a sturdy, tightly stitched beige crocheted strap, making it easy to hang on pantry doors, kitchen walls, or inside cabinets[cite: 14]. This project is not only an excellent stash-buster for cotton yarns but also a fantastic way to practice tension control with heavy textured stitches.
Materials & Specialized Tools
- Yarn: Worsted weight (Category 4) 100% kitchen cotton. Cotton is highly recommended over acrylic because it does not stretch under the weight of stored bags and is highly durable for kitchen environments.
- Color A (Bright Yellow): Approximately 230 meters (250 yards) for the main textured body.
- Color B (Vibrant Green): Approximately 90 meters (100 yards) for the top leaves and bottom elastic trim.
- Color C (Beige or Natural Cream): Approximately 15 meters (15 yards) for the hanging strap.
- Crochet Hook: 4.0 mm (US G/6) hook. An ergonomic hook is recommended, as working heavy bobble stitches in cotton yarn requires tight tension and can cause hand fatigue.
- Hardware:
- One 6.5 cm to 7.5 cm (2.5-inch to 3-inch) smooth wooden ring for wall hanging[cite: 14].
- One seamless elastic hair tie (approximately 5 cm / 2 inches in diameter) for structuring the bottom dispensing port.
- Notions: A blunt-tipped tapestry needle for weaving in ends and structural sewing, locking stitch markers to track continuous rounds, and sharp precision scissors.
Special Stitch Guide & Abbreviations
- ch = chain
- sl st = slip stitch
- sc = single crochet
- hdc = half double crochet
- dc = double crochet
- BLO = back loop only (insert hook only under the back loop of the top v-shape of the stitch)
- sc2tog (Decrease): Insert hook into next st, yarn over, pull up a loop. Insert hook into following st, yarn over, pull up a loop. Yarn over, pull through all 3 loops on hook.
- Bobble Stitch (Bo): Yarn over, insert hook into stitch, pull up a loop, yarn over, pull through two loops (2 loops on hook). Repeat this 4 more times in the same stitch (6 loops on hook). Yarn over and pull through all 6 loops tightly. Chain 1 tightly to secure the top of the bobble. This creates the prominent protruding bumps that form the pineapple’s textured rind[cite: 14].
Instructions
Part 1: The Dispenser Base & Bottom Port (Color B Green)
The bottom opening must be stretchy enough to pull bags out, but tight enough to prevent them from falling. We achieve this by crocheting directly over an elastic hair tie.
- Round 1: Hold the seamless elastic hair tie in your non-dominant hand. With the green yarn and 4.0 mm hook, work 36 single crochets (sc) entirely around the elastic, completely encasing it. Ensure the stitches are pushed tightly together so no elastic shows through. Join with a slip stitch (sl st) to the first sc. [36 sts]
- Round 2: Chain (ch) 1. *1 sc in next 2 stitches, 2 sc in the next stitch (increase)*. Repeat from * 11 more times around the circle. Join with sl st to first sc. [48 sts]
- Round 3: Ch 1, 1 sc in each stitch around. Join with sl st. Fasten off the green yarn and weave in the starting and ending tails securely. [48 sts]
Part 2: The Textured Pineapple Body (Color A Yellow)
This section uses staggered bobble stitches to create the geometric diamond texture of a pineapple skin. Maintain tight tension.
- Round 4 (Creating the bottom edge): Attach the bright yellow yarn to any stitch from Round 3. Ch 1, work 1 sc in the back loop only (BLO) of each stitch around. This creates a sharp turning edge so the body goes straight up. Join with a sl st. [48 sts]
- Round 5 (Body Expansion): Ch 1. *1 sc in next 3 sts, 2 sc in next st (increase)*. Repeat from * 11 more times around. Join with sl st. [60 sts]
- Round 6 (First Bobble Round): Ch 1. *Work 1 Bo in the first stitch, 1 sc in the next 3 sts*. Repeat from * 14 more times around. Join with a sl st to the top of the very first Bo. [15 Bobbles, 45 sc]
- Round 7 (Spacing Round): Ch 1, 1 sc in each stitch around. Be careful to count your stitches and ensure you are working into the top of each bobble and each single crochet. Join with sl st. [60 sts]
- Round 8 (Offset Bobble Round): Ch 1, 1 sc in the first 2 sts. *Work 1 Bo in the next stitch, 1 sc in the next 3 sts*. Repeat from * around, ending with 1 sc in the very last stitch. Join with sl st. (Offsetting the bobbles creates the staggered diagonal pattern characteristic of a pineapple). [15 Bobbles, 45 sc]
- Round 9 (Spacing Round): Ch 1, 1 sc in each stitch around. Join with sl st. [60 sts]
- Rounds 10 – 36: Repeat Rounds 6 through 9 sequentially until the yellow textured body measures approximately 35 to 38 cm (14 to 15 inches) tall from the green base. End your repetition on a Spacing Round (all single crochets).
- Round 37 (Top Decrease): Ch 1. *1 sc in next 3 sts, sc2tog (decrease)*. Repeat from * 11 more times around. Join with sl st. [48 sts]
- Round 38 (Final Top Decrease): Ch 1. *1 sc in next 2 sts, sc2tog*. Repeat from * 11 more times around. Join with sl st. Fasten off yellow yarn and weave in ends. [36 sts]
Part 3: The Leafy Crown (Color B Green)
The leaves are worked in continuous tiers around the top opening. They will naturally curl and droop downward over the yellow body.
- Base Round: Attach the green yarn to any stitch on the top opening (Round 38). Ch 1, 1 sc in each stitch around. Join with sl st. [36 sts]
- First Tier Leaves (Short): *Chain 12. Working back down the chain: sc in 2nd ch from hook, half double crochet (hdc) in next 2 chs, double crochet (dc) in next 5 chs, hdc in next 2 chs, sc in last ch. Slip stitch into the next 3 stitches on the pineapple base.* Repeat this sequence exactly 11 more times around the opening. You will have 12 short leaves.
- Second Tier Leaves (Long): Working slightly behind the first tier (push the first tier forward), sl st to position your yarn behind the middle of a first-tier leaf. *Chain 16. Working back down the chain: sc in 2nd ch, hdc in next 2 chs, dc in next 9 chs, hdc in next 2 chs, sc in last ch. Slip stitch into the base between the short leaves.* Repeat around to create 12 long leaves staggered behind the short ones. Fasten off and weave in ends securely.
Part 4: Hanging Strap (Color C Beige)
- Row 1: Attach beige yarn directly around the smooth wooden ring with 8 sc[cite: 14].
- Row 2: Ch 1, turn, sc in each of the 8 sts. [8 sts]
- Rows 3 – 20: Repeat Row 2 until the strap is about 10 cm (4 inches) long. Fasten off, leaving a very long tail (approx. 30 cm / 12 inches) for heavy sewing.
- Assembly: Pin the loose end of the strap securely to the top back edge of the pineapple (behind the leaves). Using the tapestry needle, sew through at least three rounds of the pineapple body using a heavy cross-hatch or backstitch to ensure the strap does not tear away under downward pulling force.
Tips and Recommendations for Success
- Perfecting the Bobble Stitch: To ensure the yellow textured bumps pop outward appropriately (instead of sinking into the inside of the cylinder), always push the bobble toward the “right side” (outside) of the fabric with your thumb before executing the single crochet that follows it. Pulling the securing chain tightly after the bobble locks it in a protruding shape.
- Checking Your Gauge: While gauge isn’t critical for fit, it is critical for structure. If your fabric feels floppy or has large holes between stitches, your hook is too large. Drop down to a 3.5 mm (US E/4) hook. The fabric should be stiff enough to stand up slightly on its own when empty.
- Structural Mounting: When mounting on the wall or inside a pantry door, use a properly anchored hook or a heavy-duty adhesive hook rated for at least 2.5 kg (5 pounds). A fully stuffed cotton dispenser filled with 30-40 plastic bags carries surprising weight, and the downward pull of dispensing adds extra force.
- Loading and Using the Dispenser: To prevent the cotton walls from bulging unevenly, do not randomly shove crumpled bags into the top. Flatten your plastic bags, fold them in half vertically, and gently push them down through the top opening beneath the leaves. Pushing them down smoothly ensures the pineapple maintains its perfect cylindrical shape. Pull bags from the green elastic bottom straight down slowly.
- Care and Maintenance: Kitchen environments naturally expose decor to airborne grease and dust. Because this is made of 100% cotton, it is fully washable. Remove all plastic bags, place the dispenser in a delicate laundry mesh bag, and machine wash on a cold, gentle cycle. Reshape the pineapple cylinder and the green leaves with your hands while it is damp, and lay it completely flat on a towel to air dry. Never put it in the dryer, as the heat will shrink the cotton and warp the wooden hanging ring.
Frequently Asked Questions
This pattern is rated as intermediate. It requires familiarity with working in the round, executing heavy textured stitches like the 5-dc Bobble, working into the back loop only (BLO), and surface crocheting tiered leaves.
How long does it take to complete this dispenser?
Constructing the pineapple dispenser typically takes between 6 and 8 hours, depending on your familiarity with the bobble stitch, which is yarn-heavy and slightly time-consuming to execute perfectly on every round.
It is strongly advised against using acrylic yarn. Acrylic stretches significantly over time when subjected to the continuous weight of stored bags. This stretch will cause the pineapple to elongate awkwardly, and the bobbles will lose their tight, clustered structure, resulting in a floppy appearance.
Yes, you are generally permitted to sell physical finished items created using this pattern at local craft fairs or online shops. Reselling, copying, or redistributing the written pattern text, instructions, or images as your own is strictly prohibited.
The finished Tropical Pineapple Plastic Bag Dispenser — Free Crochet Pattern