Watermelon Slice Spiral Hanging Amigurumi Pattern
Beginner Friendly
Perfect for those just starting their crochet journey, with clear instructions and simple techniques
Single-Day Project
A satisfying project you can complete in a single afternoon or evening.
Handmade Gift
A beautiful keepsake — free forever. Read online or print at home.
About This Watermelon Slice Spiral Hanging Amigurumi Pattern
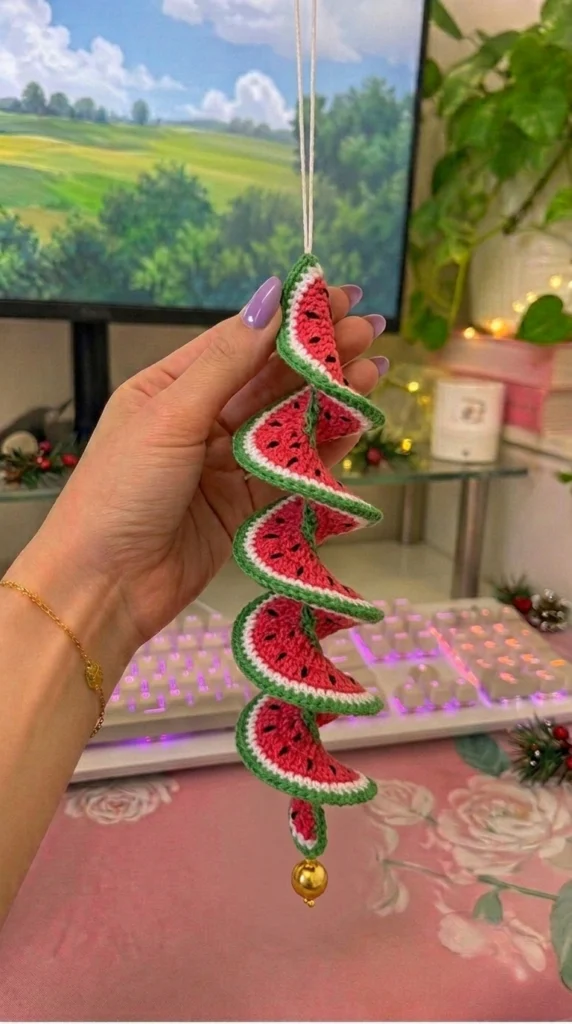
This watermelon amigurumi pattern makes a hanging spiral of six slices, each one a double-sided half-circle with red flesh, a thin white line and a green rind, finished with hand-embroidered black seeds. The slices are stitched onto a firm green cord at a fixed rotation so the whole thing corkscrews down to a gold bead at the bottom.
What makes it work is that every slice is two identical panels joined with a green border round, so there is no wrong side. That matters a lot on a piece that hangs and turns — a single-layer version shows its back half the time and looks unfinished. The trade-off is that you crochet twelve panels instead of six.
Expect seven to nine hours. The panels themselves go quickly once you have the rhythm, and most of the time goes into the seed embroidery and getting the rotation consistent during assembly. Good for someone comfortable with flat colorwork and increases who wants a project made of many small repeated units rather than one big shaped piece.
Materials
- DK cotton yarn, watermelon red ~45 g
- DK cotton yarn, white ~15 g
- DK cotton yarn, grass green ~40 g — rinds, borders and spine
- 2.5 mm crochet hook tight, firm fabric
- Black embroidery floss 6-strand, for seeds
- Gold metal or acrylic bead, 12-14 mm 1, for the bottom weight
- Small gold headpin or short length of wire 1, to hang the bead
- White or cream cotton cord, 2 mm ~50 cm for the hanging loop
- Tapestry needle and embroidery needle
- Stitch markers at least 6 — one per slice during assembly
- Scrap card or paper for a rotation guide, see Tips
Abbreviations
chchainsl stslip stitchscsingle crochetinc2 sc in same stitchst(s)stitch(es)reprepeatRSright siderow-endthe turning edge at the side of a row( )stitch count at end of row or round[ ]repeat sequence as directedLarge slice panel (make 10 — 2 per slice, 5 slices)
- With red, ch 2. Row 1 (RS): 4 sc in 2nd ch from hook, turn. (4)
- Row 2: ch 1, inc in each st, turn. (8)
- Row 3: ch 1, [sc 1, inc] rep 4 times, turn. (12)
- Row 4: ch 1, [sc 3, inc] rep 3 times, turn. (15)
- Row 5: ch 1, [sc 4, inc] rep 3 times, turn. (18)
- Row 6: ch 1, [sc 5, inc] rep 3 times, turn. (21)
- Row 7: ch 1, [sc 6, inc] rep 3 times, changing to white in the final stitch, turn. (24)
- Row 8 (white): ch 1, [sc 7, inc] rep 3 times, changing to green in the final stitch, turn. (27)
- Row 9 (green): ch 1, [sc 8, inc] rep 3 times, turn. (30)
- Row 10 (green): ch 1, [sc 9, inc] rep 3 times. Fasten off, leaving a short tail. (33)
- The piece is a half circle. The curved edge is the rind. The straight edge is formed by the row-ends on both sides — 10 row-ends per side.
- Repeat until you have 10 panels. Weave in all red and white tails now, before joining — you cannot reach them once the panels are closed.
Mini slice panel (make 2 — the bottom slice)
- With red, ch 2. Row 1 (RS): 4 sc in 2nd ch from hook, turn. (4)
- Row 2: ch 1, inc in each st, turn. (8)
- Row 3: ch 1, [sc 1, inc] rep 4 times, turn. (12)
- Row 4: ch 1, [sc 3, inc] rep 3 times, turn. (15)
- Row 5: ch 1, [sc 4, inc] rep 3 times, changing to white in the final stitch, turn. (18)
- Row 6 (white): ch 1, [sc 5, inc] rep 3 times, changing to green in the final stitch, turn. (21)
- Row 7 (green): ch 1, [sc 6, inc] rep 3 times, turn. (24)
- Row 8 (green): ch 1, [sc 7, inc] rep 3 times. Fasten off. (27)
- This panel has 8 row-ends per side on the straight edge.
Seed embroidery (before joining)
- Work the seeds on every panel individually while it is still flat and single-layer. Once two panels are joined you cannot bury the floss ends.
- Thread the embroidery needle with 3 strands of black floss.
- Large panel: place 7 seeds. Put 4 in an arc across rows 5-6, evenly spaced about 5 sts apart, and 3 in a shorter arc across rows 3-4, staggered between the ones above.
- Each seed is a single straight stitch about 4 mm long, worked at a slight angle so it leans toward the curved rind edge rather than sitting vertical.
- Widen each seed by working a second straight stitch immediately beside the first, into the same two anchor points, so the seed reads as a small oval rather than a hair-thin line.
- Mini panel: place 5 seeds — 3 across row 4 and 2 across row 3.
- Knot off on the wrong side and leave a 2 cm tail. It will be enclosed when the panels are joined.
Joining the slices
- Take two matching panels. Hold them wrong sides together with the curved edges and straight edges lined up exactly, right sides facing out. Pin or clip at the two corners and at the center of the curve.
- Join green in the right-hand corner where the curve meets the straight edge, working through both layers from here on.
- Large slice, joining round: sc 33 along the curved rind edge, matching stitch to stitch, then 1 extra sc in the corner. (34)
- Continue: sc 20 along the straight edge, working 1 sc into each row-end — 10 down one panel side and 10 up the other, keeping the two layers aligned. (54)
- Work 1 extra sc in the final corner, then sl st into the first sc to close. Fasten off, weave the tail in between the two layers. (55)
- Do not stuff. These slices are meant to sit flat, about 4 mm thick, so they catch the light edge-on as the spiral turns.
- Mini slice, joining round: sc 27 along the curve, 1 sc in the corner, sc 16 along the straight edge (8 row-ends per side), 1 sc in the final corner, sl st to join. Fasten off. (45)
- You now have 5 large slices and 1 mini slice, each finished on both faces.
Spine cord (make 1 in green)
- The spine carries the whole spiral, so it must be stiff. Work it tightly, going down a hook size if your chains are loose.
- With green, ch 76.
- Row 1: sl st in the 2nd ch from hook and in each ch across. Do not turn. (75)
- Row 2: rotate the work 180 degrees and sl st into the free back bump of each chain, all the way back to the start. (75)
- Fasten off, leaving a 30 cm tail at each end. The cord should measure about 30 cm and hold its shape when held horizontally with only a slight droop.
- If yours flops, run a doubled length of green yarn straight through the center of the cord from end to end and knot it at both ends under light tension. That extra core makes the difference between a spiral that hangs and one that collapses.
Finishing
Lay the spine cord flat and mark the attachment points with stitch markers: the first at 3 cm from the top, then five more at 4.5 cm intervals. The last marker is for the mini slice. Marking first and sewing second is worth the extra five minutes, because uneven spacing is the one flaw that cannot be fixed later without unpicking everything.
Sew each slice to the cord along the center of its straight edge, using about 8-10 stitches spread across the middle third of that edge. Leave the outer thirds of the straight edge free — attaching the whole edge locks the slice rigid and kills the spiral. Green yarn, small stitches, and pull each one snug.
The rotation is what creates the twist. Attach the top slice pointing directly toward you. Rotate each following slice 72 degrees clockwise around the cord from the one above it, so that after five slices you have made one full turn. Cut a small circle of card, mark it at 72-degree intervals, and slide it onto the cord as a guide if eyeballing the angle feels unreliable. Attach the mini slice last, at the sixth marker, continuing the same rotation.
Thread the gold bead onto the headpin, turn a small loop at the top, and attach it to the very bottom of the spine cord using the leftover green tail. Hang the whole spiral from the loop and let it settle for a minute — the bead’s weight pulls the cord straight and opens the spiral out. For the hanger, fold the white cord in half, thread it through the top of the spine, and knot into a loop at whatever length suits where it will hang.
Tips for Success
- Make all twelve panels before you join a single one. Working the same row twelve times in a row builds a rhythm and your tension evens out across the set — panels made days apart come out visibly different sizes.
- Stack the finished panels and compare them edge to edge. Any panel that is more than 2 mm off the others should be paired with the next-closest one rather than a perfect one, so the mismatch is hidden inside a single slice instead of spread across two.
- Use a card rotation guide for assembly. Cut a 4 cm circle, punch a hole in the center, mark five points at 72 degrees, and slide it along the cord as you sew each slice. It removes all the guesswork from the spiral.
- Do the seed embroidery in one sitting for all panels. Matching seed size and angle across twelve panels is much easier when the last one is still fresh in your hands.
- Test-hang the piece after the third slice is attached. If the spiral is already leaning or the cord is bowing, it is far easier to correct three attachments than six.
Common Mistakes to Avoid
- Sewing the full straight edge of each slice to the cord. This makes each slice rigid and forces the cord into a stiff column instead of a twist. Attach only the middle third and let the corners float free.
- Working the joining round too tightly around the curve. The green border pulls the two panels into a bowl shape and the slice cups instead of lying flat. If yours is cupping, go up half a hook size for the border only.
- Stuffing the slices. It seems like an improvement and it is not — puffy slices look like wedges of cake, lose the crisp half-circle silhouette, and add weight the spine cannot carry.
- Embroidering the seeds after joining. The floss ends have nowhere to hide and end up knotted on a visible face. Seeds go on flat single panels, always.
- Making the spine from a plain single chain. It has no rigidity at all and the finished spiral hangs as a tangled bundle. The double-worked slip stitch cord, with an added core if needed, is the whole reason the shape holds.
Ways to Customize This Pattern
- Swap the fruit and keep the construction. Orange flesh with a white pith line and an orange rind gives citrus slices; pale green flesh with a dark green rind gives honeydew. Skip the seeds for melon, or use white floss.
- Alternate the slice sizes — large, mini, large, mini down the cord — for a tapering spiral rather than a uniform one. Make three extra mini slices and use only three large ones.
- Shorten it into a keyring or bag charm by using three large slices on a 15 cm spine, with a lobster clasp at the top instead of a cord loop.
- Turn it into a garland by making the spine 1.5 m long and attaching slices at 12 cm intervals with no rotation at all, so they hang flat in a line across a window.
- Replace the gold bead with a small crocheted watermelon wedge worked in the round: 6 sc in a magic ring, increase to 18 over three rounds, four rounds even, then decrease to close, stuffed firmly and finished with a green stripe.
Frequently asked questions
The increase rate is not matching your row height. Three increases per row assumes your sc rows are roughly as tall as a stitch is wide, which is true for most cotton at 2.5 mm. If your rows run tall, the piece stretches into an oval — add a fourth increase to rows 5, 7 and 9, adjusting the stitch counts to 19, 26 and 32 respectively. If your rows run short and the edge ruffles, drop to two increases on rows 9 and 10.
You can, but the spine cord will be the problem. Acrylic has almost no rigidity in a slip stitch cord and the spiral will sag within days of hanging. If acrylic is what you have, work the slices in it and make the spine in cotton, or run a length of florist wire through the acrylic cord as a core.
Two things hold the twist: the fixed 72-degree rotation of each attachment, and the weight of the gold bead pulling the cord vertical. If it still relaxes, the attachments are probably too loose. Go back and add three or four more stitches at the center of each slice’s straight edge, pulling firmly. The rotation has to be locked into the cord itself, not just set by how you hung it.
Do I really need to make twelve panels, or can I do single-layer slices?
Single-layer works if the piece will hang flat against a wall where the back is never seen. But this design turns freely in any air movement, so roughly half the time you are looking at the reverse of every slice. Single-layer slices also curl at the rind edge with no second layer to counter them. If you do go single-layer, work a green border round anyway around each panel — it flattens the edge and prevents most of the curl.
The finished Watermelon Slice Spiral Hanging Amigurumi Pattern