Two-Tone Bobble Heart Medallion Bedspread — Free Crochet Pattern
Advanced intermediate
A great pattern for all skill levels.
Weekend Project
A satisfying weekend make — start Friday, finish Sunday, enjoy forever.
Handmade Gift
A beautiful keepsake — free forever. Read online or print at home.
About This Two-Tone Bobble Heart Medallion Bedspread — Free Crochet Pattern
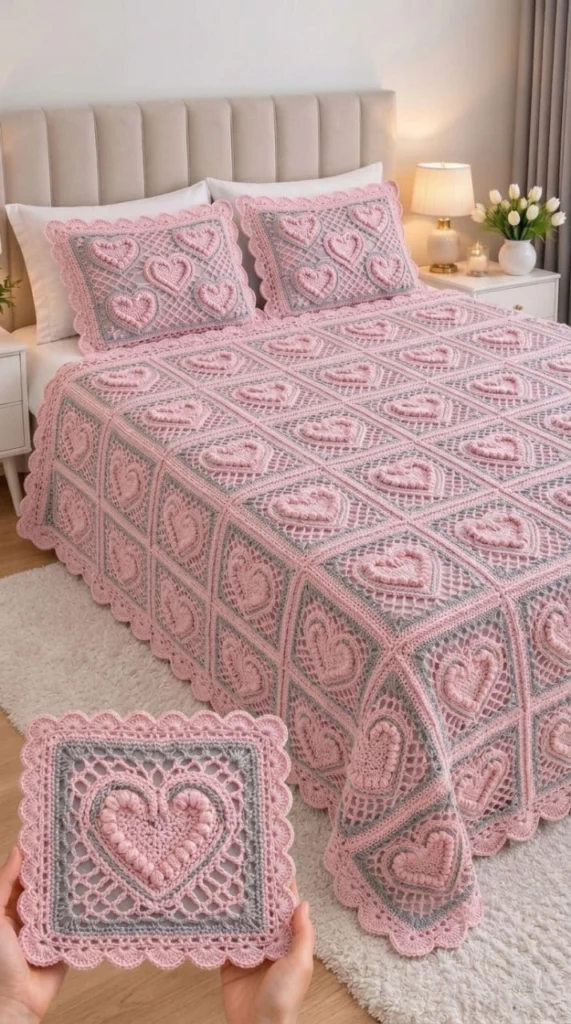
The Two-Tone Bobble Heart Medallion Bedspread free crochet pattern introduces a captivating romantic aesthetic to your master bedroom through a highly textured, meticulously structured design[cite: 13]. Showcasing a stunning visual contrast between soft petal pink and dove grey, each square motif is anchored by a central three-dimensional heart formed entirely of raised bobble stitches[cite: 13]. The tactile heart rests within a delicate pink openwork lattice, framed by a sharply contrasting solid grey double-crochet border, and finishes with a soft pink scalloped edge[cite: 13]. Complete with coordinating decorative pillow shams featuring the identical heart motif, this heirloom-quality coverlet requires patience and precision but rewards the maker with a breathtaking, handcrafted centerpiece[cite: 13].
Unlike standard geometric motifs, this complex modular project involves crocheting individual squares using a combination of filet crochet mesh and dimensional bobble stitches to literally “draw” a heart silhouette[cite: 13]. The motif begins at the bottom point of the heart, working in expanding geometric rounds to build the distinct cleft and curved upper lobes using carefully placed 5-dc bobbles[cite: 13]. The pattern then transitions colors to square off the circular tension with a robust grey frame, providing structural integrity to the drape, before returning to pink for the final joining rounds[cite: 13]. It is designed for an advanced intermediate crocheter comfortable with reading complex stitch charts or written row-by-row color transitions, carrying yarn, and executing seamless modular joins[cite: 13]. Below, you will find an expanded, highly detailed guide covering exact stitch anatomy, advanced assembly guidelines, and the matching pillow sham constructions.
Materials & Required Tools
- Yarn: DK weight (Category 3) 100% premium mercerized cotton or a high-quality 50/50 cotton-acrylic blend. Mercerized cotton is strongly recommended to ensure the raised bobbles maintain their rigid, spherical shape over decades of use.
- Main Color (Soft Petal Pink): ~3,800 meters (~4,150 yards) for the heart centers, mesh backgrounds, outer scalloped borders, main bedspread edging, and pillow sham details[cite: 13].
- Contrast Color (Dove Grey): ~1,500 meters (~1,640 yards) for the structural square framing rings on all motifs and pillow shams[cite: 13].
- Crochet Hook: 4.0 mm (US G/6) ergonomic aluminum crochet hook. If you crochet loosely, size down to a 3.5 mm hook to ensure the filet mesh background remains tight and the bobbles pop forward dramatically.
- Notions: Blunt-tip tapestry needle for weaving in the numerous color-change tails, 50+ locking stitch markers for panel assembly, precision yarn scissors, and a flexible measuring tape.
- Blocking Tools: Interlocking blocking foam mats, at least 200 stainless steel rust-proof T-pins, and a garment steamer or spray bottle. Blocking is absolutely mandatory for this project to ensure the grey framing rings lay perfectly square.
Special Stitch Anatomy & Abbreviations
- ch = chain
- sl st = slip stitch
- sc = single crochet
- hdc = half double crochet
- dc = double crochet
- tr = treble crochet
- Bobble (5-dc Bobble): Yarn over, insert hook into designated stitch, pull up a loop, yarn over, pull through two loops (2 loops on hook). Repeat this process 4 more times in the exact same stitch (6 loops on hook). Yarn over and pull tightly through all 6 loops. Chain 1 tightly to “lock” the bobble and push it forward toward the right side of the fabric. This locking chain does *not* count as a separate stitch in the row counts.
- Standing DC: Used when joining the new grey yarn to begin the contrasting frame without using a weak slip-stitch chain.
- BLO = back loop only
- picot = ch 3, sl st in 3rd ch from hook
Detailed Instructions: The Bobble Heart Motif (Make ~80 motifs for Queen size)
Each square motif progresses through 12 highly detailed rounds. The tension must remain absolutely consistent across all 80 motifs to ensure the final bedspread does not ripple or pucker during the joining phase.
Part 1: The Raised Bobble Heart & Mesh Background (Pink Yarn)
- Round 1 (Center Core & Bottom Point): With Petal Pink yarn, make a magic ring. Ch 3 (counts as dc), work 2 dc, ch 2, 3 dc, ch 2, 3 dc, ch 2, 3 dc into the ring. Pull the tail tightly. Join with a sl st to the top of the starting ch-3. [4 groups of 3 dc; 4 ch-2 corners].
- Round 2 (Establishing the V-Shape Base): Sl st to the first corner space. Ch 3, [2 dc, ch 2, 3 dc] in corner. *Ch 1, skip 3 dc, [3 dc, ch 2, 3 dc] in next corner; repeat from * twice more. Ch 1, join with sl st to ch-3.
- Round 3 (First Bobble Placements): Sl st to corner space. Ch 3, [2 dc, ch 2, 3 dc] in corner. Ch 1, in the next ch-1 space work [1 dc, 1 Bobble, 1 dc] to form the absolute bottom tip of the heart motif. Ch 1, work standard corner [3 dc, ch 2, 3 dc]. Continue around remaining 3 sides working standard open mesh (3 dc in ch-1 spaces). Join with sl st.
- Rounds 4–6 (Expanding the Heart Silhouette): Working exclusively on the “heart” half of the square, replace the central double crochets with Bobble stitches in an expanding V-formation. In Round 4, place 3 Bobbles. In Round 5, place 5 Bobbles. In Round 6, place 7 Bobbles across the widest part of the motif, ensuring the filet mesh (ch-1, skip 1) expands evenly on the opposing “background” side of the square[cite: 13].
- Round 7 (The Cleft and Upper Lobes): To create the top curves of the heart, work 3 Bobbles, switch to standard dc for 3 stitches (creating the central dip/cleft of the heart), then work 3 Bobbles. Finish the round in standard filet mesh.
- Round 8 (Final Mesh Border): Work one complete round of standard openwork lattice (dc, ch 1, skip 1) entirely in Petal Pink to border the completed heart silhouette[cite: 13]. Fasten off the pink yarn securely and weave in the tail immediately.
Part 2: The Structural Grey Frame
- Round 9 (Grey Foundation Ring): Attach Dove Grey yarn with a standing dc in any corner ch-2 space[cite: 13]. Work [1 dc, ch 2, 2 dc] in the corner. Working across the sides, place 1 dc in every dc and 1 dc in every ch-1 space of the pink mesh below. This solidifies the open lace into a rigid geometric square[cite: 13]. Join with sl st. [88 dc total].
- Round 10 (Grey Eyelet Row): Ch 4 (counts as dc + ch 1). *Skip 1 st, dc in next st, ch 1; repeat to the corner. In corner work [2 dc, ch 2, 2 dc]. Repeat around all four sides[cite: 13]. Join with sl st and fasten off Dove Grey securely. Weave in tails.
Part 3: Pink Scalloped Framing Edge
- Round 11 (Pink Reattachment): Attach Petal Pink yarn in any corner. Ch 3, work a solid round of double crochet (1 dc in each st and ch-1 space), working [2 dc, ch 2, 2 dc] in the corners[cite: 13].
- Round 12 (Outer Scallop Detail): *Work 5 dc into the next st (creating a shell/scallop), skip 2 sts, sc in the next st, skip 2 sts; repeat from * continuously around the entire perimeter of the square[cite: 13]. At the corners, work 7 dc to allow the scallop to turn neatly. Join with sl st. Fasten off[cite: 13].
Master Assembly & Seamless Joining Technique
The beauty of this bedspread relies on the invisible alignment of the geometric squares. Do not use a standard slip-stitch seam, which creates a rigid, raised ridge on the back of the blanket.
- Pre-Blocking: Before sewing a single seam, steam block every one of the 80 squares to exactly 22 x 22 cm. Pin them out on foam mats, ensuring the grey frames are perfectly straight and the pink scalloped edges fan outward. Allow them to dry completely for 24 hours.
- Grid Layout: Arrange the blocked squares in an 8 x 10 grid on a large, clean floor space[cite: 13]. Ensure all 80 bobble hearts are oriented in the exact same direction (points facing the foot of the bed)[cite: 13].
- Invisible Whipstitch (BLO): Thread a tapestry needle with Petal Pink yarn. Placing two motifs right sides together, carefully whipstitch exclusively through the Back Loops Only (BLO) of the final pink scalloped round[cite: 13]. Pull the yarn snug but not tight. This allows the front loops of the scallops to rest side-by-side, creating a seamless, integrated texture across the mattress[cite: 13]. Join all horizontal rows first, then cross-seam the vertical columns.
The Dramatic Continuous Outer Bedspread Border
Once the massive 8×10 grid is fully assembled, the raw edges must be finished with a heavy, sweeping border to anchor the drape over the sides of the mattress[cite: 13].
- Round 1 (Anchor Row – Grey): Attach Dove Grey yarn. Work a round of solid single crochet around the entire perimeter of the blanket, placing 3 sc in the outer corners and carefully decreasing (sc2tog) across the junction points where two motifs meet to prevent ruffled flaring.
- Round 2 (Grey Mesh): Work one round of (dc, ch 1, skip 1) in grey to mirror the inner frames[cite: 13]. Fasten off grey.
- Rounds 3-4 (Pink Foundations): Attach Petal Pink. Work two solid rounds of double crochet, placing [2 dc, ch 2, 2 dc] in the corners.
- Round 5 (Jumbo Scalloped Shells): To create the heavy, luxurious drape seen in the finished design[cite: 13], work *[4 tr, ch 1, 4 tr] into a single stitch, skip 3 sts, sc in next st, skip 3 sts; repeat from * entirely around the bedspread. Fasten off and weave in the final ends.
Matching Decorative Pillow Shams (Make 2)
The pillow shams utilize the exact same motifs but are scaled for a standard euro-pillow insert.
- Front Sham Construction: Crochet exactly 4 Heart Motifs following the instructions above[cite: 13]. Block them and seam them into a 2×2 square tile[cite: 13].
- Sham Expansion Border: To scale the 44×44 cm assembled tile up to a 50×50 cm sham front, attach Dove Grey and work two rounds of solid dc around the perimeter[cite: 13]. Switch to Petal Pink and work the Jumbo Scalloped Shell border (as detailed in the bedspread outer border)[cite: 13].
- Back Panel: Using Dove Grey, ch 85. Work 45 rows of standard double crochet until the panel measures approximately 48×48 cm.
- Final Pillow Assembly: Place the front 2×2 motif panel and the grey back panel wrong sides together. Using Petal Pink, slip stitch around three sides just behind the scalloped edge. Insert a plush 50×50 cm pillow form, then slip stitch the final side closed.
The finished Two-Tone Bobble Heart Medallion Bedspread — Free Crochet Pattern

