Teal and Cream Diamond Patchwork Bedspread — Free Crochet Pattern
Intermediate
For crocheters comfortable with the basics, ready to try new shaping and assembly techniques
Weekend Project
A satisfying weekend make — start Friday, finish Sunday, enjoy forever.
Handmade Gift
A beautiful keepsake — free forever. Read online or print at home.
About This Teal and Cream Diamond Patchwork Bedspread — Free Crochet Pattern
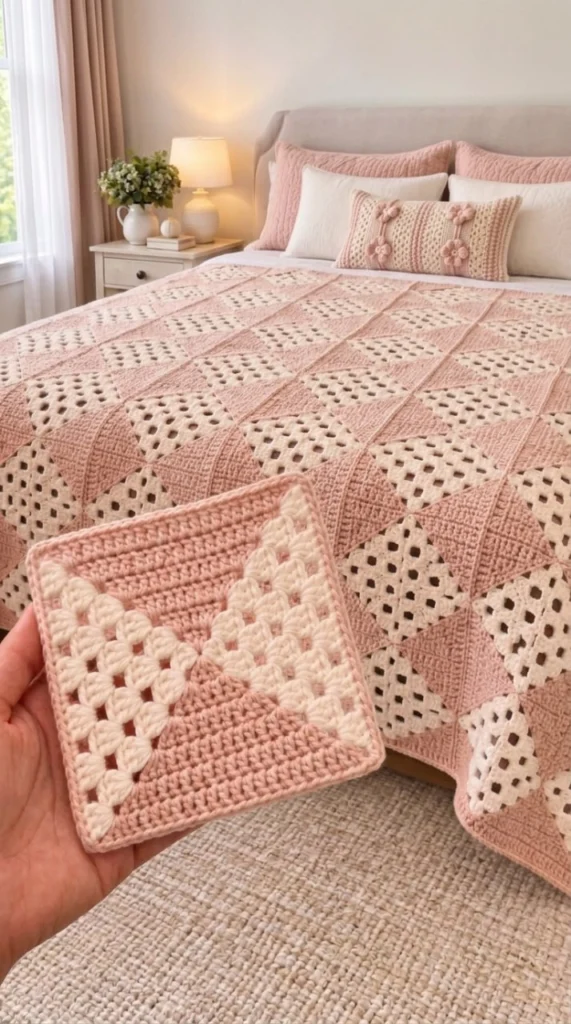
This teal and cream diamond patchwork bedspread free crochet pattern creates the same cozy, modern farmhouse look as the blanket in the photo: soft geometric motifs, a calm two-color palette, and a rich textured surface that feels handmade and polished at the same time. The repeating diamond effect comes from alternating motif orientation, so the finished bedspread looks detailed from far away and beautifully structured up close.
This design is made from small modular squares, which makes it easy to keep your tension steady and build the blanket row by row without wrestling one huge piece. It is an intermediate-level project because you will work simple shaping, texture rows, joining, and blocking, but the stitches themselves stay beginner-friendly and practical.
Materials
- Worsted-weight cotton yarn in teal, about 1,500 g
- Worsted-weight cotton yarn in cream, about 1,300 g
- 4.0 mm crochet hook (US G/6)
- Tapestry needle for weaving in ends and joining motifs
- Sharp scissors
- Stitch markers, optional but helpful for keeping motif edges aligned
- Blocking mats and pins
- Measuring tape
Abbreviations
chchainscsingle crochetsl stslip stitchst(s)stitch(es)bloback loop onlyincincrease, 2 sc in the same stitchbobblebobble stitch worked as 3 incomplete dc joined togetherreprepeatInstructions
Motif Base — Teal Triangle Panel (make 2)
- Round 1: With teal, ch 2, work 1 sc in the second ch from hook. Turn. [1]
- Round 2: Ch 1, turn, work 2 sc in the same stitch. [2]
- Round 3: Ch 1, turn, work 3 sc across. For the clean textured look in the photo, work this and all following rows in blo. [3]
- Round 4: Ch 1, turn, work 4 sc across in blo. [4]
- Round 5: Ch 1, turn, work 5 sc across in blo. [5]
- Round 6: Ch 1, turn, work 6 sc across in blo. [6]
- Round 7: Ch 1, turn, work 7 sc across in blo. [7]
- Round 8: Ch 1, turn, work 8 sc across in blo. [8]
- Round 9: Ch 1, turn, work 9 sc across in blo. [9]
- Round 10: Ch 1, turn, work 10 sc across in blo. [10]
Motif Base — Cream Triangle Panel (make 2)
- Round 1: With cream, ch 2, work 1 sc in the second ch from hook. Turn. [1]
- Round 2: Ch 1, turn, work 2 sc across. [2]
- Round 3: Ch 1, turn, work 1 sc, 1 bobble, 1 sc across. The bobble sits in the center and gives the raised pebble texture seen in the blanket. [3]
- Round 4: Ch 1, turn, work 4 sc across. [4]
- Round 5: Ch 1, turn, work 2 sc, 1 bobble, 2 sc across. [5]
- Round 6: Ch 1, turn, work 6 sc across. [6]
- Round 7: Ch 1, turn, work 3 sc, 1 bobble, 3 sc across. [7]
- Round 8: Ch 1, turn, work 8 sc across. [8]
- Round 9: Ch 1, turn, work 4 sc, 1 bobble, 4 sc across. [9]
- Round 10: Ch 1, turn, work 10 sc across. [10]
Each triangle panel should look like a clean wedge with one textured side and a flat, even edge. After blocking, the teal rows will look slightly denser and the cream rows will stand out more, which is what gives the blanket its elegant patchwork rhythm.
Join the Motif
Lay the four triangle panels out in a square so the points face inward and the colors alternate the way they do in the photo: teal opposite teal, cream opposite cream. Seam the long edges together with mattress stitch or whip stitch using matching yarn. Keep your seams flat and even so the motif stays crisp instead of bulky.
Round 1 Border — Teal
- Round 1: With teal, join yarn at any corner of the joined motif. Sc evenly around the outside edge, placing 3 sc in each outer corner to square the motif neatly. Join with sl st to the first sc. [44 sts]
Round 2 Border — Cream
- Round 2: Switch to cream. Work 1 sc in each stitch around, and again place 3 sc in each corner stitch group so the square remains flat. Join with sl st to the first sc. [44 sts]
Make the Bedspread
Make 399 finished motifs total, arranged in 19 motifs across and 21 motifs down for a queen-size bedspread measuring about 230 x 250 cm after blocking. Rotate every other motif so the teal and cream triangles alternate direction and the diamond pattern appears across the whole surface. Join the motifs in rows first, then join the rows together with mattress stitch for the cleanest finish.
Finishing
Weave in all ends carefully on the wrong side so the front stays smooth and polished. Block each motif before joining; this is the step that makes the diamonds line up and helps the blanket drape properly on the bed. After assembly, add a final outer border in teal with one round of sc and one round of reverse single crochet or slip stitches if you want the edge to match the neat, tailored look in the photo.
Tips for Success
- Block every motif before assembly. Even a small difference in size will show in a project this large.
- Keep your teal and cream tension identical so the motif grid stays square and tidy.
- Use cotton or a cotton blend for the same crisp, defined texture seen in the reference image.
- Join motifs with the same color that dominates the edge for a cleaner seam line.
- Count stitches at the end of every row on the triangle panels. A small mistake early in the motif becomes very visible after joining.
- Use stitch markers on the first and last stitch of each row if your edges tend to curl or narrow.
- Work all motifs in batches so your tension stays consistent from the first square to the last.
- Lay the bedspread out every few rows of joining to check that the diamond flow is matching the photo-style layout.
Common Mistakes to Avoid
- Skipping blocking — the motifs may still look nice, but they will not line up into sharp diamonds. Block each piece before joining.
- Loose seams — floppy joining creates gaps between motifs. Keep your seam stitches snug but not tight.
- Uneven tension — if one color is tighter than the other, the motif will twist. Relax your grip and check your gauge often.
- Forgetting corner stitches — corners that are too tight will curl. Always place the full 3 sc in each corner group.
- Mixing up motif direction — the diamond look depends on alternating rotation. Lay out several motifs before sewing anything permanent.
- Using fuzzy yarn — the stitch texture will disappear. A smooth cotton yarn gives the crisp look shown in the blanket.
- Not checking row counts — if even one panel is shorter, the finished square will not be balanced. Count as you go.
Ways to Customize This Pattern
You can keep the same motif structure and change the whole mood of the blanket with just a new color story. Sage and ivory gives a softer cottage look, navy and cream feels more classic, and dusty rose with oatmeal makes the bedspread warmer and more romantic. If you want a lighter throw instead of a bedspread, simply stop when you reach your preferred size and add a matching border.
- Use two shades of the same color for a subtle tone-on-tone version.
- Make the motif smaller or larger by changing the number of rows in each triangle panel.
- Add a third accent color for the border only.
- Turn the same motif into pillow covers, a wall hanging, or a nursery blanket.
- For a more seasonal look, swap teal for moss green in autumn or soft blue in summer.
Frequently Asked Questions
This pattern is best for an advanced beginner or intermediate crocheter. The stitches themselves are simple, but you need to keep your counts even, block the motifs properly, and join them neatly so the patchwork layout looks clean and professional.
For the size shown here, plan on 399 motifs arranged 19 across and 21 down. That gives a bedspread close to 230 x 250 cm after blocking, which fits the generous drape seen in the photo.
Yes. To make a throw, baby blanket, or lap blanket, simply reduce the number of motifs. Keep the same motif size and border method, and your finished blanket will still have the same geometric style.
Cotton is the best choice if you want the same crisp texture and structured look as the reference image. You can use acrylic or a cotton blend, but choose a smooth yarn with good stitch definition so the textured rows stay visible.
Why does my motif look slightly curved before blocking?
That usually happens when the tension changes between rows or when the seams are pulled a little too tightly. Finish the panel, block it flat, and recheck your stitch count before joining the next motif.
Yes, finished items may be sold with credit to the site; the written pattern may not be resold or redistributed. Selling handmade blankets, pillow covers, or throws made from the finished pattern is perfectly fine.
Mattress stitch gives the cleanest result, especially for a bedspread with geometric lines. If you prefer a softer seam, you can join with slip stitch through the back loops only, but keep the tension loose enough that the blanket can drape naturally.
No. The teal-and-cream combination gives the same calm, modern look as the photo, but you can use any two colors that contrast clearly. The important part is keeping one color textured and one color lighter so the diamond pattern stays easy to see.
If you follow the motif count, keep your tension even, and block each square before assembly, you will end up with a bedspread that has the same soft geometry and elegant handmade feel as the one in the image. The result is timeless, cozy, and detailed enough to become the statement piece in any bedroom.
The finished Teal and Cream Diamond Patchwork Bedspread — Free Crochet Pattern

