Sunburst Crochet Granny Square Coasters — Free Crochet Pattern
Beginner Friendly
Perfect for those just starting their crochet journey, with clear instructions and simple techniques
Single-Day Project
A satisfying project you can complete in a single afternoon or evening.
Handmade Gift
A beautiful keepsake — free forever. Read online or print at home.
About This Sunburst Crochet Granny Square Coasters — Free Crochet Pattern
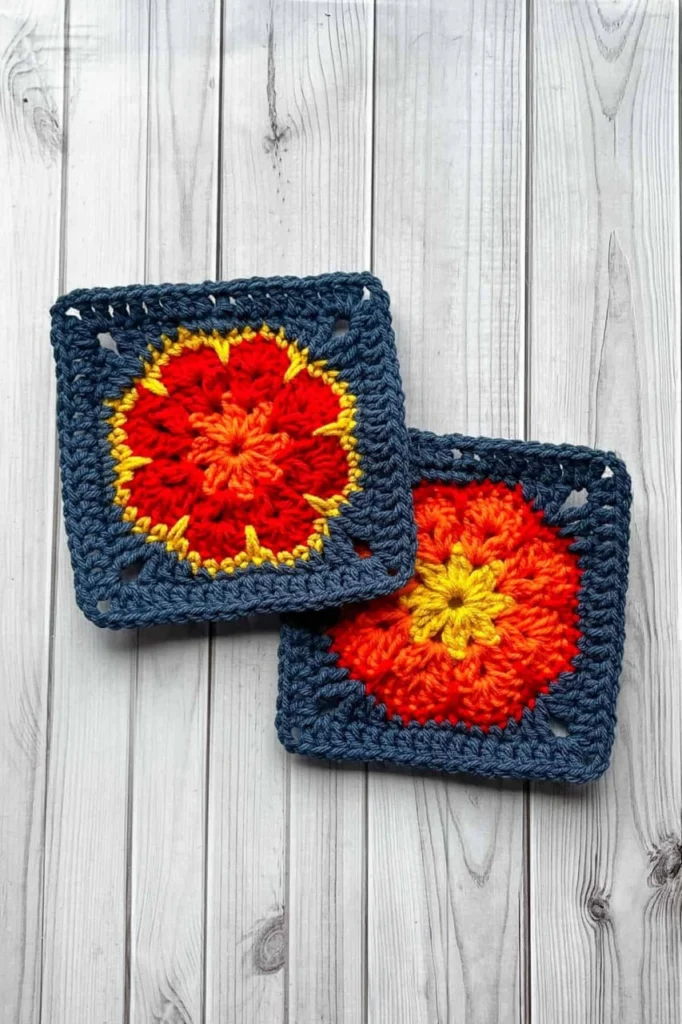
This Sunburst Crochet Granny Square Coaster free crochet pattern creates a pair of vibrant, handmade square coasters featuring a bold red-and-orange floral center, sunny yellow accents, and a textured slate-blue border. Each coaster has a dimensional flower-like center with raised stitches radiating outward, a contrasting golden outline, and a sturdy square frame with small open spaces at the corners. The rich combination of warm sunset colors and deep blue-gray yarn gives these coasters a striking, vintage-inspired look that works beautifully in farmhouse kitchens, cozy living rooms, and colorful handmade gift collections.
Each coaster is worked in joined rounds, beginning with a small orange center and building outward into a textured red sunburst. Yellow stitches define the circular motif before the blue-gray yarn transforms it into a square granny-style frame. This pattern is suitable for confident beginners who know basic crochet stitches and intermediate crocheters who enjoy textured motifs, controlled color changes, and neat finishing.
Materials
- Slate-blue cotton yarn: approximately 18–25 yards per coaster for the square border and corner spaces.
- Bright red cotton yarn: approximately 10–15 yards per coaster for the main sunburst petals.
- Orange cotton yarn: approximately 5–8 yards per coaster for the flower center and inner highlights.
- Golden-yellow cotton yarn: approximately 5–8 yards per coaster for the narrow outline and radiating accents.
- Crochet hook: 4.0 mm (US G/6), or the size needed to achieve firm, even stitches.
- Yarn needle for weaving in ends.
- Small scissors.
- Locking stitch marker, optional.
- Rustproof blocking pins and a blocking mat, optional.
- Measuring tape or ruler.
Choose a smooth, absorbent cotton yarn rather than acrylic for the best everyday coaster performance. Cotton handles occasional moisture better, tolerates repeated use, and produces clear stitch definition. Use the same yarn weight for all four colors so the flower center and square border lie evenly together.
Abbreviations
chchainsl stslip stitchscsingle crochethdchalf double crochetdcdouble crochettrtreble crochetststitchspspaceskskipreprepeatFOfasten offRSright sideWSwrong sideThis pattern uses US crochet terminology. The turning or starting chains do not count as stitches unless specifically stated. A beginning chain-3 used to represent a double crochet counts as one stitch only when noted in the instructions.
Instructions
Part 1: Orange Flower Center — orange (make 1 per coaster)
The center begins as a compact ring. The first round establishes a small, dense foundation for the raised red petals and the golden details that follow. Keep the center snug, but avoid pulling the yarn so tightly that the stitches become difficult to work into.
- Round 1: With orange yarn, make a magic ring. Ch 1, work 8 sc into the ring, and pull the ring closed. Join with a sl st to the first sc. (8 sc)
- Round 2: Ch 1. Work 2 sc in each stitch around. Join with a sl st to the first sc. (16 sc)
FO orange yarn, leaving a short tail for weaving in. The small circle should remain flat and compact. If it cups, check that both rounds contain the correct number of stitches before moving on.
Part 2: Textured Sunburst Petals — bright red (make 1 per coaster)
The red round forms the bold, radiating flower visible in the reference image. The raised clusters are worked over the foundation stitches to create a fuller surface than a plain circle. The clusters below are a pattern interpretation designed to reproduce the photograph’s dimensional appearance; the exact original stitch sequence cannot be confirmed from the image alone.
- Round 3: Join bright red yarn with a sl st in any stitch. Ch 2; this does not count as a stitch. In the same stitch, work 3 dc together, then ch 1. Repeat [3 dc together in the next stitch, ch 1] around. Join with a sl st to the top of the first cluster. (16 clusters, 16 ch-1 spaces)
- Round 4: Sl st into the next ch-1 space. Ch 1, work 1 sc in the same space, then work 2 sc in each remaining ch-1 space around. Join with a sl st to the first sc. (32 sc)
FO red yarn. Gently arrange the clusters so their raised surfaces face the right side. The red circle should have a full, petal-like texture without large gaps. If your yarn is particularly thick, use a slightly larger hook for this section to prevent the center from becoming rigid.
Part 3: Golden Sunburst Outline — golden yellow (make 1 per coaster)
The narrow golden outline separates the warm flower from the cool blue-gray square. Small pointed accents can be created with chains and slip stitches, giving the edge a sunray appearance. Work carefully around the red circle so the yellow remains a distinct decorative line.
- Round 5: Join golden-yellow yarn in any stitch of the red outer edge. Ch 1, work 1 sc in the same stitch, ch 1, sk the next stitch, and work 1 sc in the following stitch. Repeat around, adjusting the skipped stitch placement only as needed to distribute the points evenly. Join with a sl st to the first sc. (16 sc, 16 ch-1 spaces)
- Round 6: Sl st into the first ch-1 space. Ch 1, work 1 sc in the space, ch 2, sl st in the second chain from the hook, and work 1 sc in the same space. Repeat in each ch-1 space around to create small pointed accents. Join with a sl st to the first sc. (16 paired accent points)
FO yellow yarn. The yellow details should sit close to the red circle rather than form a large separate band. If the accent points curl strongly, loosen the chain tension or omit one point in places where the motif is already crowded.
Part 4: Slate-Blue Square Frame — slate blue (make 1 per coaster)
The blue-gray border converts the circular sunburst into a square. The corner spaces create the openwork detail visible in the photograph, while the surrounding stitches form a substantial frame. To preserve a neat square, place the four corners evenly around the flower and work each corner space consistently.
- Round 7: Join slate-blue yarn in a yellow accent valley. Ch 3, work 2 dc in the same area, ch 2, work 3 dc in the same area to form the first corner. Work 3 dc into an appropriate space along the next section of the flower edge. Continue placing 3-dc groups at evenly spaced intervals, forming a corner with [3 dc, ch 2, 3 dc] at each of the four corner positions. Join with a sl st to the top of the beginning ch-3. (12 groups of 3 dc, 4 corner ch-2 spaces)
- Round 8: Sl st across to the next corner space. Ch 3, work 2 dc, ch 2, and 3 dc in the corner space. Work 3 dc in each space between groups along the side, maintaining the same number of groups on each side. At each remaining corner, work [3 dc, ch 2, 3 dc]. Join with a sl st to the beginning ch-3. (4 corner groups of 3 dc on each side, with consistent side spacing)
- Round 9: Ch 1. Work 1 sc in each stitch along the side, placing 3 sc in each corner ch-2 space. At each corner, use the center of the three sc as the corner point for the next round. Join with a sl st to the first sc. (Stitch count varies with the number of side groups; verify that all four sides match.)
- Round 10: Ch 1. Work 1 sc in each sc along the sides and 3 sc in the center sc of each corner group. Join with a sl st to the first sc. (Stitch count varies according to the completed previous round.)
FO slate-blue yarn, leaving a tail long enough to secure the final join. The finished square should have a dense, softly rounded frame, four defined corners, and small open spaces near the corners. Because the exact stitch counts and construction cannot be recovered from a photograph, check the square after Round 8 and omit Round 10 if the border is already the desired width. Keep any adjustments symmetrical.
Part 5: Finishing
- Thread each yarn tail onto a yarn needle and weave it through several stitches on the wrong side. Change direction at least once so the tail stays secure.
- Inspect the flower center and gently spread the red clusters with your fingers. The orange center should remain visible, with the red texture radiating outward.
- Check that the yellow accents are distributed around the flower. Secure any loose points without pulling them flat.
- Lay the coaster on a flat surface. If necessary, pin the four corners and lightly dampen the cotton before allowing it to dry completely.
- Measure the finished piece and compare its four sides. If one side is longer, adjust the blocking rather than stretching the entire coaster excessively.
- Make a second coaster using the same round structure. You can reverse the emphasis of the orange and yellow center details for a coordinated pair while retaining the slate-blue border.
Important construction note: The reference photograph shows two finished square coasters, each with an orange-and-red sunburst center, yellow accents, and a dark blue-gray granny-style frame. A photograph does not reveal the precise original stitch sequence or stitch counts. The instructions above are a reproducible interpretation of the visible design, and the square-frame rounds may require adjustment to suit your yarn and tension.
Tips for Success
- Use cotton yarn. Cotton gives coasters the absorbency and structure needed for mugs and glasses. A smooth, tightly spun yarn also makes the yellow outline and blue frame easier to see.
- Keep the center compact. A loose magic ring can leave a hole beneath the orange center. Pull the starting ring closed firmly and weave the tail through the first round before trimming.
- Watch your color joins. Join each new color at the back or in a less noticeable stitch. When changing colors, complete the final yarn-over of the previous stitch with the new color for a cleaner transition.
- Make the flower dimensional. Avoid flattening the red clusters with your fingers. The raised texture is an important part of the sunburst appearance.
- Keep the square symmetrical. Identify the four corner positions before starting the blue frame. Equal spacing helps prevent a diamond-shaped or lopsided coaster.
- Check the fabric frequently. If the center curls upward, the stitches may be too tight or the circle may need additional ease. If the edges ruffle, check for excess increases or loose corner groups.
- Block gently. Cotton can be shaped while slightly damp, but aggressive stretching can distort the openwork corners and separate the flower from its frame.
- Make a test square. If you plan to produce a matching set, finish one coaster first and record the hook, yarn, measurements, and any adjustments before making the remaining pieces.
Common Mistakes to Avoid
- A center that will not close — This usually happens when the magic ring tail is not pulled firmly enough. Tighten the ring and weave the tail through several stitches to keep the opening closed.
- Red petals that look flat — Flat clusters may result from tight tension or from accidentally working ordinary stitches instead of the specified grouped stitches. Check the cluster structure and keep the loops even.
- A thick yellow band — Too many stitches between the red circle and the accent points can make the outline look like a solid ring. Keep the decorative points close to the flower edge and avoid adding extra rounds without checking the proportions.
- A crooked square — Uneven corner placement can cause one side to bow or become longer. Mark the four corner positions and maintain consistent spacing between them.
- Large holes in the border — Open corner spaces are intentional, but accidental gaps can appear when groups are missed. Count the groups along each side before joining the round.
- Loose yarn tails — Cutting tails immediately after fastening off can cause the color changes to unravel. Weave each tail through several stitches in more than one direction before trimming.
- Overblocking the coaster — Pulling the corners too far apart can distort the square and stretch the flower. Shape the edges gently and let the piece dry naturally.
Ways to Customize This Pattern
- Autumn sunset: Replace the bright red with burnt orange, use mustard yellow for the accents, and keep the slate-blue frame for a bold seasonal contrast.
- Classic sunflower: Use golden yellow for the center, warm brown for the petals, and forest green for the square frame. This gives the motif a more traditional floral appearance.
- Christmas palette: Combine deep red, orange-red, gold, and dark forest green. A coordinated set of four makes a colorful holiday table accessory.
- Vintage kitchen colors: Use rust, terracotta, golden ochre, and dusty navy. These muted shades work especially well with wooden tables and neutral linens.
- Soft cottage palette: Substitute coral for red, pale apricot for orange, buttercream for yellow, and denim blue for the border.
- Larger mug mat: Use a slightly thicker cotton yarn and a suitable larger hook. Add another evenly spaced blue frame round only if the square remains flat, keeping all four corners consistent.
- Matching table set: Make several coasters with identical outer frames but vary the flower colors. Keeping the border color consistent helps the set look coordinated even when the centers differ.
- Decorative trivet: Make the square larger with a heavier cotton yarn and additional frame rounds. For hot cookware, use materials and construction specifically rated for the intended heat; ordinary crochet cotton coasters are not automatically suitable for very hot pans.
Frequently asked questions
This pattern is best for confident beginners who already know how to make single crochet, double crochet, slip stitches, and joined rounds. The main challenge is shaping the circular motif into a square while maintaining four balanced corners. If you are new to crochet, practise the center and one color change before making the complete coaster.
Medium-weight cotton yarn is a practical choice because it absorbs small amounts of moisture and produces a firm fabric. Choose four colors with similar thickness so the center and border sit at approximately the same height. Avoid very fuzzy yarn because it can hide the sunburst texture and make the color changes less distinct.
Finished dimensions depend on your yarn, hook size, stitch tension, and the number of blue border rounds. With medium-weight cotton and a 4.0 mm hook, a coaster made with this general construction will often measure approximately 4.5–5.5 inches across. Measure your first coaster after finishing and adjust the frame consistently if you need a particular size.
Can I make these coasters in different colors?
Yes. The design works well with many contrasting color combinations. Keep one warm shade for the center, a stronger color for the raised flower, a lighter accent for the outline, and a darker shade for the square border. The original red, orange, yellow, and slate-blue combination creates a particularly bold sunburst effect.
Curling often means the fabric is too tight, while wavy sides can indicate excessive stitches or uneven corner placement. Check that the center lies flat before continuing, and make sure each side of the blue border contains a consistent arrangement of stitch groups. A gentle block can improve minor irregularities, but it will not fully correct a significant stitch-count problem.
If you use colorfast cotton yarn, the coasters can generally be hand-washed or machine-washed on a gentle cycle, following the yarn manufacturer’s care instructions. Use cool or lukewarm water, especially when the red and orange yarns are strongly dyed. Reshape the squares while damp and allow them to dry flat.
Yes, you may sell finished items made from this pattern, including handmade coaster sets, provided you comply with any applicable marketplace rules and give credit to the pattern source when sharing the design. You may not resell, reproduce, or redistribute the written pattern itself as your own, whether in print or digital form. If you publish photographs of your finished work, describe it honestly as handmade crochet.
Can I make a matching set of four or six coasters?
Absolutely. Make each coaster using the same hook, yarn weight, and border structure to keep the finished sizes consistent. You can vary the orange and yellow details slightly between coasters while retaining the same red sunburst and slate-blue frame. A set of four or six makes a thoughtful handmade housewarming gift or a colorful addition to a cozy kitchen.
The finished Sunburst Crochet Granny Square Coasters — Free Crochet Pattern

