Spiral Motif Bedspread — Free Crochet Pattern
Intermediate
For crocheters comfortable with the basics, ready to try new shaping and assembly techniques
Weekend Project
A satisfying weekend make — start Friday, finish Sunday, enjoy forever.
Handmade Gift
A beautiful keepsake — free forever. Read online or print at home.
About This Spiral Motif Bedspread — Free Crochet Pattern
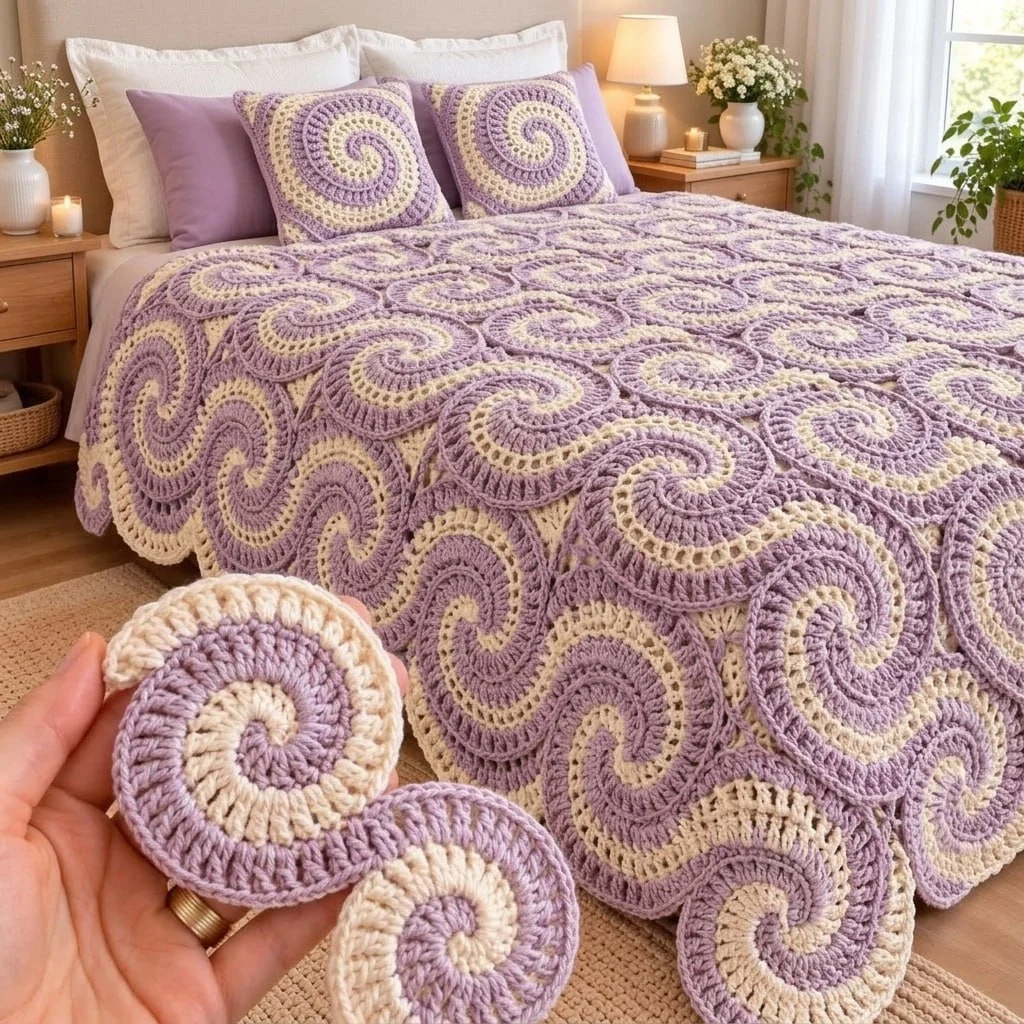
The Spiral Motif Bedspread free crochet pattern features an exquisite interlocking swirl design in soft lavender purple and warm cream off-white[cite: 2, 11]. Each motif is formed by crocheting two continuous spiral swirls into a distinctive S-shaped ribbon unit, which are then seamlessly joined together to build a luxurious textured blanket[cite: 2, 11]. Accompanied by matching square spiral throw pillows, this blanket set adds a soothing, artistic aesthetic to any bedroom, blending vintage elegance with modern handmade charm[cite: 2, 11].
This project is constructed by creating modular two-tone spiral S-motifs that interlock into a continuous repeating grid[cite: 2, 11]. The skill level is intermediate due to the continuous spiral technique (working two colors simultaneously in the round without joining at each step), gradient stitch height transitions from single crochet to treble crochet to form smooth tapering swirls, and joining multiple curved units into a flat, cohesive bedspread[cite: 2, 11].
Materials
- Yarn: Worsted weight (Category 4) acrylic, wool, or cotton blend yarn[cite: 2, 11].
- Color A (Soft Lavender / Lilac): ~2,200 meters (~2,400 yards)[cite: 2, 11]
- Color B (Cream / Off-White): ~2,000 meters (~2,200 yards)[cite: 2, 11]
- Crochet Hook: 5.0 mm (US H/8) crochet hook, or size required to match gauge and drape[cite: 2, 11].
- Notions: 2 locking stitch markers (essential for securing unworked yarn loops while switching colors in spirals), tapestry needle, scissors, measuring tape[cite: 2, 11].
- Blocking Tools: Foam blocking mats, rust-proof stainless steel T-pins, and steam iron or spray bottle[cite: 2, 11].
Abbreviations
chchain[cite: 2, 11]sl stslip stitch[cite: 2, 11]scsingle crochet[cite: 2, 11]hdchalf double crochet[cite: 2, 11]dcdouble crochet[cite: 2, 11]trtreble crochet[cite: 2, 11]incincrease (work 2 stitches in same stitch)[cite: 2, 11]st(s)stitch(es)[cite: 2, 11]spspace[cite: 2, 11]FLOfront loop only[cite: 2, 11]BLOback loop only[cite: 2, 11]pmplace marker[cite: 2, 11]Instructions
Main S-Spiral Unit Motif — Lavender & Cream (make ~80 for Queen size)
Each modular S-unit consists of two interlocked two-tone spiral circles joined at a central S-curve stem[cite: 2, 11]. The spirals are worked continuously without joining rounds[cite: 2, 11]. Use stitch markers to hold live loops when switching between Color A (Lavender) and Color B (Cream)[cite: 2, 11].
First Spiral Circle (Center to Outer Expansion)
- Round 1 (Starting Core with Color A): With Color A (Lavender), make a magic ring[cite: 2, 11]. Ch 1, work 1 sc, 1 hdc, 2 dc into the ring[cite: 2, 11]. Do not join[cite: 2, 11]. Place a locking stitch marker in the live loop of Color A and pull loop tall[cite: 2, 11]. [4 sts in ring][cite: 2, 11]
- Round 1 Continuation (Introducing Color B): Join Color B (Cream) into the same magic ring behind Color A’s stitches[cite: 2, 11]. Work 1 sc, 1 hdc, 2 dc into the ring[cite: 2, 11]. Pull magic ring tail tight[cite: 2, 11]. [4 sts of Color B; 8 sts total in core][cite: 2, 11]
- Round 2 (Color A Swirl Expansion): Re-insert hook into Color A loop[cite: 2, 11]. Work 2 dc in each of the 4 sts made by Color B in Round 1[cite: 2, 11]. Place marker in loop, remove hook[cite: 2, 11]. [8 dc in Color A][cite: 2, 11]
- Round 2 (Color B Swirl Expansion): Re-insert hook into Color B loop[cite: 2, 11]. Work 2 dc in each of the 8 sts made by Color A in Round 2[cite: 2, 11]. Place marker in loop, remove hook[cite: 2, 11]. [16 dc in Color B][cite: 2, 11]
- Round 3 (Color A Outer Ridge): Re-insert hook into Color A loop[cite: 2, 11]. Work *1 dc in next st, 2 dc in next st; repeat from * across next 8 sts of Color B[cite: 2, 11]. [12 dc in Color A][cite: 2, 11]
- Round 3 (Color B Outer Ridge): Re-insert hook into Color B loop[cite: 2, 11]. Work *1 dc in next st, 2 dc in next st; repeat from * across next 12 sts of Color A[cite: 2, 11]. [18 dc in Color B][cite: 2, 11]
- Round 4 (Tapering Color A): Re-insert hook into Color A loop[cite: 2, 11]. Work 1 dc in next 4 sts, 1 hdc in next 2 sts, 1 sc in next 2 sts, sl st in next st to smooth down the edge[cite: 2, 11]. Fasten off Color A, leaving a 20 cm tail[cite: 2, 11]. [9 tapering sts][cite: 2, 11]
- Round 4 (Tapering Color B): Re-insert hook into Color B loop[cite: 2, 11]. Work 1 dc in next 6 sts, 1 hdc in next 2 sts, 1 sc in next 2 sts, sl st in next st to finish the first circular spiral[cite: 2, 11]. Fasten off Color B[cite: 2, 11]. [11 tapering sts][cite: 2, 11]
Second Counter-Spiral Circle (Forming the S-Curve Unit)
- Step 1 (Connecting Stem): Attach Color A (Lavender) to the outer edge of the first spiral circle at the base of the final sl st[cite: 2, 11]. Ch 8 to form the bridging stem curve between spiral centers[cite: 2, 11].
- Step 2 (Core of Second Spiral): In 4th ch from hook, work 1 sc, 1 hdc, 2 dc[cite: 2, 11]. Place marker in Color A loop[cite: 2, 11]. Join Color B (Cream) into same ch space, work 1 sc, 1 hdc, 2 dc[cite: 2, 11]. [8 sts core][cite: 2, 11]
- Step 3 (Reversing Spiral Direction): Work the 2nd spiral following Rounds 2–4 of the First Spiral, but curving in the opposite direction (counter-clockwise) so that the two circular swirls form a continuous symmetrical “S” shape[cite: 2, 11].
- Step 4 (Outer Border & Edge Smoothening): Attach Color B around the entire perimeter of the completed S-unit: work 1 sc in each st around both outer curves and 3 sc into the inner valley fold where the two circles meet[cite: 2, 11]. Join with sl st, fasten off, and weave in core tails[cite: 2, 11]. [1 unit completed][cite: 2, 11]
Interlocking Border & Assembly
- Arrangement: Lay out the completed S-spiral units in interlocking rows on a flat surface[cite: 2, 11]. Each S-unit fits snuggly into the curves of neighboring units like puzzle pieces, creating an alternating purple-and-cream wave pattern across the blanket[cite: 2, 11].
- Joining Rows (Whipstitch or Slip Stitch Join): With wrong sides facing together, use Color B (Cream) and a tapestry needle to whipstitch the matching outer loops of adjacent S-units together[cite: 2, 11]. Alternatively, join with a flat slip stitch seam working in the back loops only[cite: 2, 11].
- Filling Outer Edges: To straighten the outer top, bottom, and side borders of the bedspread, work partial half-spiral fill motifs (make 12 half-spirals) to fill in the concave edges along the perimeter[cite: 2, 11].
- Bedspread Scalloped Outer Border: Attach Color A (Lavender) in any corner st along the outer bedspread edge[cite: 2, 11].
- Round 1: Ch 1, work 1 sc in each st around all 4 edges, working 3 sc in each corner[cite: 2, 11]. Join with sl st[cite: 2, 11].
- Round 2: Switch to Color B (Cream)[cite: 2, 11]. Ch 3 (counts as dc), *skip 1 st, [1 dc, ch 1, 1 dc] in next st, skip 1 st, 1 sc in next st; repeat from * around perimeter to form soft scalloped waves[cite: 2, 11]. Join with sl st[cite: 2, 11]. Fasten off[cite: 2, 11].
Matching Spiral Throw Pillows (make 2)
Each throw pillow features a large square panel composed of 4 interlocking spiral motifs on the front and a solid double crochet back panel[cite: 2, 11].
Pillow Front Panel (Spiral Square)
- Step 1: Crochet 4 main S-Spiral Unit Motifs using Color A and Color B as instructed above[cite: 2, 11].
- Step 2: Arrange the 4 S-units into a square tile (2×2 formation) so the swirls rotate toward the center[cite: 2, 11]. Seam the inner edges securely together using Color B[cite: 2, 11].
- Step 3 (Squaring the Circle Border): Attach Color B to any corner curve[cite: 2, 11].
- Round 1: Work *[2 tr, ch 2, 2 tr] in corner st, dc in next 4 sts, hdc in next 6 sts, sc in next 8 sts, hdc in next 6 sts, dc in next 4 sts; repeat from * around all 4 sides to square out the motif[cite: 2, 11]. Join with sl st[cite: 2, 11]. [100 sts][cite: 2, 11]
- Round 2: Ch 3, 1 dc in each st around, working [2 dc, ch 2, 2 dc] in each ch-2 corner sp[cite: 2, 11]. Fasten off[cite: 2, 11]. [116 dc][cite: 2, 11]
Pillow Back Panel
- Row 1: With Color A (Lavender), ch 57[cite: 2, 11]. Dc in 4th ch from hook and in each ch across[cite: 2, 11]. Turn[cite: 2, 11]. [55 dc][cite: 2, 11]
- Rows 2–32: Ch 3 (counts as dc), dc in each st across[cite: 2, 11]. Turn[cite: 2, 11]. Fasten off after Row 32[cite: 2, 11]. [55 dc per row; square panel ~40 x 40 cm][cite: 2, 11]
Finishing
- Pillow Assembly: Place one Pillow Front Panel and one Pillow Back Panel wrong-sides together[cite: 2, 11]. Using Color A, sc around 3 sides through both layers[cite: 2, 11]. Insert a 40 x 40 cm pillow insert, then sc across the 4th side to seal[cite: 2, 11]. Fasten off and weave in ends[cite: 2, 11].
- Weaving Ends: Turn the bedspread wrong side up and thread all loose yarn tails through a tapestry needle[cite: 2, 11]. Weave ends securely back and forth through dense stitches before trimming[cite: 2, 11].
- Steam Blocking: Pin the bedspread out onto blocking mats to its full dimensions (~220 x 240 cm)[cite: 2, 11]. Lightly steam with a steam iron held 2 inches above the fabric (do not touch iron directly to yarn if using acrylic) to set the flat spiral geometry and open up the wave edges[cite: 2, 11].
Tips for Success
- Use Stitch Markers for Two-Tone Spirals: When working continuous two-color spirals, keep locking stitch markers in the active loops[cite: 2, 11]. This prevents your unworked yarn from unraveling while you switch colors[cite: 2, 11].
- Match Yarn Weights Exactly: Ensure your Lavender and Cream yarns are the exact same brand and weight class[cite: 2, 11]. Variations in thickness will warp the spiral geometry and prevent motifs from lying flat[cite: 2, 11].
- Maintain Consistent Tension: Spirals can easily cup if stitches are too tight or ruffle if increases are too loose[cite: 2, 11]. Check your gauge on the first 3 motifs before crocheting the entire batch[cite: 2, 11].
- Count Increases Carefully: The gradual expansion from single crochet up to treble crochet gives the spiral its smooth swirl line; missing an increase will alter the circular shape[cite: 2, 11].
- Join Motifs in Batches: Rather than waiting until all 80 motifs are made, seam them together in blocks of 10 to monitor total bedspread size and shape as you go[cite: 2, 11].
- Steam Block for Best Results: Blocking is crucial for this design to flatten the interlocked S-curves and smooth out seam joins across the large bedspread surface[cite: 2, 11].
Common Mistakes to Avoid
- Forgetting to Carry Yarn Loose Behind Work — Pulling the dormant yarn color too tightly across the back when alternating spiral strands will pucker the center circle[cite: 2, 11].
- Twisting the Bridging Stem Chain — When chaining between the two spiral circles of an S-motif, ensure the foundation chain is not twisted before inserting your hook for Round 1[cite: 2, 11].
- Using Too Small a Hook Size — A small hook makes the dense double crochet swirls stiff rather than soft and drapey on a bed cover[cite: 2, 11]. Stick to a 5.0 mm hook or larger[cite: 2, 11].
- Uneven Seaming Tension — Pulling assembly thread too tightly when joining S-units will cause visible ridge puckers along the blanket face[cite: 2, 11]. Keep seaming stitches light and flexible[cite: 2, 11].
- Skipping Blocking on Pillow Panels — Unblocked square framing around circular spirals can distort the pillow shape[cite: 2, 11]. Always block front panels before sewing them to back panels[cite: 2, 11].
Ways to Customize This Pattern
- Alternative Color Combinations: Try deep ocean navy blue and crisp white for a Mediterranean nautical motif, or sage green and terracotta orange for an earth-toned rustic look[cite: 2, 11].
- Convert to a Throw Blanket: Make a smaller lapghan or throw blanket (~120 x 150 cm) by reducing the total motif count to approximately 30 S-units[cite: 2, 11].
- Single Spiral Coasters & Trivets: Work just the First Spiral Circle (Rounds 1–4) in thick cotton yarn to craft matching round spiral coasters and hot pads[cite: 2, 11].
- Adding Fringe or Tassels: Attach 15 cm yarn tassels to the four corners of the bedspread or pillow corners for a bohemian decorative finish[cite: 2, 11].
Frequently asked questions
This pattern is best suited for intermediate crocheters[cite: 2, 11]. Working continuous two-color spirals without standard round joins requires comfort with holding active yarn loops with stitch markers and managing two working yarn skeins simultaneously without tangling[cite: 2, 11].
Due to the large dimensions (~220 x 240 cm) and the high motif count (~80 individual two-tone S-units plus seaming and border work), this project typically takes 4 to 6 weeks of regular stitching (around 10–15 hours per week)[cite: 2, 11].
What type of yarn is best for a heavy crochet bedspread?
A worsted weight (Category 4) premium acrylic or acrylic-cotton blend yarn is ideal[cite: 2, 11]. Acrylic makes the bedspread durable, machine washable, and lightweight enough so that the overall blanket does not become overly heavy or stretch out of shape over time[cite: 2, 11].
Place your Lavender skein on your left side and your Cream skein on your right side[cite: 2, 11]. When dropping one color to pick up the other, always flip the working yarn in the same direction (e.g., front-to-back) to keep the working strands separated[cite: 2, 11].
Yes, if made with 100% premium acrylic yarn, you can machine wash on a gentle cycle in cool water using a lingerie bag or large pillowcase to protect the surface stitches[cite: 2, 11]. Lay flat or tumble dry on low heat settings[cite: 2, 11]. Always check your specific yarn ball band instructions[cite: 2, 11].
Yes, you are permitted to sell finished physical items created using this pattern[cite: 2, 11]. We kindly ask that you credit patterns.noobcooks.com as the pattern source in your product listings or social media posts[cite: 2, 11]. Redistribution, reselling, or reproducing the written pattern text, diagrams, or images is strictly prohibited[cite: 2, 11].
The finished Spiral Motif Bedspread — Free Crochet Pattern

