Sky Blue and Cream Oval Lace Table Runner — Free Crochet Pattern
Intermediate
For crocheters comfortable with the basics, ready to try new shaping and assembly techniques
Single-Day Project
A satisfying project you can complete in a single afternoon or evening.
Handmade Gift
A beautiful keepsake — free forever. Read online or print at home.
About This Sky Blue and Cream Oval Lace Table Runner — Free Crochet Pattern
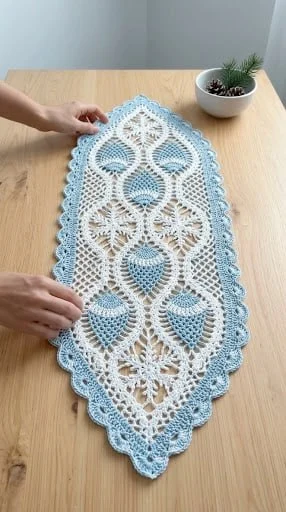
This sky blue and cream oval lace table runner free crochet pattern creates the same elegant look as the piece in the photo, with soft openwork, teardrop medallions, and a delicate scalloped border that feels refined and handmade. The design is light and airy, but the repeating sections give it enough structure to sit beautifully on a table without losing its shape.
The runner is worked from the center out in repeated oval motifs, then finished with a decorative edging that frames the lace pattern and brings out the pretty blue border. It is an intermediate project because you will work shell stitches, filet-style spaces, and join-as-you-go shaping, but the stitches themselves stay simple and relaxing once you get into the rhythm.
Materials
- Size 10 cotton crochet thread in cream, about 250 g
- Size 10 cotton crochet thread in sky blue, about 150 g
- 1.75 mm crochet hook (US 7)
- Tapestry needle for weaving in ends
- Small sharp scissors
- Stitch markers, optional
- Blocking board or foam mats
- Fine pins for blocking
Abbreviations
chchainsl stslip stitchscsingle crochetdcdouble crochettrtreble crochetst(s)stitch(es)spspacereprepeatpicotch 3, sl st in first chInstructions
Center Oval Motif — Cream Base (make 5)
- Round 1: With cream, ch 24. Work 3 dc in the 4th ch from hook, dc in the next 19 ch, 6 dc in the last ch, working along the opposite side of the chain, dc in the next 19 ch, and 3 dc in the same first ch. Join with sl st to the first dc. [52]
- Round 2: Ch 3, dc in each st around. Place 2 dc in each of the 6 curved end stitches on both ends to keep the oval smooth. Join with sl st. [64]
- Round 3: Ch 3, dc in next 4 sts, ch 2, skip 2 sts, dc in next 8 sts, ch 2, skip 2 sts, dc in next 12 sts, ch 2, skip 2 sts, dc in next 8 sts, ch 2, skip 2 sts, dc in next 4 sts. On each oval end, place 2 dc in the same stitch as needed to keep the shape flat. Join with sl st. [68]
- Round 4: Ch 1, sc in each dc and 2 sc in each ch-2 space. Join with sl st. [76]
- Round 5: Join sky blue in any ch-2 space. Ch 3, work 5 dc in the same space, ch 1, sc in the next sc, ch 1, 5 dc in the next ch-2 space, ch 1, sc in the next sc. Rep around so the oval gains soft teardrop clusters. Join with sl st. [five blue clusters each side]
- Round 6: Switch back to cream. Work 1 sc in each dc and 1 sc in each ch-1 space around. In the center stitch at each curved end, work 3 sc to keep the oval flat. Join with sl st. [88]
- Round 7: Ch 1, work a filet-style round: sc in the first 4 sts, ch 3, skip 3 sts, sc in the next 6 sts, ch 3, skip 3 sts, sc in the next 8 sts, ch 3, skip 3 sts, sc in the next 6 sts, ch 3, skip 3 sts, sc in the last 4 sts. On each oval end, keep the shaping even with 2 sc in the end stitches where needed. Join with sl st. [92]
- Round 8: Work 1 sc in each sc and 3 sc in each ch-3 space. Join with sl st. [104]
Blue Teardrop Insert — make 10
- Round 1: With sky blue, ch 8. Work 2 dc in the 4th ch from hook, dc in next 2 ch, 5 dc in the last ch, then work along the opposite side of the chain, dc in next 2 ch, 2 dc in the last ch. Join with sl st to form a small teardrop shape. [16]
- Round 2: Ch 1, sc evenly around the teardrop, placing 2 sc in each tip stitch to keep the shape rounded. Join with sl st. Fasten off, leaving a long tail for sewing. [20]
Center Flower Accent — Cream and Blue (make 10)
- Round 1: With cream, make a magic ring, ch 1, work 8 sc into ring. Join with sl st. [8]
- Round 2: Join sky blue in any stitch. In each stitch work 1 puff stitch, ch 1. Join with sl st. [8 puff sts, 8 ch-1 spaces]
- Round 3: Join cream in any ch-1 space. Work 1 sc, 3 dc, 1 sc in each space around to form flower petals. Join with sl st. Fasten off. [8 petals]
Build the Runner
Make 5 center oval motifs. Block them so each one measures the same size and the edges are smooth. Arrange them in a vertical line, overlapping slightly at the pointed ends if needed so the runner forms one continuous shape, or join them end to end with mattress stitch for a cleaner flat finish. The finished layout should look like a long oval medallion with repeating lace sections, just like the runner in the photo.
Join the Teardrops
Sew the blue teardrop inserts into the open spaces of the cream lace sections. Place each teardrop with the pointed end facing inward and the rounded end facing outward, matching the visual rhythm shown in the image. Add one cream flower accent in the center of each lace opening if you want the runner to match the layered look more closely.
Border Round 1 — Cream
- Round 1: Join cream at one long side edge. Work sc evenly around the entire outer edge, placing 3 sc in each pointed end and 2 sc in each curved corner space. Join with sl st. [st count will vary slightly by tension]
Border Round 2 — Sky Blue
- Round 2: Join sky blue. Work 1 sc in each sc around, and in every 4th stitch along the long sides work a small scallop by making 5 dc in the same stitch, then skip 2 sts. At each tip, work 3 dc, ch 1, 3 dc in the same stitch to keep the edge rounded and decorative. Join with sl st. [st count will vary]
Border Round 3 — Cream Picot Edge
- Round 3: Join cream. Work 1 sc in each stitch around. At every scallop peak, work picot, then continue. At the pointed ends, work picot at the center stitch for a delicate lace finish. Join with sl st. Fasten off. [st count will vary]
Finishing
Weave in all ends carefully on the back side so the front stays smooth and elegant. Block the runner flat with pins, shaping the pointed ends and scalloped border until the curves look even. If the runner feels too narrow, add one extra repeat of the border round before the picot edge. The finished piece should lie flat on the table with a soft, airy drape and a crisp lace outline.
Tips for Success
- Block each motif before joining so the runner stays straight and balanced.
- Use a small hook and fine thread to keep the lace detail sharp.
- Keep your tension relaxed on the chain spaces so the openwork does not pucker.
- Join motifs with matching cream thread for the cleanest finish.
- Lay the runner out on a table before adding the border to check symmetry.
- Count stitches carefully at the pointed ends, since that is where shape changes happen most often.
- Weave ends in as you go so the fine thread does not become tangled at the end.
- Steam or wet block gently for the crisp, polished look seen in the photo.
Common Mistakes to Avoid
- Skipping blocking — lace thread pieces often curl until they are shaped. Block every section before joining.
- Pulling the chain spaces too tight — this closes the lace openings and makes the runner stiff. Keep the ch-2 and ch-3 spaces loose.
- Uneven end shaping — the oval will twist if one end gets extra stitches. Check the stitch count on both ends.
- Making the border too dense — too many stitches can hide the lace. Use a light hand on the edging.
- Joining motifs too tightly — this can make the runner buckle. Keep the seam flat and flexible.
- Using yarn instead of thread — the motif will lose its delicate look. Size 10 thread gives the best definition.
- Forgetting symmetry — the design depends on even placement of the blue inserts. Check layout before sewing anything down.
Ways to Customize This Pattern
This runner is easy to adapt once you understand the shape. You can make it longer by adding another oval motif in the center, wider by adding one more lace repeat on each side, or shorter for a small coffee table. The same structure also works beautifully in white and silver, cream and blush, or sage and ivory if you want a different mood.
- Use all cream thread for a vintage heirloom look.
- Replace sky blue with dusty rose for a softer romantic style.
- Add one extra lace round before the border for a fuller center panel.
- Turn the motif into a placemat, doily, or dresser scarf.
- Change the border color only to make the edges stand out more.
Frequently Asked Questions
This pattern is best for an advanced beginner or intermediate crocheter. The stitches are simple, but the shaping, lace spaces, and border all need careful counting to keep the runner balanced and flat.
The finished size is about 30 x 85 cm after blocking, depending on your tension and thread brand. If you want a longer table runner, add one or two more oval repeats before finishing the border.
Crochet thread gives the light, delicate look shown in the photo. You can use fine sport yarn if you want a softer feel, but the stitch detail will look heavier and less lace-like.
Yes. Add another lace repeat on both sides of the center panel, or work two runner sections and join them lengthwise. Just keep the border consistent so the shape stays elegant.
That usually means the curved end does not have enough shaping stitches. Add a few extra stitches at the tip sections, then block the piece flat so the ends settle into shape.
Can I sell finished items made from this pattern?
Yes, finished items may be sold with credit to the site; the written pattern may not be resold or redistributed. Handmade runners, placemats, and doilies made from the finished pattern are fine to sell.
Wet blocking works very well for cotton thread. Pin the runner into shape on a blocking board, mist or soak it lightly, and let it dry completely before removing the pins.
Absolutely. The design still looks beautiful in cream and sage, white and pale gold, or blue and ivory. The most important thing is keeping the border color slightly stronger than the center so the lace frame stays visible.
When you block it carefully and keep the border light and even, this runner turns into a graceful table piece with the same soft lace charm shown in the image. The result is delicate, polished, and timeless, with enough texture to stand out while still feeling airy and refined.
The finished Sky Blue and Cream Oval Lace Table Runner — Free Crochet Pattern

