Rustic Two-Tone Granny Diamond Bedspread — Free Crochet Pattern
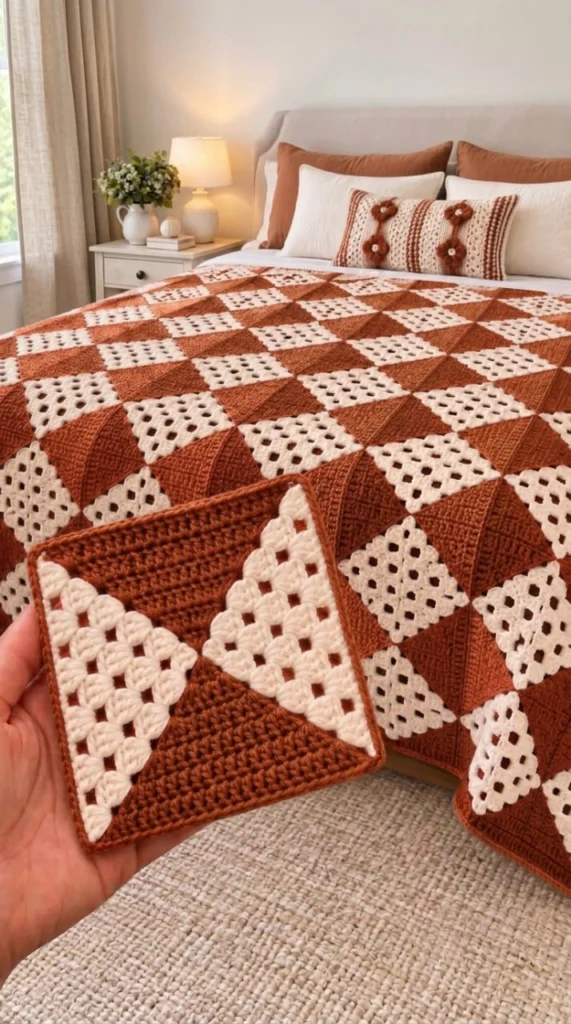
Intermediate
For crocheters comfortable with the basics, ready to try new shaping and assembly techniques
Weekend Project
A satisfying weekend make — start Friday, finish Sunday, enjoy forever.
Handmade Gift
A beautiful keepsake — free forever. Read online or print at home.
About This Rustic Two-Tone Granny Diamond Bedspread — Free Crochet Pattern
This rustic two-tone granny diamond bedspread free crochet pattern recreates the warm, autumnal blanket in the photo: dozens of granny-stitch and moss-stitch half-squares in burnt sienna and soft cream, seamed along the diagonal and set on point so the colours flow together into a bold checkerboard of diamond shapes. What makes this piece special is the clever construction — every single square carries both colours, split cleanly down the middle, and when the squares are rotated alternately in the layout, the two halves visually merge into solid-coloured diamonds with a subtle diagonal seam line running through each one. The sienna sections are worked in a dense, woven-looking moss stitch, while the cream sections use the open, lacy classic granny stitch, so the blanket has two completely different textures that play against each other in the light. Finished, it drapes generously over a queen-size bed with a deep hang on all three sides, just like in the photo.
The bedspread is built from 42 identical square motifs, and each square is built from just two triangles: one cream granny-stitch triangle and one sienna moss-stitch triangle. Both triangles are worked in rounds from the centre out, blocked to size, and then seamed together along the hypotenuse. The real skill level is confident-beginner to intermediate: the stitches themselves are basic (double crochet, single crochet, chains), but keeping your corner spaces consistent and your tension even across 84 triangles is where the discipline comes in. If you can crochet a granny square and are comfortable changing nothing more complicated than colour, you can absolutely make this.
Materials
- Burnt sienna DK cotton or cotton-acrylic, approx 1.3 kg (about 13 x 100 g balls, roughly 3,200 m) — used for the solid moss-stitch half-squares, the diagonal seaming, and the border
- Soft cream DK cotton or cotton-acrylic, approx 1.15 kg (about 12 x 100 g balls, roughly 2,800 m) — used for the granny-stitch half-squares
- 5.0 mm (US H/8) crochet hook
- Tapestry needle for seaming and weaving ends
- Scissors
- Blocking mats and rust-proof T-pins (strongly recommended — blocking is what makes the seams disappear)
- Locking stitch markers for holding paired triangles together
Abbreviations
chchainscsingle crochetdcdouble crochetsl stslip stitchMRmagic ringspspacest(s)stitch(es)reprepeatRSright sideInstructions
Before you begin: Work one cream granny triangle and one sienna moss-stitch triangle, block both, and seam them to make a single full square. Measure it on point — it should span roughly 39.5 cm corner to corner. If your square is smaller, go up to a 5.5 mm hook; if it is larger, drop to a 4.5 mm hook. This single check matters more than anything else in the pattern, because all 42 squares must be identical for the diamonds to line up. The blanket is laid out 6 squares wide by 7 squares long, every square rotated 45 degrees (set on point), with every other square turned 180 degrees so the sienna halves touch sienna halves and the cream halves touch cream halves.
Granny half-square — cream (make 42)
- Round 1: With cream, make a MR. Ch 3 (counts as dc here and throughout), 2 dc in ring, ch 2, (3 dc in ring, ch 2) twice, sl st into top of beg ch-3. Pull the ring closed. You now have a tiny triangle with 3 ch-2 corner spaces. (9 dc)
- Round 2: Sl st into each of the next 2 dc and into the first ch-2 sp. Ch 3, 2 dc in same sp, ch 2, 3 dc in same sp (first corner made), (3 dc, ch 2, 3 dc) in each of the next 2 ch-2 sps, sl st into top of beg ch-3. (18 dc)
- Round 3: Sl st into the next 2 dc and into the first ch-2 sp. Ch 3, 2 dc in same sp, ch 2, 3 dc in same sp (first corner made), *3 dc in the sp along the side, (3 dc, ch 2, 3 dc) in the next ch-2 sp; rep from * 2 more times, sl st into top of beg ch-3. (27 dc)
- Round 4: Work as Round 3, working 2 groups of 3 dc along each of the 3 sides. (36 dc)
- Round 5: Work as Round 3, working 3 groups of 3 dc along each side. (45 dc)
- Round 6: Work as Round 3, working 4 groups of 3 dc along each side. (54 dc)
- Round 7: Work as Round 3, working 5 groups of 3 dc along each side. (63 dc)
- Round 8: Work as Round 3, working 6 groups of 3 dc along each side. (72 dc)
- Round 9: Work as Round 3, working 7 groups of 3 dc along each side. (81 dc)
- Round 10: Work as Round 3, working 8 groups of 3 dc along each side. (90 dc)
- Round 11: Work as Round 3, working 9 groups of 3 dc along each side. (99 dc) Fasten off, leaving a 15 cm tail for weaving.
Block each triangle to a right-angled triangle whose two shorter sides (legs) measure 28 cm; the long diagonal edge will measure roughly 39.5 cm. Do not skip this — an unblocked triangle is almost always several centimetres short.
Solid half-square — sienna, moss stitch (make 42)
- Round 1: With sienna, make a MR. Ch 1 (does not count as a st), [sc, ch 1] 3 times in ring, sl st into first sc. Pull the ring closed. (3 sc)
- Round 2: Sl st into the first ch-1 sp, ch 1, sc in same sp, ch 2, sc in same sp (first corner made), *ch 1, (sc, ch 2, sc) in next ch-1 sp; rep from * once more, ch 1, sl st into first sc. (6 sc, 3 corner ch-2 sps)
- Round 3: Sl st into the first ch-2 sp, ch 1, sc in same sp, ch 2, sc in same sp (first corner made), *ch 1, sc in next ch-1 sp, ch 1, (sc, ch 2, sc) in next ch-2 sp; rep from * 2 more times, sl st into first sc. (9 sc)
- Round 4: Work as Round 3, working (sc, ch 1) twice along each side between corners. (12 sc)
- Round 5: Work as Round 3, working (sc, ch 1) 3 times along each side. (15 sc)
- Round 6: Work as Round 3, working (sc, ch 1) 4 times along each side. (18 sc)
- Round 7: Work as Round 3, working (sc, ch 1) 5 times along each side. (21 sc)
- Round 8: Work as Round 3, working (sc, ch 1) 6 times along each side. (24 sc)
- Round 9: Work as Round 3, working (sc, ch 1) 7 times along each side. (27 sc)
- Round 10: Work as Round 3, working (sc, ch 1) 8 times along each side. (30 sc)
- Round 11: Work as Round 3, working (sc, ch 1) 9 times along each side. (33 sc) Fasten off, leaving a 15 cm tail.
Block to exactly the same dimensions as the cream triangles: 28 cm legs, roughly 39.5 cm hypotenuse. If a sienna triangle and a cream triangle do not match edge to edge, re-block the smaller one rather than stretching it while seaming.
Seaming the 42 squares
- Place one blocked cream triangle and one blocked sienna triangle together with RS facing each other and the long diagonal edges aligned. The two triangles will naturally want to form a square — the moss-stitch edge and the granny edge are the same length by design.
- Using sienna yarn and your tapestry needle, seam the diagonal edges together with mattress stitch, catching the back loops (or the inner loops) of both edges so the seam sits invisible on the RS and the two stitch patterns butt up against each other cleanly. This visible diagonal line is intentional — it is the colour boundary you see in the finished blanket.
- Fasten the seam off securely at both ends and weave the tails into the neighbouring stitches on the WS. You now have one finished square, roughly 28 cm along each side. Repeat until you have 42 identical squares.
Joining the blanket
- On a large flat surface (the floor works best), lay the squares out in a 6 by 7 grid, every square set on point (rotated 45 degrees). Now rotate every second square 180 degrees in a checkerboard pattern: the square in row 1, column 1 points one way, its neighbours point the other way. When the rotation is correct, the sienna half of each square touches the sienna half of the adjacent square, and the cream halves touch the cream halves — stand back and you will see the diamond checkerboard from the photo appear.
- Join the squares with whip stitch or mattress stitch through the back loops only, using sienna yarn for seams between sienna edges and cream yarn for seams between cream edges (or use sienna throughout for strength — it sinks invisibly into the moss stitch and is barely visible in the granny). Work row by row, then seam the rows together, keeping every seam on the same side (the WS).
- Because the squares are set on point, the outer edge of the blanket is a gentle zigzag of square points. That is correct — the border round will even it out.
Finishing
- Border round 1 (sc): Join sienna with a sl st at any outer point. Ch 1, work sc evenly along every edge, working 3 sc into each square point and into each inward corner to keep the edge flat. Do not pull the sc tight — a slightly relaxed edge lets the blanket drape over the side of the bed. Join with a sl st to first sc.
- Border round 2 (moss stitch): Ch 1, sc in same st, *ch 1, sk 1, sc in next st; rep from * around, working (sc, ch 2, sc) at each corner point to turn. Join with sl st. This echoes the sienna texture and gives the edge a tidy, woven finish.
- Weave in every remaining end on the WS, running tails through at least 5-6 stitches in different directions before trimming.
- Blocking the finished bedspread: Wet-block or steam-block the completed blanket on clean towels or blocking mats, pinning the points of the diamonds so the geometry is true. Cotton takes a day or two to dry fully. Once dry, the seams will be nearly invisible and the diamonds will read crisp and clean.
Tips for Success
- Block every single triangle, every time. Seaming unblocked triangles is the number one reason blankets end up wonky. Five minutes per triangle saves hours of regret later.
- Count in groups of three. On every granny round, the total dc count is a multiple of 9 (9, 18, 27… 99). If your count is off, a corner got skipped — the mistake is always at a ch-2 corner space.
- Keep the corner ch-2 spaces loose. Tight ch-2 corners pull the triangle into a cup shape. If your corners curl, go up a hook size or consciously relax the two chains.
- Weave ends in as you finish each square, not at the end of the project. With 84 triangles plus seams, a giant end-weaving session at the finish line is genuinely demoralising.
- Buy all your yarn in one dye lot. A queen bedspread needs roughly 25 balls, and sienna shades vary noticeably between lots. Check the lot numbers before you leave the shop.
- Photograph your layout before seaming. A quick phone photo of the 6 x 7 grid lets you check the rotation pattern from a distance — it is much easier to spot a wrongly rotated square on a screen than standing over it.
- Use stitch markers to pair triangles. Clip each cream triangle to its sienna partner as soon as both are blocked, so you never run short of one half.
Common Mistakes to Avoid
- Skipping the gauge square — it happens when makers assume all DK yarn and a 5 mm hook behave the same. A 2 cm difference per square multiplies into a 12 cm difference across the width of the bed; make one square first and measure it on point.
- Inconsistent corner chains — alternating accidentally between ch 1, ch 2 and ch 3 at corners makes some rounds wavy and others tight. Every corner in this pattern is exactly ch 2, no exceptions.
- Seaming through both loops — it creates a thick, ropey ridge on the RS. Work into the back loops only (or use mattress stitch on the inner loops) so the seam stays flat and nearly invisible.
- Rotating squares randomly in the layout — if even one square points the wrong way, a cream half meets a sienna half and the diamond pattern breaks. Fix it on the floor, not after seaming.
- Pulling the joining seams too tight — tight seams pucker the squares into little pillows. The seam should have the same tension as a row of crochet; let the blocking do the final smoothing.
- Stretching triangles to fit while seaming — a mismatched pair means one triangle was not blocked enough. Re-wet and re-pin the smaller one rather than distorting the larger one.
Ways to Customize This Rustic Granny Diamond Bedspread Crochet Pattern
- Size it down to a throw: work a 4 x 5 grid (20 squares, 10 of each triangle) for a generous lap blanket of roughly 158 x 197 cm, or a 3 x 4 grid (12 squares) for a pram or sofa throw of about 118 x 158 cm.
- Swap the palette: forest green and cream reads winter cabin; navy and ecru reads coastal; charcoal and oatmeal reads modern graphic; mustard and ivory reads retro seventies. Any two colours with strong warm-cool contrast will preserve the diamond effect.
- Go chunky: work in aran weight with a 6.0 mm hook and skip Rounds 10-11 of each triangle — the squares finish around 28 cm with only 9 rounds and the whole blanket works up in about a third of the time.
- Reverse the roles: make the granny half-squares sienna and the moss-stitch half-squares cream for the same blanket with the texture emphasis flipped.
- Add a wider border: repeat the moss-stitch border round three or four times with ch-2 corners, or finish with a round of picots for a more traditional heirloom edge.
Frequently asked questions
Most makers report 50 to 70 hours of actual hook time spread across 4 to 6 weeks: roughly 25 hours for the 84 triangles, 15 to 20 hours for seaming and joining, and the rest for the border, ends and blocking. It is an ideal “one square a day” project — 42 days of squares and you are nearly done.
Can I use worsted weight yarn instead of DK?
Yes, with a 5.5 or 6.0 mm hook. Your squares will come out larger, so a 5 x 6 grid will cover a queen bed and you will need fewer squares (30) but more yarn per square. Always make the test square first and re-plan the grid based on its actual on-point measurement.
If you used cotton or a cotton-acrylic blend, yes — machine wash cold on a gentle cycle and lay flat or tumble dry low. Pure wool should be hand washed cool and dried flat. Blocking after the first wash will refresh the diamond geometry, because even the best seams relax slightly with use.
Almost always one of two things: the corner ch-2 spaces are too tight (the fabric cups), or the sides are missing a group of stitches (the edges look stair-stepped). Count every round — granny rounds must land on a multiple of 9 dc and moss-stitch rounds on a multiple of 3 sc — and loosen up at the corners. A good wet-block fixes the rest.
No — if you lay all 42 squares straight (not rotated 45 degrees) and rotate them 180 degrees in the same checkerboard, you get a lovely offset stripe effect instead of diamonds, and the joins are simpler because nothing is on the bias. The on-point layout is what creates the diamond look from the photo, but the pattern works either way.
If you can chain, single crochet, double crochet and work a basic granny square, yes. The moss-stitch triangle is genuinely easier than it looks because it mirrors the granny triangle’s shape exactly. Give yourself permission to make the first two or three squares slowly and count every round out loud — by square five it will be automatic.
Can I sell finished items made from this pattern?
Yes — finished items may be sold, with credit given to the pattern source. The written pattern itself may not be resold, republished or redistributed, in full or in part, in any form.
The finished Rustic Two-Tone Granny Diamond Bedspread — Free Crochet Pattern

