Retro Earth Tone Granny Square Bedspread — Free Crochet Pattern
Intermediate
For crocheters comfortable with the basics, ready to try new shaping and assembly techniques
Weekend Project
A satisfying weekend make — start Friday, finish Sunday, enjoy forever.
Handmade Gift
A beautiful keepsake — free forever. Read online or print at home.
About This Retro Earth Tone Granny Square Bedspread — Free Crochet Pattern
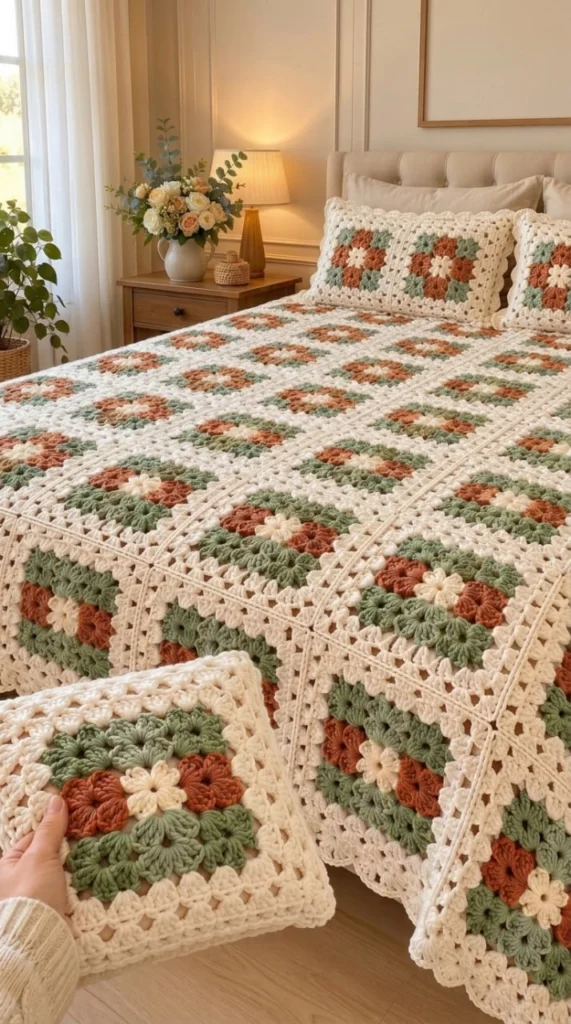
The Retro Earth Tone Granny Square Bedspread free crochet pattern brings cozy vintage charm, warm color harmony, and rich classic texture right into your bedroom. Crafted in a timeless color palette of cream off-white, terracotta rust orange, and muted sage green, each square features a flower-like cream center, a ring of textured rust cluster stitches, a band of sage green granny clusters, and a wide off-white framing border. Assembled into a seamless repeating grid alongside matching throw pillows, this heirloom-quality blanket turns any bed into a relaxing, handcrafted sanctuary.
This project is constructed by crocheting individual classic granny square motifs in consistent color-changing rounds before joining them with an off-white lace seam and framing the entire bedspread with a scalloped cluster border. It is designed for an intermediate crocheter who enjoys working traditional 3-dc granny clusters, neat color changes between rounds, precise square framing, and assembling modular geometric motifs into a large blanket surface.
Materials
- Yarn: Worsted weight (Category 4) 100% acrylic or cotton-acrylic blend yarn.
- Color A (Cream / Off-White): ~2,200 meters (~2,400 yards)
- Color B (Rust / Terracotta Orange): ~1,200 meters (~1,310 yards)
- Color C (Muted Sage Green): ~1,400 meters (~1,530 yards)
- Crochet Hook: 5.0 mm (US H/8) crochet hook, or size required to obtain recommended gauge and drape.
- Notions: Tapestry needle for seaming and weaving in ends, locking stitch markers, sharp yarn scissors, measuring tape.
- Blocking Tools: Blocking foam mats, stainless steel rust-proof T-pins, and steam iron or spray bottle.
Abbreviations
chchainsl stslip stitchscsingle crochethdchalf double crochetdcdouble crochettrtreble crochetcluster3-dc granny cluster (3 double crochet worked into same space)incincreasest(s)stitch(es)sp(s)space(s)ch-spchain spacepicotch 3, sl st in 3rd ch from hookInstructions
Main Granny Square Motif — Cream, Rust & Sage (make ~80 motifs for Queen size)
Each square motif begins with a floral cream center core, expanding into a ring of rust orange clusters, a ring of sage green clusters, and two framing rounds of off-white cream.
Part 1: Center Core & Color Rounds
- Round 1 (Floral Core – Color A Cream): With Color A (Cream), make a magic ring. Ch 3 (counts as dc), work 2 dc into ring, ch 2, *3 dc into ring, ch 2; repeat from * 2 more times. Join with sl st to top of starting ch-3. Fasten off Color A. [4 clusters, 4 ch-2 corner sps]
- Round 2 (Inner Ring – Color B Rust Orange): Attach Color B in any corner ch-sp. Ch 3 (counts as dc), work [2 dc, ch 2, 3 dc] in same corner sp, ch 1, *[3 dc, ch 2, 3 dc] in next corner sp, ch 1; repeat from * 2 more times. Join with sl st to top of starting ch-3. Fasten off Color B. [8 clusters, 4 corner ch-sps, 4 side ch-1 sps]
- Round 3 (Middle Ring – Color C Sage Green): Attach Color C in any corner ch-sp. Ch 3, work [2 dc, ch 2, 3 dc] in corner sp, ch 1, 3 dc in next side ch-1 sp, ch 1, *[3 dc, ch 2, 3 dc] in corner sp, ch 1, 3 dc in next side ch-1 sp, ch 1; repeat from * 2 more times. Join with sl st to top of starting ch-3. Fasten off Color C. [12 clusters total, 3 clusters per side]
Part 2: Framing & Outer Scallop Border (Color A Cream)
- Round 4 (Inner Frame – Color A Cream): Attach Color A in any corner ch-sp. Ch 3, work [2 dc, ch 2, 3 dc] in corner sp, ch 1, (3 dc in next ch-sp, ch 1) across side to next corner; repeat around all 4 sides. Join with sl st to top of starting ch-3. [16 clusters total]
- Round 5 (Outer Frame – Color A Cream): Ch 3, work [2 dc, ch 2, 3 dc] in corner sp, ch 1, (3 dc in next ch-sp, ch 1) across side to next corner; repeat around all 4 sides. Join with sl st to top of starting ch-3. [20 clusters total]
- Round 6 (Outer Scalloped Edge – Color A Cream): *In corner ch-sp work [3 dc, picot, 3 dc], sc in next ch-sp, (3 dc in next ch-sp, sc in next ch-sp) across side; repeat from * around all 4 corners. Join with sl st, fasten off, and weave in ends. [Square motif size = ~22 x 22 cm]
Bedspread Assembly
- Arrangement: Lay out all 80 completed granny square motifs on a flat surface in an 8 x 10 grid, ensuring color alignment and pattern symmetry across the mattress top.
- Joining Motifs: Place adjacent squares right sides together. Using Color A (Cream) and a tapestry needle, whipstitch through the back loops only (BLO) of matching edge stitches along touching sides. This creates a completely flat, flexible seam grid across the blanket face.
Continuous Outer Scalloped Bedspread Border
- Round 1 (Base Anchor Row): Attach Color A (Cream) yarn in any corner of the assembled bedspread. Ch 1, work single crochets evenly around all 4 outer edges, placing 3 sc into outer corner points and 1 sc dec in inner seams where motifs meet. Join with sl st.
- Round 2 (Granny Cluster Outer Band): Ch 3 (counts as dc), work [2 dc, ch 2, 3 dc] in corner st, ch 1, *skip 2 sts, 3 dc in next st, ch 1; repeat around entire outer perimeter, working [3 dc, ch 2, 3 dc] into outer corners. Join with sl st.
- Round 3 (Scalloped Shell Border): *In corner ch-sp work [4 dc, picot, 4 dc], sc in next ch-sp, *skip 2 sts, work [3 dc, picot, 3 dc] in next ch-sp, sc in next ch-sp; repeat from * continuously around all 4 sides of the bedspread to form the draped scalloped edging. Join with sl st, fasten off, and weave in all remaining ends.
Matching Decorative Throw Pillows (make 2)
Front Pillow Panel
- Step 1: Crochet 1 large main Granny Square Motif using Colors A, B, and C through Round 5.
- Step 2: Work 3 additional rounds of Color A (Cream) 3-dc granny clusters around the single square to expand the motif panel to 40 x 40 cm.
- Step 3: Finish the outer edge of the front panel with Round 6 (Outer Scalloped Edge).
Back Pillow Panel
- Row 1: With Color A (Cream), ch 52. Dc in 4th ch from hook and in each ch across. Turn. [50 dc]
- Rows 2–28: Ch 3 (counts as dc), 1 dc in each st across. Turn. Fasten off after Row 28 [50 dc per row; ~40 x 40 cm square].
Pillow Assembly
Place front and back panels wrong sides together. Single crochet around 3 sides using Color A, insert a 40 x 40 cm pillow form, and sc across the 4th side to seal. Finish with a picot scallop border around the outer edge.
Tips for Success
- Maintain Consistent Tension: Uniform gauge across all ~80 square motifs ensures that outer cluster spaces align perfectly during row-by-row seaming.
- Steam Block Individual Squares: Steam-blocking each square motif to ~22 x 22 cm before assembly makes seaming significantly faster and prevents puckering along grid lines.
- Weave In Color Ends As You Go: Fasten off and weave in loose ends after completing each color round on individual motifs to avoid a daunting finishing workload later.
- Keep Assembly Stitches Relaxed: Avoid pulling assembly threads too tightly so that the bedspread retains a soft, fluid drape over the mattress.
- Choose a High-Definition Yarn: Smooth acrylic or cotton-acrylic yarn highlights the classic 3-dc cluster definition and crisp color transitions clearly.
Common Mistakes to Avoid
- Skipping Motif Blocking — Unblocked granny squares tend to curl at the corners, causing puckered, uneven seams during assembly.
- Miscounting Corner Chain Spaces — Forgetting a ch-2 in corner spaces will flatten corners into straight sides, distorting the square geometry.
- Uneven Seaming Tension — Seaming too tightly pulls joints into rigid ridges instead of letting the blanket lie completely flat.
- Mixing Yarn Weights — Using different yarn weights or brands for the cream, rust, and sage colors will warp individual motif dimensions.
Ways to Customize This Pattern
- Coastal Palette: Replace rust and sage with soft duck-egg blue, navy, and cream for a coastal cottage look.
- Throw Blanket Dimension: Reduce motif count to 35 squares (5 x 7 grid) to create a smaller couch lapghan (~110 x 150 cm).
- Matching Table Runner: Join a single column of 5 granny squares top-to-bottom to craft a matching rustic dining runner.
Frequently asked questions
This pattern is rated as intermediate. It requires familiarity with classic 3-dc granny clusters, making clean color changes between rounds, working concentric square expansions, and seaming geometric motifs together.
A full queen bedspread (~80 main square motifs, outer scalloped border, and two matching throw pillows) typically takes between 4 and 6 weeks of regular crocheting (~12–15 hours per week).
What type of yarn works best for a granny square bedspread?
A worsted weight (Category 4) premium acrylic or cotton-acrylic blend is best. Acrylic provides soft drape, durability, and easy machine care, while cotton blend adds crisp stitch definition for granny clusters.
Machine wash on a gentle, cool cycle inside a large laundry bag using mild liquid detergent. Lay flat on clean dry towels to air dry to preserve its square geometry and picot edging.
Yes! Because this is a modular motif pattern, simply add or subtract rows of square motifs. Each motif adds approximately 22 cm (~8.5 inches) to your overall bed dimensions.
Yes, you are permitted to sell physical finished items created using this pattern. We kindly ask that you credit patterns.noobcooks.com as the original designer in your listings. Reselling, copying, or redistributing the written pattern text or images is strictly prohibited.
The finished Retro Earth Tone Granny Square Bedspread — Free Crochet Pattern

