Luna the Sleepy Moon Rainbow Suncatcher Amigurumi Pattern
Beginner Friendly
Perfect for those just starting their crochet journey, with clear instructions and simple techniques
Single-Day Project
A satisfying project you can complete in a single afternoon or evening.
Handmade Gift
A beautiful keepsake — free forever. Read online or print at home.
About This Luna the Sleepy Moon Rainbow Suncatcher Amigurumi Pattern
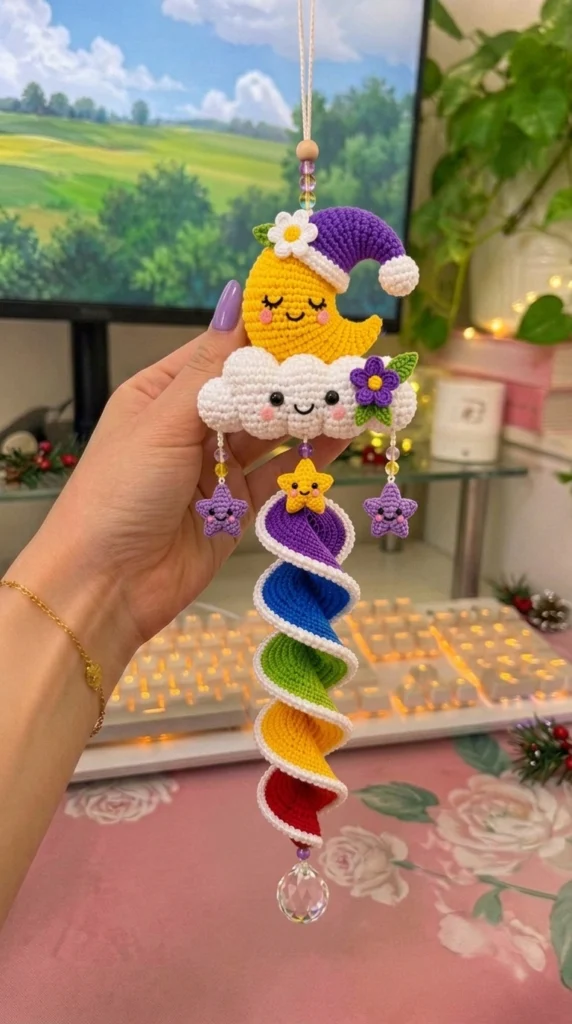
This moon and cloud amigurumi pattern makes a hanging suncatcher with a sleeping crescent moon in a purple nightcap, a smiling cloud beneath it, three star charms on beaded strings, and a long rainbow spiral that twists all the way down to a faceted glass drop. It is the kind of piece that looks complicated because it is made of many small parts, not because any single part is hard.
The tricky bits are the crescent shaping on the moon and the spiral, which is worked flat as one long strip and coils itself as you go. Everything else is standard amigurumi in the round. Expect eight to ten hours spread over a few sittings, most of it in the spiral and the assembly.
Good for someone who has finished a few amigurumi and wants to try shaping and multi-piece assembly. It hangs beautifully in a nursery window, above a crib, or from a rear-view mirror. Cotton is strongly recommended here because it holds edges crisply and does not sag over time when hung.
Materials
- DK cotton yarn, white ~60 g — cloud, hat trim, spiral edging
- DK cotton yarn, golden yellow ~25 g — moon, one star, one rainbow band
- DK cotton yarn, purple ~20 g — nightcap, two stars, flower, one rainbow band
- DK cotton yarn, royal blue ~10 g — rainbow band
- DK cotton yarn, grass green ~12 g — rainbow band and leaves
- DK cotton yarn, red ~10 g — rainbow band
- 2.5 mm crochet hook tight gauge, no stuffing showing
- Black safety eyes, 6 mm 2 pairs — cloud and yellow star
- Black embroidery floss closed sleeping eyes on moon and purple stars
- Pale pink embroidery floss or blush powder cheeks
- Polyester fiberfill ~40 g total
- Faceted glass suncatcher drop, 30-40 mm 1
- Acrylic or glass beads, 6-8 mm 12-16, clear and pastel
- Wooden bead, 15 mm 1, for the hanging cord
- Waxed cotton cord or nylon beading thread ~1.5 m
- Stitch markers, tapestry needle, small sharp scissors
Abbreviations
MRmagic ringchchainsl stslip stitchscsingle crochethdchalf double crochetdcdouble crochettrtreble crochetinc2 sc in same stitchdecinvisible decrease over 2 stitchesBLOback loops onlyst(s)stitch(es)reprepeat( )stitch count at end of round[ ]repeat sequence as directedMoon (crescent, make 1 in yellow)
- Worked flat in rows, then edged. Row 1: ch 26, sc in 2nd ch from hook and in each ch across, turn. (25)
- Row 2: ch 1, sc in each st across, turn. (25)
- Row 3: ch 1, inc, sc 23, inc, turn. (27)
- Row 4: ch 1, sc 27, turn. (27)
- Row 5: ch 1, inc, sc 25, inc, turn. (29)
- Rows 6-8: ch 1, sc in each st across, turn. (29)
- Row 9: ch 1, dec, sc 25, dec, turn. (27)
- Row 10: ch 1, sc 27, turn. (27)
- Row 11: ch 1, dec, sc 23, dec, turn. (25)
- Row 12: ch 1, dec, sc 21, dec, turn. (23)
- Row 13: ch 1, dec, sc 19, dec, turn. (21)
- Row 14: ch 1, dec, sc 17, dec. Fasten off leaving a long tail. (19)
- Make a second identical panel. Do not fasten off the second one — you will join through both.
- The crescent curve: hold both panels wrong sides together, aligning row 1 edges. The long straight edge of row 1 becomes the inner concave curve once shaped.
- Joining round: sc through both layers all the way around the outer edge, working 1 sc per row-end and 1 sc per stitch along the top and bottom edges, and 3 sc in each of the two pointed tips. Stuff firmly through the remaining gap before closing the last 6 sts.
- Shaping the crescent: with yellow yarn and needle, run a gathering thread along the inner edge (the row 1 edge) from tip to tip. Pull gently until the piece curves into a crescent about 9 cm from tip to tip. Knot off inside.
- Embroider closed sleeping eyes with black floss: two shallow downward arcs, each about 10 sts wide, spaced 3 cm apart, placed on the outer face of the crescent’s lower belly. Add 3-4 short lashes curving down from the outer end of each arc.
- Embroider a small smile in black floss below and between the eyes, about 1.5 cm wide, curving upward. Blush the cheeks just outside each eye.
Nightcap (make 1, purple with white trim)
- With white, R1: 6 sc in MR. (6)
- R2: inc in each st. (12)
- R3: [sc 1, inc] rep 6 times. (18)
- R4: [sc 2, inc] rep 6 times. (24)
- R5: [sc 3, inc] rep 6 times. (30)
- R6-R7: sc in each st. (30)
- R8: [sc 3, dec] rep 6 times. (24)
- R9: sc in each st. (24)
- R10: [sc 2, dec] rep 6 times. (18)
- R11: sc in each st. Change to purple at the end of this round. (18)
- R12: sc in each st. (18)
- R13: [sc 4, dec] rep 3 times. (15)
- R14-R15: sc in each st. (15)
- R16: [sc 3, dec] rep 3 times. (12)
- R17-R19: sc in each st. Begin curving the cone now — work R18 and R19 slightly tighter on one side by pulling the yarn firmer across 4 consecutive sts each round. (12)
- R20: [sc 2, dec] rep 3 times. (9)
- R21-R23: sc in each st, continuing the same one-sided tension to bend the tip. (9)
- R24: [sc 1, dec] rep 3 times. (6)
- R25-R26: sc in each st. (6)
- R27: dec 3 times. Fasten off, close the hole. (3)
- Stuff the cone lightly and only in the lower third so the tip stays floppy and curls. Do not stuff the white brim at all — it should sit flat around the moon.
Cap pompom (make 1 in white)
- R1: 6 sc in MR. (6)
- R2: inc in each st. (12)
- R3: [sc 1, inc] rep 6 times. (18)
- R4-R5: sc in each st. (18)
- R6: [sc 1, dec] rep 6 times. (12)
- Stuff firmly.
- R7: dec 6 times. Fasten off, close the hole, leave a long tail for sewing. (6)
Cloud (make 1 in white)
- The cloud is two identical flat panels joined and stuffed. Panel: ch 30.
- R1: working around both sides of the chain — sc in 2nd ch from hook, sc 27, 3 sc in last ch; rotate and work along the opposite side: sc 27, 2 sc in the final ch, sl st to join. (62)
- R2: ch 1, sc 27, 3 sc in next st, sc 1, 3 sc in next st, sc 27, 3 sc in next st, sc 1, 3 sc in next st, sl st to join. (70)
- R3: ch 1, sc in each st around, sl st to join. (70)
- R4 — bump shaping, top edge: ch 1, sc 3, [hdc 2, 3 dc in next st, hdc 2, sc 2] rep 4 times, sc 2, then sc across the remaining 29 sts of the bottom edge, sl st to join. (78)
- R5: ch 1, sc in each st around, working 2 sc in the center st of each of the 4 bumps, sl st to join. Fasten off. (82)
- Make a second panel identically but do not fasten off.
- Insert 6 mm safety eyes into the front panel only, 4 cm apart, sitting about one third up from the bottom edge. Secure the backs.
- Hold panels wrong sides together and sc through both layers around the entire edge, matching stitch for stitch. Stuff evenly and lightly as you close — the cloud should stay flat-ish, about 2.5 cm deep, not ball-shaped. Sl st to join, fasten off, weave in.
- Embroider a wide upward smile in black floss between and slightly below the eyes, about 2 cm across. Blush both cheeks generously just outside the eyes.
Stars (make 1 yellow, 2 purple)
- R1: 5 sc in MR. (5)
- R2: inc in each st. (10)
- R3: [sc 1, inc] rep 5 times. (15)
- R4: [sc 2, inc] rep 5 times. (20)
- R5: sc in each st. (20)
- Make a second identical disc for each star. Do not fasten off the second.
- Join: hold both discs together and sc through both layers around, stuffing very lightly with a pinch of fiberfill before closing. (20)
- Points: sl st to the first st. In each of 5 evenly spaced stitches (every 4th st), work a point as follows — ch 5, sc in 2nd ch from hook, hdc 1, dc 1, tr 1, then sl st into the same base st. Sl st across the next 3 sts and repeat. Fasten off after the fifth point.
- Yellow star: insert 6 mm safety eyes 1.5 cm apart before joining the two discs. Embroider a small smile and blush the cheeks.
- Purple stars: embroider closed curved sleeping eyes and a small smile in black floss. Blush the cheeks.
Rainbow spiral (make 1, five color bands)
- The spiral is one long strip worked in a single pass — the increase rate forces it to coil. Do not block it flat.
- Foundation: with purple, ch 61.
- Purple band: sc in 2nd ch from hook and in each ch across. (60)
- Change to blue in the last st of the purple section only if working continuous color; otherwise fasten off and rejoin per band as noted below. For the pictured version, work the foundation in five 12-chain color blocks: purple 12, blue 12, green 12, yellow 12, red 12, then work the sc row across all 60 matching each color.
- Turn. Row 2: ch 3 (counts as dc), 2 more dc in the same st, then 3 dc in every st across, matching the color of the stitch below. (180)
- The strip will begin twisting on its own by the fifth or sixth stitch. Let it. Do not straighten it out or count against the coil.
- Fasten off. The finished coil should have 4-5 full turns and measure about 20 cm hanging.
- White edging: with white, join at the starting end and sc evenly along the entire outer edge of the row-2 stitches, working 1 sc in the top of each dc — 180 sc total. Keep this edging slightly loose so it does not fight the coil. Fasten off, weave in.
- Run a length of white yarn through the center of the coil from top to bottom and secure lightly at three points so the spiral holds its shape and does not stretch out when hung.
Flower and leaves (make 1 flower purple with white center, 1 white daisy, 4 leaves green)
- Flower center: with white, 6 sc in MR, sl st to join, fasten off. (6)
- Petals: join purple in any st. [ch 3, 2 dc in same st, ch 3, sl st in same st, sl st in next st] rep 5 times, ending with a sl st in the joining st. Fasten off. (5 petals)
- White daisy: with yellow, 6 sc in MR, sl st to join, fasten off. Join white in any st and work [ch 4, sc in 2nd ch from hook, hdc 1, dc 1, sl st in same base st, sl st in next st] rep 6 times. Fasten off. (6 petals)
- Leaf (make 4): ch 8. Sc in 2nd ch from hook, hdc 1, dc 2, hdc 1, sc 1, 3 sc in last ch; working back along the opposite side of the chain: sc 1, hdc 1, dc 2, hdc 1, sc 1, sl st to the base. Fasten off leaving a sewing tail. (18)
Finishing
Sew the nightcap onto the upper curve of the moon so the white brim sits at an angle across the moon’s forehead and the purple tip flops to the right. Pin first and check the angle from a distance before stitching — a straight-on cap looks stiff, a tilted one looks sleepy. Sew the pompom to the very tip. Sew the white daisy and two leaves at the left edge of the brim.
Sew the moon to the top of the cloud, letting the crescent’s lower point rest just behind the cloud’s top bumps so it looks like it is settling down into it. Use small tight stitches along the whole contact line — this joint carries the weight of everything below. Sew the purple flower and two leaves to the right side of the cloud.
For the hanging cord, thread waxed cord through the top of the nightcap brim, add the wooden bead and two or three pastel beads, and knot into a loop about 25 cm long. For the drops, cut three lengths of cord about 12 cm each. Attach one to the bottom left of the cloud, thread two beads, then the purple star. Repeat on the bottom right with the second purple star. The yellow star hangs shortest, at the center, on a 7 cm cord.
Attach the rainbow spiral to the center bottom of the cloud with a short cord and a single bead, so it hangs directly below the yellow star and slightly behind it. Thread the glass suncatcher drop onto the bottom of the spiral with a bead above the knot. Hang the whole piece and check the balance — if it tilts, move one star drop 1 cm along the cloud’s bottom edge until it hangs true.
Tips for Success
- Crochet the crescent panels at a tighter tension than you think you need. A loose moon will sag under the weight of the cap and pompom and lose its curve within a week of hanging.
- Stuff the cloud in thin flat layers, not in balls. Push each pinch out toward the edges with the back of your hook before adding the next, or the bumps will stay hollow while the center bulges.
- Let the rainbow spiral twist as it forms. Every impulse will tell you to flatten it out and count your stitches straight — that impulse ruins the piece. Count by color block instead: 36 dc per color band.
- Place both sets of safety eyes before any joining. Once a piece is closed and stuffed, the backs are unreachable and you will be cutting it open.
- Assemble the whole thing hanging from a hook rather than lying on a table. Weight distribution is invisible when flat and obvious when suspended.
Common Mistakes to Avoid
- Gathering the moon’s inner edge too tightly, which pinches the crescent into a horseshoe. Pull only until the tips are about 9 cm apart, then knot. You can always tighten later; loosening a knotted gather means picking it all out.
- Stuffing the nightcap all the way to the tip. A fully stuffed cone stands straight up and reads as a party hat. Stuff only the bottom third.
- Working the white spiral edging at the same tension as the dc rows. Too tight and it strangles the coil into a rigid corkscrew. Go up half a hook size for the edging if yours is pulling.
- Sewing the moon to the cloud with a few anchor stitches at each end. It will pivot and hang crooked. Stitch continuously along the entire line where the two pieces touch.
- Using acrylic yarn for the spiral. It has no memory and the coil relaxes into a limp ribbon. Cotton holds the twist.
Ways to Customize This Pattern
- Swap the rainbow for a monochrome ombre spiral — five shades of one color from dark at the top to pale at the bottom. This suits a more muted nursery.
- Make the moon a full circle instead of a crescent by working the two panels as flat discs (6 sc in MR increasing by 6 to 48) and skipping the gathering step entirely.
- Replace the glass drop with a crocheted raindrop: 6 sc in MR, increase to 18 over three rounds, work 4 rounds even, then decrease to close, stuffed firmly.
- Add a small music box mechanism inside the cloud before closing it, running the pull cord out through the top bump — turns the piece into a working crib mobile.
- Scale everything down by using 4 ply cotton and a 2 mm hook for a car mirror version at about 60 percent size.
Frequently asked questions
Almost always the row 2 increase. You need 3 dc in every single stitch of the foundation row — 180 dc from 60 sc. If you worked 2 dc in some stitches, or skipped increases at the color changes, there is not enough excess fabric to force the coil. Count one color band: it should have 36 dc over 12 base stitches.
Yes. The drop adds weight that helps the spiral hang straight, so if you leave it off, either substitute a crocheted stuffed raindrop with a small metal washer inside, or add two extra beads at the bottom. Without any weight at all the spiral tends to curl up on itself.
Not directly over a sleeping baby, and not within reach. It has small parts — safety eyes, beads, a glass drop — and long cords. Hang it on a wall or in a window where it can be seen but not grabbed, and check the cord knots monthly.
The moon keeps flopping forward under the weight of the hat. How do I fix it?
Two causes. Either the moon is understuffed, in which case you can add fiberfill through the gap where the cap sits before sewing it down, or the cap is sewn too far forward. The cap’s brim should sit over the top third of the crescent, with the bulk of its weight behind the moon’s center line, not in front of it.
The finished Luna the Sleepy Moon Rainbow Suncatcher Amigurumi Pattern