Hot Pink Pineapple Oval Table Runner — Free Crochet Pattern
Advanced
For experienced crocheters who enjoy complex shaping, fine detail, and ambitious construction
Single-Day Project
A satisfying project you can complete in a single afternoon or evening.
Handmade Gift
A beautiful keepsake — free forever. Read online or print at home.
About This Hot Pink Pineapple Oval Table Runner — Free Crochet Pattern
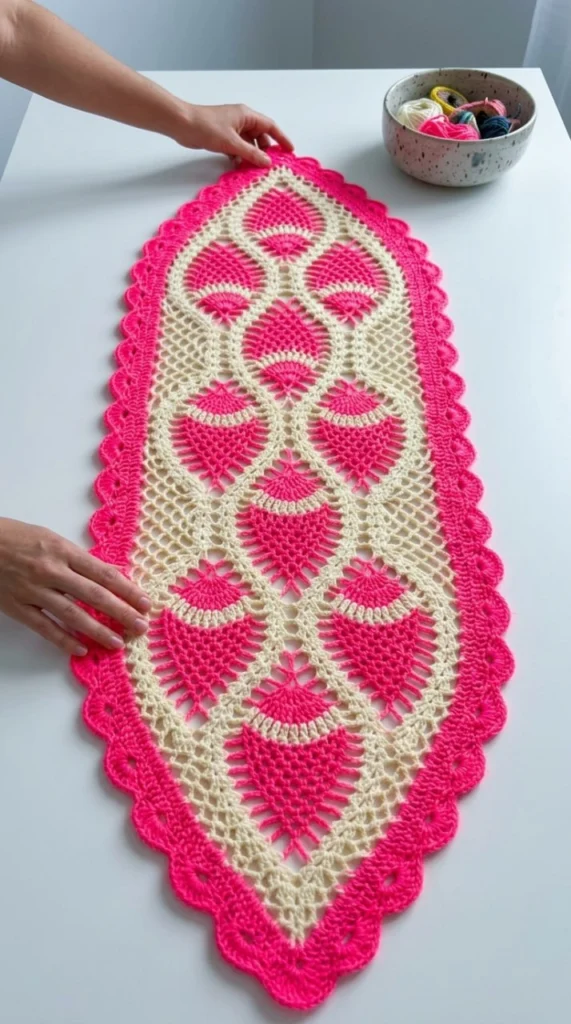
This free crochet pattern shows you how to crochet a stunning oval table runner in vibrant hot pink and cream, featuring classic pineapple motifs arranged in a beautiful mirrored lattice. The runner has an elegant elongated oval shape with a scalloped shell border that drapes beautifully over any table. The pineapple stitch pattern creates a wonderful dimensional texture that looks incredibly intricate but is built from simple repeats once you understand the construction.
The runner is worked in one piece from the centre outwards, beginning with a small oval foundation ring. The pineapple motifs are created using the classic “pineapple stitch” technique — clusters of double crochet separated by chain spaces that gradually decrease to form the distinctive pineapple shape. The pattern is rated Advanced because of the pineapple shaping and the importance of precise stitch counts, but intermediate crocheters looking for a challenge will find it very achievable.
Materials
- Yarn: Cotton thread size 10 (or fingering-weight cotton) in two colours — Colour A: hot pink (approx. 400 m), Colour B: cream (approx. 300 m).
- Hook: 3.0 mm (US C/2 or D/3) — or size needed to match gauge.
- Notions: tapestry needle for weaving ends, scissors, stitch markers (to mark centre and ends), blocking mats and rustproof pins (essential for this project), row counter (optional but helpful).
Abbreviations
chchainscsingle crochethdchalf double crochetdcdouble crochettrtreble crochetsl stslip stitchspspacest(s)stitch(es)skskipshell5 dc in same st or spV-st(dc, ch 2, dc) in same st or spcluster3 dc worked together in same sp (keep last loop of each dc on hook, yo and pull through all 4 loops at once)picotch 3, sl st in first chreprepeatRSright sideInstructions
Centre Oval — cream (make 1)
- Round 1: With cream, ch 12, sl st to first ch to form ring. Ch 3 (counts as dc), work 23 dc into ring, join with sl st to top of ch-3. (24 dc)
- Round 2: Ch 4 (counts as dc + ch-1), *dc in next dc, ch 1; rep from * around, join with sl st to 3rd ch of ch-4. (24 dc, 24 ch-1 sps)
- Round 3: Sl st into first ch-1 sp, ch 3 (counts as dc), 2 dc in same sp, *3 dc in next ch-1 sp; rep from * around, join with sl st to top of ch-3. (72 dc)
- Round 4: Ch 5 (counts as dc + ch-2), *sk 2 dc, dc in next dc, ch 2; rep from * around, join with sl st to 3rd ch of ch-5. (24 dc, 24 ch-2 sps)
- Round 5: Sl st into first ch-2 sp, ch 3 (counts as dc), 4 dc in same sp (first shell made), *shell in next ch-2 sp; rep from * around, join with sl st to top of ch-3. (24 shells)
Pineapple Motifs — pink and cream (worked around centre oval)
- Round 6 (pink — first pineapple round): Join pink in any shell. Ch 3 (counts as dc), dc in same st, *ch 3, sk 1 shell, V-st in next shell; rep from * around, ending with ch 3, join with sl st to top of ch-3. (12 V-sts, 12 ch-3 sps)
- Round 7 (pink): Sl st into ch-2 sp of first V-st, ch 3 (counts as dc), dc in same sp, *ch 4, V-st in ch-2 sp of next V-st; rep from * around, ending with ch 4, join with sl st to top of ch-3. (12 V-sts, 12 ch-4 sps)
- Round 8 (cream — pineapple body): Join cream in any ch-4 sp. Ch 3 (counts as dc), 4 dc in same sp (first shell made), *ch 2, shell in next ch-4 sp; rep from * around, ending with ch 2, join with sl st to top of ch-3. (12 shells, 12 ch-2 sps)
- Round 9 (cream): Sl st into first shell, ch 3 (counts as dc), dc in same st, *ch 3, V-st in ch-2 sp between shells; rep from * around, ending with ch 3, join with sl st to top of ch-3. (12 V-sts, 12 ch-3 sps)
- Round 10 (cream): Sl st into ch-2 sp of first V-st, ch 3 (counts as dc), dc in same sp, *ch 4, V-st in ch-2 sp of next V-st; rep from * around, ending with ch 4, join with sl st to top of ch-3. (12 V-sts, 12 ch-4 sps)
- Round 11 (pink — pineapple tips): Join pink in any ch-4 sp. Ch 1, sc in same sp, *ch 5, sk next V-st, sc in next ch-4 sp; rep from * around, ending with ch 5, join with sl st to first sc. (12 sc, 12 ch-5 sps)
- Round 12 (pink): Sl st into first ch-5 sp, ch 3 (counts as dc), 4 dc in same sp (first shell made), *shell in next ch-5 sp; rep from * around, join with sl st to top of ch-3. (12 shells)
Side Panels and Shaping — cream (make 2, one for each side)
- Row 1 (cream): Join cream in any shell on one side of the oval. Ch 3 (counts as dc), dc in same st, *ch 3, sk 1 shell, V-st in next shell; rep from * across to last shell, 2 dc in last shell. Turn. (6 V-sts, 7 shells)
- Row 2 (cream): Ch 4 (counts as dc + ch-1), *dc in next dc, ch 1; rep from * across, ending with dc in top of ch-3. Turn. (13 dc, 12 ch-1 sps)
- Row 3 (cream): Sl st into first ch-1 sp, ch 3 (counts as dc), 2 dc in same sp, *3 dc in next ch-1 sp; rep from * across. Turn. (39 dc)
- Row 4 (cream): Ch 5 (counts as dc + ch-2), *sk 2 dc, dc in next dc, ch 2; rep from * across. Turn. (13 dc, 12 ch-2 sps)
- Row 5 (cream): Sl st into first ch-2 sp, ch 3 (counts as dc), 4 dc in same sp (first shell made), *shell in next ch-2 sp; rep from * across. Turn. (13 shells)
End Panels — pink (make 2, one for each end)
- Row 1 (pink): Join pink in centre shell on one end of the oval. Ch 3 (counts as dc), dc in same st, *ch 3, sk 1 shell, V-st in next shell; rep from * across to last shell, 2 dc in last shell. Turn. (6 V-sts, 7 shells)
- Row 2 (pink): Ch 4 (counts as dc + ch-1), *dc in next dc, ch 1; rep from * across, ending with dc in top of ch-3. Turn. (13 dc, 12 ch-1 sps)
- Row 3 (pink): Sl st into first ch-1 sp, ch 3 (counts as dc), 2 dc in same sp, *3 dc in next ch-1 sp; rep from * across. Turn. (39 dc)
- Row 4 (pink): Ch 5 (counts as dc + ch-2), *sk 2 dc, dc in next dc, ch 2; rep from * across. Turn. (13 dc, 12 ch-2 sps)
- Row 5 (pink): Sl st into first ch-2 sp, ch 3 (counts as dc), 4 dc in same sp (first shell made), *shell in next ch-2 sp; rep from * across. Turn. (13 shells)
Border — pink (worked around entire runner)
- Round 1 (pink): Join pink in any shell on the outer edge. Ch 1, sc in same st, *ch 3, sk 1 shell, sc in next shell; rep from * around entire runner, working (sc, ch 3, sc) in each corner, join with sl st to first sc. (approx. 60 sc, 60 ch-3 sps)
- Round 2 (pink): Sl st into first ch-3 sp, ch 3 (counts as dc), 4 dc in same sp (first shell made), *shell in next ch-3 sp; rep from * around, join with sl st to top of ch-3. (60 shells)
- Round 3 (pink): Sl st into next 2 dc of shell, ch 1, sc in same dc, *ch 5, sk next shell, sc in centre dc of next shell; rep from * around, join with sl st to first sc. Fasten off. (approx. 30 sc, 30 ch-5 sps)
Finishing
- Weave in all ends on the WS using a tapestry needle.
- Wet-block or steam-block the runner on blocking mats, pinning the scalloped border open and shaping the oval. Allow to dry completely before moving.
- Optional: add a light spray of fabric starch for extra crispness.
Tips for Success
- Count the ch-3 and ch-4 spaces in every round — losing or adding a space is the most common error and throws off the pineapple shape.
- Keep your shell stitches loose; tight shells make the pineapple motifs curl inward and the runner harder to block flat.
- Use stitch markers to mark the centre and ends of the oval — this helps you keep track of where to start and end each panel.
- Block the centre oval before starting the side panels — this gives you a firm foundation to work around.
- Weave ends in as you finish each section, not at the end. This runner has many colour changes, and weaving in as you go saves a lot of time.
- When working the border, keep the ch-3 loops loose; tight loops make the scalloped edge curl.
- Use a row counter to keep track of the pineapple rounds — it’s easy to lose count with so many similar rounds.
Common Mistakes to Avoid
- Pineapple motifs that twist or lean — usually caused by inconsistent ch-3 or ch-4 tension. Keep chain loops loose and consider going up 0.5 mm hook size for the pineapple rounds only.
- Runner that ruffles at the border — too many stitches in the border rounds. Count your sc around each side; each side should have the same number.
- Curled scalloped edges — shells worked too tightly or too few chains in the ch-5 loops of Round 3. Loosen up and check you have a loop in every space.
- Uneven side panels — not working the same number of rows on each side. Count your rows carefully and use stitch markers to keep track.
- Running out of yarn mid-project — dye lots vary. Buy all your yarn at once and alternate skeins every few sections to blend any slight colour differences.
- Skipping the final block — the runner looks lumpy after joining even if every section was blocked. One final wet-block transforms it.
Ways to Customize This Pattern
- Size it your way: the runner can be made longer or shorter by adding or removing rows in the side panels. Each row adds about 2 cm to the length.
- Colour play: swap the hot pink for soft pastels for a spring version, or use rich jewel tones for a luxurious winter runner.
- Seasonal version: use red and green for a Christmas runner, or orange and black for a Halloween version.
- Heavier fabric: use DK-weight yarn and a 4.0 mm hook for a thicker, more substantial runner — motifs will be larger, so recalculate your stitch counts.
- Placemats: make smaller versions of the runner for matching placemats — simply work fewer rows in the side panels.
Frequently asked questions
Most crocheters can complete this runner in 3–5 days of steady work. The pineapple motifs are time-consuming but very satisfying once you get into the rhythm. Experienced makers may finish in 2–3 days; there’s no rush — this is a project to enjoy.
This pattern is rated Advanced because of the pineapple shaping and the importance of precise stitch counts. However, intermediate crocheters who are comfortable with shells, V-stitches, and colour changes will find it very achievable. If you’re a beginner, we recommend practising the pineapple stitch on a small swatch first.
How much yarn do I need for a different size?
The runner uses roughly 400 m pink and 300 m cream of size 10 cotton thread. For a longer runner, add about 50 m per 10 cm of length. For a shorter runner, subtract about 50 m per 10 cm. Always add 10% extra for the border and swatching.
Yes, blocking is essential for this project. The pineapple motifs and scalloped border need to be blocked to open up and show their full beauty. Without blocking, the runner will look lumpy and the pineapples won’t be clearly defined.
What’s the best way to weave in ends with so many colour changes?
Weave in ends as you go, using a tapestry needle to thread the ends through the back of the stitches. For colour changes, weave the old colour end in one direction and the new colour end in the opposite direction to secure them.
You can, but cotton thread or fingering-weight cotton gives the best definition for the pineapple stitches and drapes beautifully for a table runner. Acrylic is softer and cheaper but tends to stretch and lose its shape over time. If you do use acrylic, choose a premium anti-pilling fingering-weight and block firmly.
Yes — finished items made from this pattern may be sold, with credit given to the pattern source (patterns.noobcooks.com). The written pattern itself may not be resold, redistributed, or republished in any form.
The finished Hot Pink Pineapple Oval Table Runner — Free Crochet Pattern

