Heirloom Lace Square Bedspread — Free Crochet Pattern
Advanced
For experienced crocheters who enjoy complex shaping, fine detail, and ambitious construction
Multi-Day Project
A rewarding 12+ hour journey — perfect for dedicated crafters who love detailed work.
Handmade Gift
A beautiful keepsake — free forever. Read online or print at home.
About This Heirloom Lace Square Bedspread — Free Crochet Pattern
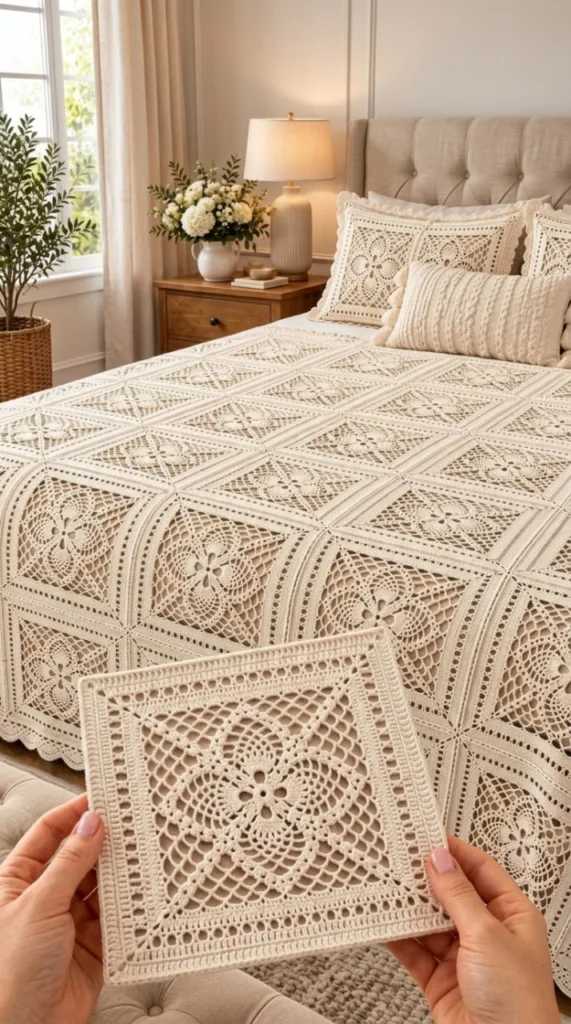
This heirloom lace square bedspread free crochet pattern recreates the timeless, elegant blanket in the photo: dozens of delicate square motifs in warm ecru, each one featuring an intricate pineapple centre surrounded by openwork mesh and a scalloped edge, all joined into a geometric lattice that drapes gracefully over a queen-size bed. What makes this piece special is the classic pineapple motif — the symbol of hospitality — worked in fine cotton thread to create a lightweight yet substantial fabric that feels both luxurious and practical. The single-colour ecru palette emphasizes the sculptural texture and shadow play of the lace, while the square shape of each motif creates a crisp, orderly grid that contrasts with the organic pineapple centres. Despite its heirloom appearance, each motif is built from the same repeatable rounds, making the work rhythmic and deeply satisfying once you master the pineapple shaping.
The bedspread is constructed entirely from identical square motifs worked in rounds from the centre out, then blocked and joined in a straight grid layout that emphasizes the geometric precision of the squares. The skill level is advanced: the stitches are straightforward (double crochet, single crochet, chains and clusters), but the pineapple centre demands careful attention to increase placement, the mesh rounds require consistent tension, and the final look depends on blocking every motif to open the lace fully. If you have made doilies, tablecloths, or fine lace garments and are ready for a project that combines sculptural texture with geometric precision, this bedspread will become a treasured family heirloom.
Materials
- Warm ecru fingering cotton or cotton-acrylic, approx 2.5 kg (about 25 x 100 g balls, roughly 6,000 m) — used for all motifs and joining
- 4.0 mm (US G/6) crochet hook
- Tapestry needle for joining and weaving ends
- Scissors
- Blocking mats and plenty of rust-proof T-pins — with fine lace motifs this size, blocking is not optional
- Stitch markers for marking the start of rounds and holding motifs together
Abbreviations
chchainscsingle crochethdchalf double crochetdcdouble crochettrtreble crochetsl stslip stitchskskipsp(s)space(s)st(s)stitch(es)reprepeatMRmagic ringcluster3 dc closed together (work 3 dc leaving last loop of each on hook, yo, pull through all 4 loops)picotch 3, sl st into first chshell5 dc in same st or spInstructions
Before you begin: Work one complete square motif and block it. It should measure roughly 19 cm along each side. If it is smaller, go up to a 4.5 mm hook; if it is larger, drop to a 3.5 mm hook. The blanket is laid out in a straight grid of motifs — approximately 12 motifs across and 12 rows deep, about 140 motifs in total for a queen-size bedspread with a generous drape. Your exact motif count will follow your gauge and your preferred overhang, so confirm the plan with your test motif before buying yarn.
Pineapple square motif — ecru (make approx 140)
- Round 1 (centre ring): Make a MR. Ch 3 (counts as dc here and throughout), 15 dc in ring, sl st into top of beg ch-3, pull the ring tight. (16 dc)
- Round 2 (first pineapple round): Ch 3, dc in same st, 1 dc in each of next 3 sts, *2 dc in next st, 1 dc in each of next 3 sts; rep from * around, sl st into top of beg ch-3. (20 dc)
- Round 3: Ch 3, dc in same st, 1 dc in each of next 4 sts, *2 dc in next st, 1 dc in each of next 4 sts; rep from * around, sl st into top of beg ch-3. (24 dc)
- Round 4: Ch 3, dc in same st, 1 dc in each of next 5 sts, *2 dc in next st, 1 dc in each of next 5 sts; rep from * around, sl st into top of beg ch-3. (28 dc)
- Round 5: Ch 3, dc in same st, 1 dc in each of next 6 sts, *2 dc in next st, 1 dc in each of next 6 sts; rep from * around, sl st into top of beg ch-3. (32 dc)
- Round 6 (openwork): Ch 4 (counts as dc, ch 1), *sk 1, dc in next st, ch 1; rep from * around, sl st into 3rd ch of beg ch-4. (16 dc, 16 ch-1 sps)
- Round 7 (first shell round): Sl st into first ch-1 sp, ch 3, 2 dc in same sp, ch 2, 3 dc in next ch-1 sp, ch 2; rep from * around, sl st into top of beg ch-3. (48 dc, 16 ch-2 sps)
- Round 8 (openwork): Sl st into next 2 dc and into first ch-2 sp, ch 4 (counts as dc, ch 1), *sk 1, dc in next st, ch 1; rep from * around, sl st into 3rd ch of beg ch-4. (24 dc, 24 ch-1 sps)
- Round 9 (shell round): Sl st into first ch-1 sp, ch 3, 2 dc in same sp, ch 2, 3 dc in next ch-1 sp, ch 2; rep from * around, sl st into top of beg ch-3. (72 dc, 24 ch-2 sps)
- Round 10 (openwork): Sl st into next 2 dc and into first ch-2 sp, ch 4 (counts as dc, ch 1), *sk 1, dc in next st, ch 1; rep from * around, sl st into 3rd ch of beg ch-4. (36 dc, 36 ch-1 sps)
- Round 11 (shell round): Sl st into first ch-1 sp, ch 3, 2 dc in same sp, ch 2, 3 dc in next ch-1 sp, ch 2; rep from * around, sl st into top of beg ch-3. (108 dc, 36 ch-2 sps)
- Round 12 (square corners): Sl st into next 2 dc and into first ch-2 sp, ch 3, 2 dc in same sp, ch 2, 3 dc in same sp (first corner made), *3 dc in each of next 8 sps, (3 dc, ch 2, 3 dc) in next sp; rep from * 2 more times, 3 dc in each of last 8 sps, sl st into top of beg ch-3. (132 dc, 4 corner ch-2 sps)
- Round 13 (openwork sides): Sl st into next 2 dc and into first corner sp, ch 4 (counts as dc, ch 1), *sk 1, dc in next st, ch 1; rep from * across to next corner, (dc, ch 2, dc) in corner sp; rep from * around, sl st into 3rd ch of beg ch-4. (approx 44 dc, 44 ch-1 sps, 4 corner ch-2 sps)
- Round 14 (final shell round): Sl st into first ch-1 sp, ch 3, 2 dc in same sp, ch 2, 3 dc in next ch-1 sp, ch 2; rep from * around, working (3 dc, ch 2, 3 dc) in each corner sp, sl st into top of beg ch-3. (approx 132 dc, 44 ch-2 sps)
- Round 15 (picot edge): Sl st into next 2 dc and into first ch-2 sp, ch 1, sc in same sp, *ch 3, sc in next ch-2 sp, picot, ch 3, sc in same sp; rep from * around, working (sc, ch 3, sc) in each corner sp, sl st into first sc. Fasten off, leaving a 20 cm tail for joining. (approx 88 sc, 44 picots)
Block every motif aggressively to 19 cm square, pinning each corner point open and the picot edge flat. The openwork rounds relax enormously with blocking — an unblocked motif is typically 4-5 cm too small and looks nothing like the photo.
Joining the motifs
- Lay the blocked motifs on a large flat surface in a straight grid: rows and columns aligned, all motifs oriented the same way. Aim for about 12 motifs per row and 12 rows; adjust to your bed and your gauge.
- Whip stitch the motifs together with the ecru yarn tail through the back loops of the edge stitches, seam by seam. The picot edges should just touch; do not overlap them. Lace-to-lace seams should sit nearly invisible; keep the tension relaxed so the blanket keeps its drape.
- Alternatively, join as you go: on the final round of each motif, work the picot edge as normal but slip-stitch into the matching picot edge of the neighbouring motif every few stitches. This halves the finishing time — but practise the rhythm on a pair of spare motifs first.
- When the blanket is fully joined, weave in every tail on the wrong side, running each through at least 5-6 stitches in different directions before trimming.
Finishing
- Evening border round (ecru): Join ecru yarn at any outer point. Work a round of sc evenly around the entire blanket, working 2 sc into the valleys and (sc, ch 3 picot, sc) into each outer picot point, so the scalloped edge becomes a continuous lace trim.
- Final wet-block: Wet-block the finished bedspread flat on towels or mats, opening every pineapple centre and every picot. Fine cotton lace takes one to two days to dry fully. Once dry, the seams disappear and the pineapples pop in dimensional relief, exactly as in the photo.
Tips for Success
- Count the pineapple increases carefully. The solid centre must grow by 4 stitches per round (16, 20, 24, 28, 32). If your count is off, the pineapple will be lopsided — the mistake is always a missed or extra increase.
- Keep the chain spaces loose. Tight chains make the pineapple pucker and the motif cup. If your chains are hard to work into, go up a hook size or consciously relax your tension.
- Block motifs in batches, not all at the end. Pinning and drying 140 motifs in one weekend is misery; pinning ten while the next ten dry is painless.
- Weave the centre tail in immediately after Round 1 — in a magic ring worked with 16 stitches it tends to loosen later if left hanging.
- Buy all your yarn in a single dye lot. At 25-plus balls, a lot mismatch will show as subtle striping across the blanket. Check the lot numbers before you leave the shop.
- Safety-pin your layout rows. A locking marker on the first motif of each row stops the grid from drifting out of alignment as you seam.
- Photograph your layout before seaming. A quick phone photo of the grid lets you check the alignment from a distance — it is much easier to spot a wrongly placed motif on a screen than standing over it.
Common Mistakes to Avoid
- Skipping the test motif — it happens when the maker trusts the hook size on the ball band. Fine lace gauges vary wildly between hands; a 1 cm difference per motif becomes 12 cm across the bed. Make one, block it, measure it.
- Inconsistent chain space sizes — alternating accidentally between ch 4 and ch 5 makes some pineapple scales tall and others squat. Every space in a round is the same size, no exceptions.
- Working into the wrong space — the 3-dc groups go into the spaces between chains, not into the chains themselves. Working into the chain makes a tight, dense fabric instead of open lace.
- Joining unblocked motifs — they differ by several centimetres and the seams will pucker no matter how carefully you sew. Block first, always.
- Over-tight seams — pulled-tight whip stitches turn the openwork into a stiff net. The seam should feel like a row of crochet, not a drawstring.
- Losing track of the square corners — each corner needs (3 dc, ch 2, 3 dc) to keep the square flat. Missing one makes the corner curl up like a bowl.
Ways to Customize This Heirloom Lace Square Bedspread Crochet Pattern
- Size it down: a 6 x 7 motif layout (42 squares) makes a beautiful sofa or pram throw of roughly 115 x 135 cm, and a single motif makes a stunning doily or trivet.
- Add a touch of colour: work the centre rounds (Rounds 1-5) in a soft pastel — blush, sage, or powder blue — for a subtle tinted pineapple effect, keeping the outer rounds in ecru.
- Go bolder: make the entire bedspread in a deep, rich colour like burgundy, navy, or forest green for a dramatic, moody look that still shows the lace texture.
- Worsted weight version: with a 5.0 mm hook and DK cotton, each motif finishes around 24-26 cm; a 9 x 10 layout covers a queen bed with only 90 motifs, at the cost of a heavier blanket.
- Create matching pillows: work four motifs and join them into a larger square for a coordinating cushion cover that completes the heirloom look.
Frequently asked questions
For a queen-size bedspread with a drape like the photo, plan on roughly 140 motifs at the written gauge (19 cm each) — about 12 across and 12 rows in the straight grid. The honest way to know is to join your first six motifs and measure the little patch; grid maths is far kinder when measured than when calculated. For a throw, 42 to 49 motifs are plenty.
Most advanced makers spend about 80 to 100 minutes per motif once in a rhythm, plus blocking and joining, bringing the total to roughly 180 to 220 hours spread over 12 to 16 weeks. Crocheting one or two motifs an evening and seaming once a week makes steady, pleasant progress without burnout.
Can an intermediate crocheter make this?
Yes, if you have made doilies or fine lace and are comfortable with dimensional shaping. The only truly new technique is the pineapple centre, and it appears in exactly five rounds. The openwork rounds teach you to read spaces instead of stitches, which is a genuinely valuable skill. Make two or three practice motifs before counting any of them toward the blanket.
Cupping means the pineapple increases are too tight — go up a hook size or consciously loosen the stitches. Ruffling means too many increases per round; recount that each round gains exactly 4 stitches. And if the fabric looks right but slightly wavy, it simply needs blocking — wet cotton lace transforms.
Yes — on Round 15, slip-stitch into the matching picot edge of the neighbouring motif every few stitches instead of working free picots. It is faster and the seam is flatter, but the rhythm takes a couple of practice motifs to learn, and you must plan the layout before you start. Traditional whip stitching afterwards gives you more freedom to rearrange.
Fine cotton or cotton-acrylic versions machine wash cold on a gentle cycle; dry flat. Because of the dimensional pineapples, reshape the scales with your fingers while damp and let it dry flat so the centres keep their shape. A quick steam with an iron held above the fabric refreshes the lace between washes. Store it flat or rolled, never folded sharply, to keep the pineapples crisp.
Can I sell finished items made from this pattern?
Yes — finished items may be sold, with credit given to the pattern source. The written pattern itself may not be resold, republished or redistributed, in full or in part, in any form.
The finished Heirloom Lace Square Bedspread — Free Crochet Pattern

