Grey Floral Petal Square Bedspread — Free Crochet Pattern
Intermediate
For crocheters comfortable with the basics, ready to try new shaping and assembly techniques
Weekend Project
A satisfying weekend make — start Friday, finish Sunday, enjoy forever.
Handmade Gift
A beautiful keepsake — free forever. Read online or print at home.
About This Grey Floral Petal Square Bedspread — Free Crochet Pattern
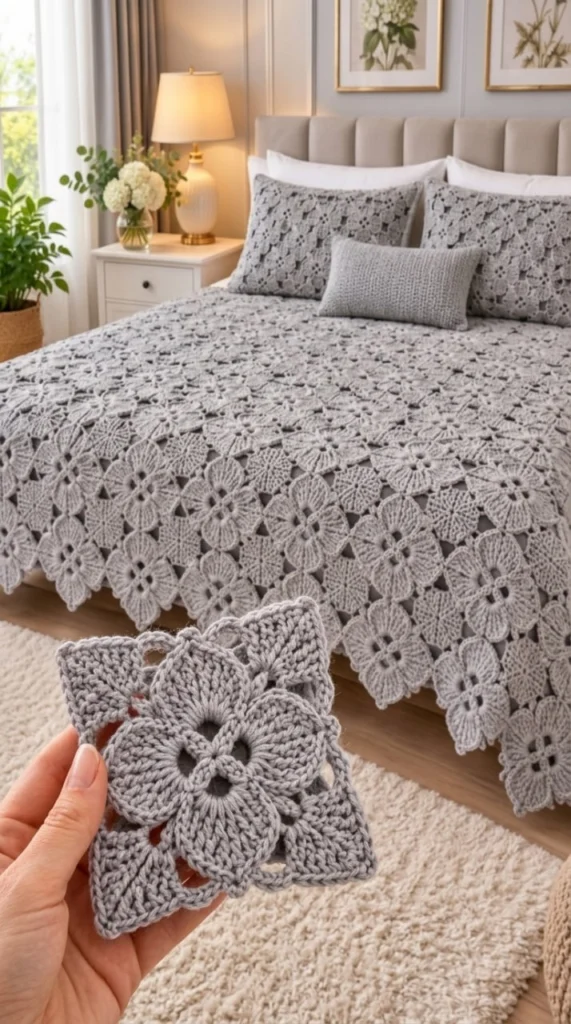
The Grey Floral Petal Square Bedspread free crochet pattern brings sophisticated modern vintage charm, tactile relief texture, and serene monochrome elegance directly to your bedroom[cite: 5]. Crafted in a refined soft silver-grey yarn, each square motif features a central dimensional four-petal flower core with raised front-post petal veins, surrounded by an openwork corner frame and solid outer borders[cite: 5]. Joined into a seamless repeating grid alongside matching decorative shams and a textured accent pillow, this heirloom-quality bedspread turns any bed into a peaceful, handcrafted sanctuary[cite: 5].
This project is constructed by crocheting individual square motifs in two distinct stages: first forming the 3D central four-petal blossom core, then squaring out the block with openwork lace corner arches and a solid double crochet outer border[cite: 5]. The completed motifs are seamed together along their back loops to maintain an invisible seam grid, then finished with a continuous scalloped outer border[cite: 5]. It is designed for an intermediate crocheter who enjoys working post stitches, shaped petal curves, corner square expansions, and joining geometric blanket blocks[cite: 5].
Materials
- Yarn: Worsted weight (Category 4) 100% acrylic or cotton-acrylic blend yarn in Soft Silver-Grey[cite: 5].
- Main Color (Soft Grey): ~3,800 meters (~4,150 yards) for the complete queen bedspread, matching pillow shams, and small lumbar accent cover[cite: 5].
- Crochet Hook: 5.0 mm (US H/8) ergonomic or aluminum crochet hook, or size required to obtain recommended gauge and smooth drape[cite: 5].
- Notions: Tapestry needle for seaming and weaving in ends, locking stitch markers, sharp yarn scissors, measuring tape[cite: 5].
- Blocking Tools: Blocking foam mats, stainless steel rust-proof T-pins, and steam iron or spray bottle[cite: 5].
Abbreviations
chchain[cite: 5]sl stslip stitch[cite: 5]scsingle crochet[cite: 5]hdchalf double crochet[cite: 5]dcdouble crochet[cite: 5]trtreble crochet[cite: 5]dtrdouble treble crochet[cite: 5]incincrease (work 2 stitches in same stitch)[cite: 5]st(s)stitch(es)[cite: 5]sp(s)space(s)[cite: 5]ch-spchain space[cite: 5]FPdcfront post double crochet[cite: 5]FPtrfront post treble crochet[cite: 5]BLOback loop only[cite: 5]FLOfront loop only[cite: 5]picotch 3, sl st in 3rd ch from hook[cite: 5]Instructions
Main Floral Square Motif — Soft Grey (make ~80 motifs for Queen size)
Each square motif begins with an open center ring, building out 4 dimensional petals with raised post-stitch ridges before squaring out into an openwork lattice frame and solid border[cite: 5].
Part 1: 3D Four-Petal Floral Core
- Round 1 (Center Core Ring): With Soft Grey yarn, make a magic ring (or ch 6, sl st to join)[cite: 5]. Ch 1, work 8 sc into the ring[cite: 5]. Join with sl st to first sc[cite: 5]. Pull ring tail tight[cite: 5]. [8 sc]
- Round 2: Ch 3 (counts as dc), dc in same st, work 2 dc in each st around[cite: 5]. Join with sl st to top of starting ch-3[cite: 5]. [16 dc]
- Round 3 (Establishing 4 Petal Base Loops): *Ch 5, skip 3 sts, sc in next st; repeat from * 3 more times around[cite: 5]. Join with sl st to base of starting ch-5[cite: 5]. [4 ch-5 loops]
- Round 4 (Petal Surface Expansion): In each ch-5 loop work [1 sc, 1 hdc, 2 dc, 3 tr, 2 dc, 1 hdc, 1 sc][cite: 5]. Join with sl st to first sc[cite: 5]. [4 large petals]
- Round 5 (Raised Petal Vein Texture): *Sc in first sc, hdc in next hdc, FPdc around next 2 dc, FPtr around next 3 tr, FPdc around next 2 dc, hdc in next hdc, sc in next sc, sl st in valley between petals; repeat from * 3 more times around to give all 4 petals raised surface definition[cite: 5]. Join with sl st[cite: 5]. [4 textured petals]
Part 2: Squaring Out & Openwork Lattice Frame
- Round 6 (Rear Frame Foundation): Working behind Round 5 petals, attach yarn around the back post of the Round 2 center stitches[cite: 5]. *Work [3 tr, ch 3, 3 tr] in back of corner petal tip, ch 3, sc in valley between petals, ch 3; repeat from * 3 more times to square out the motif[cite: 5]. Join with sl st to top of first tr[cite: 5]. [4 corner ch-3 sps, 8 side ch-3 sps]
- Round 7 (Openwork Corner Lattice): Sl st into first corner sp[cite: 5]. *Work [3 dc, ch 2, 3 dc] in corner ch-3 sp, ch 1, 3 dc in next ch-sp, ch 1, 3 dc in next ch-sp, ch 1; repeat from * 3 more times around all 4 sides[cite: 5]. Join with sl st to top of starting ch-3[cite: 5]. [16 dc clusters, 12 ch-1 sps]
- Round 8 (Solid Outer Frame): Ch 3 (counts as dc), work 1 dc in each st and 1 dc in each ch-1 sp across all sides, working [2 dc, ch 2, 2 dc] into each corner ch-sp[cite: 5]. Join with sl st to top of starting ch-3[cite: 5]. [72 dc]
- Round 9 (Frame Extension Row): Ch 3, work 1 dc in each st around, working [2 dc, ch 2, 2 dc] into each corner ch-sp[cite: 5]. Join with sl st, fasten off, and weave in all loose ends[cite: 5]. [Square motif size = ~20 x 20 cm]
Bedspread Assembly
- Arrangement: Lay out all 80 completed floral square motifs on a flat surface in an 8 x 10 grid, ensuring clean orientation of the central four-petal flowers across the mattress top[cite: 5].
- Invisible Seaming: Place adjacent squares right sides together[cite: 5]. Using Soft Grey yarn and a tapestry needle, whipstitch through the back loops only (BLO) of matching edge stitches along touching sides[cite: 5]. This creates a completely flat, flexible seam grid across the entire blanket face[cite: 5].
Continuous Outer Scalloped Bedspread Border
- Round 1 (Base Anchor Row): Attach Soft Grey yarn in any outer corner of the assembled bedspread[cite: 5]. Ch 1, work single crochets evenly around all 4 outer edges, placing 3 sc into outer corner points and 1 sc dec in inner seams where motifs meet[cite: 5]. Join with sl st[cite: 5].
- Round 2 (Open Mesh Band): Ch 4 (counts as dc + ch 1), *skip 1 st, dc in next st, ch 1; repeat around entire outer perimeter, working [2 dc, ch 2, 2 dc] into outer corners[cite: 5]. Join with sl st[cite: 5].
- Round 3 (Scalloped Shell Border): *In corner ch-sp work [4 dc, picot, 4 dc], sc in next ch-sp, *skip 2 sts, work [3 dc, picot, 3 dc] in next ch-sp, sc in next ch-sp; repeat from * continuously around all 4 sides of the bedspread to form the draped scalloped edging[cite: 5]. Join with sl st, fasten off, and weave in all remaining ends[cite: 5].
Matching Decorative Pillow Shams & Lumbar Pillow (make 2 shams + 1 lumbar)
Square Pillow Shams (45 x 45 cm) — make 2
- Front Panel Assembly: Join 4 main Grey Floral Square Motifs in a 2×2 square tile using Soft Grey yarn[cite: 5].
- Work 2 additional rounds of double crochet framing around the 2×2 block to square off the panel to 45 x 45 cm[cite: 5].
- Back Panel: With Soft Grey yarn, ch 57[cite: 5].
- Row 1: Dc in 4th ch from hook and in each ch across[cite: 5]. Turn[cite: 5]. [55 dc]
- Rows 2–32: Ch 3 (counts as dc), 1 dc in each st across[cite: 5]. Turn[cite: 5]. Fasten off after Row 32 [55 dc per row; ~45 x 45 cm square][cite: 5].
- Sham Assembly: Place front and back panels wrong sides together[cite: 5]. Single crochet around 3 sides using Soft Grey yarn, insert a 45 x 45 cm pillow form, and sc across the 4th side to seal[cite: 5]. Finish with a picot scallop border around the outer sham edge[cite: 5].
Ribbed Lumbar Accent Pillow Cover (30 x 50 cm) — make 1
- Row 1: With Soft Grey yarn, ch 62[cite: 5]. Hdc in 3rd ch from hook and in each ch across[cite: 5]. Turn[cite: 5]. [60 hdc]
- Rows 2–36 (Ribbed Stitch Pattern): Ch 2 (counts as hdc), hdc in BLO of each st across[cite: 5]. Turn[cite: 5]. Fasten off after Row 36[cite: 5].
- Assembly: Fold panel over a 30 x 50 cm lumbar pillow form, seam short sides together using sl st, and weave in ends[cite: 5].
Finishing
- Weaving Ends: Thread all loose yarn tails onto a tapestry needle and weave securely through dense stitch clusters on the wrong side of each motif[cite: 5].
- Steam Blocking: Pin the complete bedspread to full Queen dimensions (~220 x 240 cm) on blocking mats[cite: 5]. Steam thoroughly with a steam iron held 5 cm away from the surface (never touch iron directly to yarn) to open up the flower petals, smooth out seams, and set the outer scalloped edging[cite: 5].
Tips for Success
- Maintain Uniform Petal Tension: Ensure treble stitches in the central flower are pulled to a consistent height so that all 80 flower cores lay completely flat before framing[cite: 5].
- Steam Block Individual Squares: Steam-blocking each square motif to ~20 x 20 cm before seaming makes row-by-row assembly significantly faster and prevents puckering along grid lines[cite: 5].
- Weave In Center Tails Early: Fasten off and weave in magic ring tails securely on all 80 motifs during initial construction to avoid a tedious finishing workload later[cite: 5].
- Keep Assembly Stitches Relaxed: Avoid pulling assembly threads too tightly so that the bedspread retains a soft, fluid drape over the mattress corners[cite: 5].
- Choose a High-Definition Yarn: Smooth acrylic or cotton-acrylic yarn highlights the 3D raised post-stitch petal veins and corner openwork details clearly[cite: 5].
Common Mistakes to Avoid
- Skipping Motif Blocking — Unblocked floral squares tend to pull inward at the corners, causing puckered, uneven seams during assembly[cite: 5].
- Omitting Front-Post Stitches — Substituting plain double crochets for FPdc/FPtr in Round 5 will flatten out the distinctive 3D petal vein texture[cite: 5].
- Uneven Seaming Tension — Seaming too tightly pulls joints into rigid ridges instead of letting the blanket lie completely flat[cite: 5].
- Mixing Yarn Dye Lots — Ensure all soft grey skeins share the exact same dye lot to avoid visible color bands across the plain border sections[cite: 5].
Ways to Customize This Pattern
- Cream & Off-White Palette: Crochet the entire bedspread in cream or ivory yarn for a classic wedding gift aesthetic[cite: 5].
- Throw Blanket Dimension: Reduce motif count to 35 squares (5 x 7 grid) to create a smaller couch lapghan (~100 x 140 cm)[cite: 5].
- Single Motif Coasters & Trivets: Work individual single flower square motifs in thick cotton yarn to craft structured floral table trivets or coasters[cite: 5].
Frequently asked questions
This pattern is rated as intermediate[cite: 5]. It requires familiarity with working post stitches (FPdc, FPtr), rear chain foundation work, square framing expansions, and seaming geometric motifs together[cite: 5].
How long does it take to complete this queen-size bedspread?
A full queen bedspread (~80 main square motifs, outer scalloped border, two matching pillow shams, and lumbar pillow cover) typically takes between 4 and 6 weeks of regular crocheting (~12–15 hours per week)[cite: 5].
A worsted weight (Category 4) premium acrylic or cotton-acrylic blend is best[cite: 5]. Acrylic provides soft drape, durability, and easy machine care, while cotton blend adds crisp stitch definition for post-stitch petal veins[cite: 5].
How do I care for and wash this handmade bedspread?
Machine wash on a gentle, cool cycle inside a large laundry bag using mild liquid detergent[cite: 5]. Lay flat on clean dry towels to air dry to preserve its square geometry and picot edging[cite: 5].
Yes! Because this is a modular motif pattern, simply add or subtract rows of square motifs[cite: 5]. Each motif adds approximately 20 cm (~8 inches) to your overall bed dimensions[cite: 5].
Yes, you are permitted to sell physical finished items created using this pattern[cite: 5]. We kindly ask that you credit patterns.noobcooks.com as the original designer in your listings[cite: 5]. Reselling, copying, or redistributing the written pattern text or images is strictly prohibited[cite: 5].
The finished Grey Floral Petal Square Bedspread — Free Crochet Pattern

