Flower Garden Granny Square Bedspread — Free Crochet Pattern
Intermediate
For crocheters comfortable with the basics, ready to try new shaping and assembly techniques
Weekend Project
A satisfying weekend make — start Friday, finish Sunday, enjoy forever.
Handmade Gift
A beautiful keepsake — free forever. Read online or print at home.
About This Flower Garden Granny Square Bedspread — Free Crochet Pattern
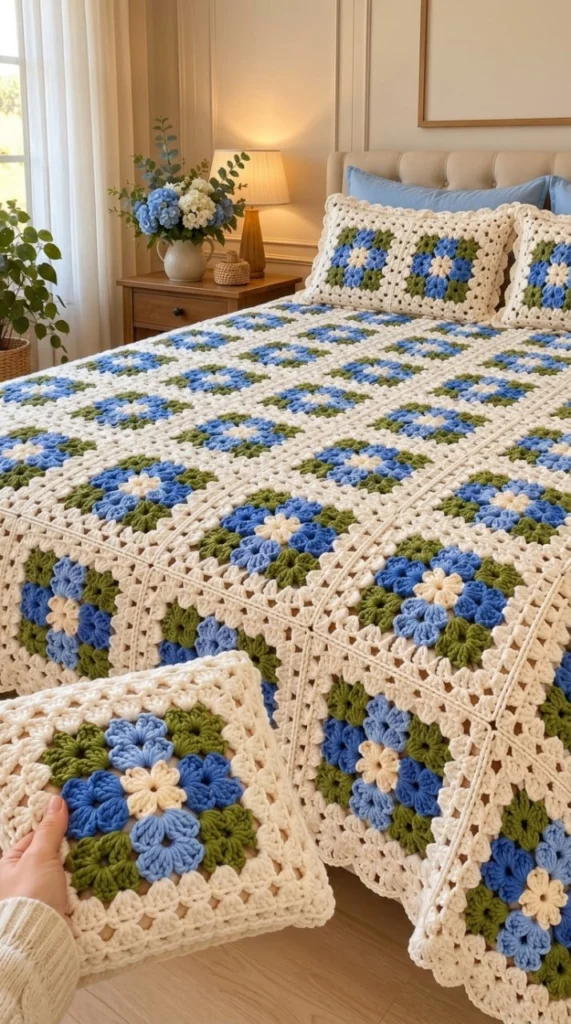
This free crochet pattern shows you how to make a charming flower garden granny square bedspread in soft cream, sage green, and two beautiful shades of blue. Each square features a dimensional flower centre with layered petals in alternating colours, surrounded by a classic granny square border in cream. The finished bedspread looks like a blooming garden of flowers scattered across your bed, with the matching pillow shams completing the cozy, cottage-core look.
The bedspread is constructed from identical flower granny squares that are worked in the round, starting with a flower centre and finishing with a solid granny square border. The pattern is rated Intermediate because of the dimensional flower petals and the number of motifs, but the stitches themselves are simple — mostly double crochet, clusters, and chain spaces. If you can crochet a basic granny square, you can absolutely make this delightful bedspread.
Materials
- Yarn: Worsted-weight (medium #4) acrylic or cotton-blend yarn. Colour A: cream (approx. 1200 m); Colour B: sage green (approx. 400 m); Colour C: medium blue (approx. 500 m); Colour D: light blue (approx. 300 m). For a queen-size spread of ~90 squares, each square uses roughly 13 m cream, 4 m green, 5 m blue, and 3 m light blue.
- Hook: 4.0 mm (US G/6) — or size needed to match gauge.
- Notions: tapestry needle for weaving ends, scissors, stitch markers (to mark first st of round), blocking mats and rustproof pins (essential for this project), row counter (optional but helpful).
Abbreviations
chchainscsingle crochethdchalf double crochetdcdouble crochettrtreble crochetsl stslip stitchspspacest(s)stitch(es)skskipincincrease (2 sts in same st/sp)shell5 dc in same st or spcluster3 dc worked together in same sp (keep last loop of each dc on hook, yo and pull through all 4 loops at once)picotch 3, sl st in first chreprepeatRSright sideInstructions
Flower Square Motif — cream, green, and blues (make 90 for queen size)
- Round 1 (blue flower centre): With medium blue, ch 4, sl st to first ch to form ring. Ch 3 (counts as dc), work 11 dc into ring, join with sl st to top of ch-3. (12 dc)
- Round 2 (blue flower petals): Ch 3 (counts as dc), dc in same st, *ch 2, sk 1 dc, 2 dc in next dc; rep from * around, ending with ch 2, join with sl st to top of ch-3. (6 groups of 2 dc, 6 ch-2 sps)
- Round 3 (blue flower petals — continue): Sl st into next dc and into ch-2 sp. Ch 3 (counts as dc), 2 dc in same sp, *ch 3, 3 dc in next ch-2 sp; rep from * around, ending with ch 3, join with sl st to top of ch-3. Fasten off blue. (6 groups of 3 dc, 6 ch-3 sps)
- Round 4 (light blue flower petals): Join light blue in any ch-3 sp. Ch 3 (counts as dc), 4 dc in same sp (first shell made), *ch 3, shell in next ch-3 sp; rep from * around, ending with ch 3, join with sl st to top of ch-3. Fasten off light blue. (6 shells, 6 ch-3 sps)
- Round 5 (green leaves): Join green in any ch-3 sp. Ch 1, sc in same sp, *ch 5, sc in next ch-3 sp; rep from * around, ending with ch 5, join with sl st to first sc. Fasten off green. (6 sc, 6 ch-5 sps)
- Round 6 (cream granny square — first round): Join cream in any ch-5 sp. Ch 3 (counts as dc), 2 dc in same sp, *ch 2, 3 dc in next ch-5 sp; rep from * around, ending with ch 2, join with sl st to top of ch-3. (6 groups of 3 dc, 6 ch-2 sps)
- Round 7 (cream granny square — corners): Sl st into next 2 dc and into ch-2 sp. Ch 3 (counts as dc), 2 dc in same sp, *ch 2, 3 dc in same sp (corner made), ch 2, 3 dc in next ch-2 sp; rep from * around, ending with ch 2, join with sl st to top of ch-3. (6 corners, 6 groups of 3 dc)
- Round 8 (cream granny square — continue): Sl st into next 2 dc and into ch-2 sp. Ch 3 (counts as dc), 2 dc in same sp, *ch 2, 3 dc in next ch-2 sp, ch 2, 3 dc in same sp (corner made), ch 2, 3 dc in next ch-2 sp; rep from * around, ending with ch 2, join with sl st to top of ch-3. (6 corners, 12 groups of 3 dc)
- Round 9 (cream granny square — continue): Sl st into next 2 dc and into ch-2 sp. Ch 3 (counts as dc), 2 dc in same sp, *ch 2, 3 dc in next ch-2 sp, ch 2, 3 dc in same sp (corner made), ch 2, 3 dc in next ch-2 sp, ch 2, 3 dc in next ch-2 sp; rep from * around, ending with ch 2, join with sl st to top of ch-3. (6 corners, 18 groups of 3 dc)
- Round 10 (cream granny square — final round): Sl st into next 2 dc and into ch-2 sp. Ch 3 (counts as dc), 2 dc in same sp, *ch 2, 3 dc in next ch-2 sp, ch 2, 3 dc in same sp (corner made), ch 2, 3 dc in next ch-2 sp, ch 2, 3 dc in next ch-2 sp, ch 2, 3 dc in next ch-2 sp; rep from * around, ending with ch 2, join with sl st to top of ch-3. Fasten off, leaving a 20 cm tail for joining. (6 corners, 24 groups of 3 dc)
Each finished square measures about 25 cm. Block firmly to size before joining — this opens up the flower petals and evens the granny square border.
Joining the Squares
- Lay out motifs in a 9 × 10 grid (or your preferred arrangement), alternating the direction of the flowers if desired for extra texture.
- Place two squares RS together. Whipstitch through the back loops of the sc stitches along one edge, using the long cream tails. Alternatively, use a flat slip-stitch join through both loops for a firmer seam.
- Join in strips first, then join the strips. Weave in all ends as you go — with 90 motifs this step is much easier before the full spread is assembled.
Finishing
- Once all motifs are joined, check the outer edge. If any gaps appear at the outer corners, work one round of sc around the entire bedspread in cream, working 3 sc in each outer corner.
- For a finished edge, add a final round in cream: *sc in next sc, ch 3, sk 1 sc; rep from * around, with (sc, ch 3, sc) in each corner.
- Weave in every remaining end on the WS.
- Wet-block or steam-block the finished bedspread on blocking mats, pinning the flower petals open and squaring each motif. Allow to dry completely before moving.
Tips for Success
- Count the ch-2 and ch-3 spaces in every round — losing or adding a space is the most common error and throws off the flower shape.
- Keep your shell stitches loose; tight shells make the flower petals curl inward and the squares harder to join flat.
- Use stitch markers to mark the corners — this helps you keep track of where to work the corner groups.
- Block the flower centre before starting the granny square border — this gives you a firm foundation to work around.
- Weave ends in as you finish each square, not at the end. This bedspread has many colour changes, and weaving in as you go saves a lot of time.
- When joining, keep the ch-2 loops loose; tight loops make the granny square border curl.
- Use a row counter to keep track of the granny square rounds — it’s easy to lose count with so many similar rounds.
Common Mistakes to Avoid
- Flower centres that twist or lean — usually caused by inconsistent ch-2 tension in Round 2. Keep chain loops loose and consider going up 0.5 mm hook size for the flower centre rounds only.
- Squares that ruffle at the border — too many stitches in the granny square rounds. Count your 3-dc groups around each side; each side should have the same number.
- Curled flower petals — shells worked too tightly or too few chains in the ch-3 loops of Round 4. Loosen up and check you have a loop in every space.
- Uneven joining seams — catching different loops on each square. Always join through the same loop (back loop or both loops) on every motif.
- Running out of yarn mid-project — dye lots vary. Buy all your yarn at once and alternate skeins every few squares to blend any slight colour differences.
- Skipping the final block — the spread looks lumpy after joining even if every motif was blocked. One final wet-block transforms it.
Ways to Customize This Pattern
- Size it your way: each motif is ~25 cm, so a throw of 6 × 7 motifs is about 150 × 175 cm; add a column or row for a king-size spread.
- Colour play: swap the blues for pinks, purples, or yellows for a different garden look; or use all one colour for the flowers with green leaves for a more subtle effect.
- Seasonal version: use red and green for a Christmas version, or orange and yellow for a fall version.
- Heavier fabric: use chunky yarn and a 6.0 mm hook for a super-cosy, quick-to-make bedspread — motifs will be ~35 cm, so recalculate your motif count.
- Pillow covers: make 4 extra squares, join 2 × 2 for the front, add a plain back, and you have matching cushion covers like the ones on the bed in the photo.
Frequently asked questions
Most crocheters can complete this bedspread in 4–6 weeks of steady work. The flower motifs are time-consuming but very satisfying once you get into the rhythm. Experienced makers may finish in 3–4 weeks; there’s no rush — this is a project to enjoy.
Can a beginner make this pattern?
Yes, with patience. The stitches are basic (ch, sc, dc, shells), and the square is small enough to practise on. What makes it “Intermediate” is the consistency needed across dozens of motifs and the dimensional flower petals. If you can crochet a basic granny square, you can absolutely make this as a first big project.
The bedspread uses roughly 1200 m cream, 400 m green, 500 m blue, and 300 m light blue of worsted-weight yarn. For a throw of 6 × 7 motifs (42 squares), you’ll need about 560 m cream, 190 m green, 230 m blue, and 140 m light blue. For a king-size spread of 10 × 11 motifs (110 squares), you’ll need about 1470 m cream, 490 m green, 610 m blue, and 370 m light blue. Always add 10% extra for the border and swatching.
Do I have to block every square?
Yes, blocking is essential for this project. The flower petals and granny square border need to be blocked to open up and show their full beauty. Without blocking, the bedspread will look lumpy and the flowers won’t be clearly defined.
A whipstitch through back loops gives an invisible, flat seam and is the quickest for 90 motifs. A flat slip-stitch join through both loops is sturdier and creates a pretty raised ridge on the right side — lovely if you want the joins to show as part of the design. Both work; choose one and use it consistently.
You can, but acrylic or cotton-blend yarn drapes and blocks best for a bedspread — it holds the flower shape and feels soft against the skin. Cotton is cooler for summer but tends to stretch and sag over time on a large piece like this. If you do use cotton, choose a mercerised DK and block firmly.
Yes — finished items made from this pattern may be sold, with credit given to the pattern source (patterns.noobcooks.com). The written pattern itself may not be resold, redistributed, or republished in any form.
The finished Flower Garden Granny Square Bedspread — Free Crochet Pattern

