Floral Granny Square Bedspread — Free Crochet Pattern
Intermediate
For crocheters comfortable with the basics, ready to try new shaping and assembly techniques
Weekend Project
A satisfying weekend make — start Friday, finish Sunday, enjoy forever.
Handmade Gift
A beautiful keepsake — free forever. Read online or print at home.
About This Floral Granny Square Bedspread — Free Crochet Pattern
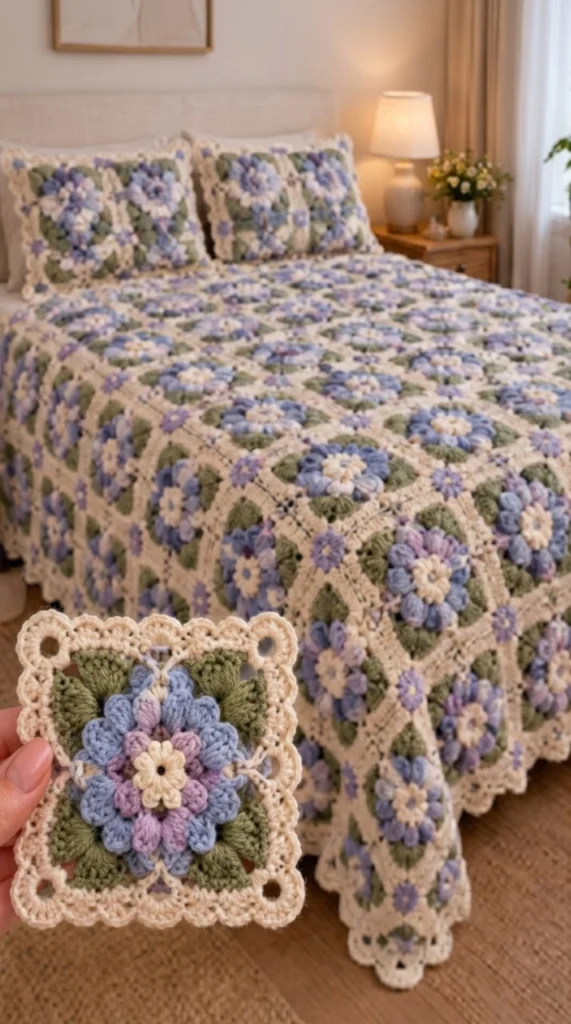
This floral granny square bedspread free crochet pattern creates the same soft, cottage-style look as the blanket in the photo, with raised flower centers, leafy corners, and a creamy border that makes every square look framed and polished. The finished fabric has a romantic handmade feel, but the repeating motif construction keeps the project organized and very satisfying to build.
Each square is worked in rounds, then joined into a large bedspread, so you can make the blanket one motif at a time without losing track of the design. This is an intermediate project because it combines puff stitches, layered color changes, and joining, but the stitches themselves are simple and easy to learn if you take the motif slowly.
Materials
- Worsted-weight cotton yarn in cream, about 1,400 g
- Worsted-weight cotton yarn in soft blue, about 500 g
- Worsted-weight cotton yarn in lavender, about 350 g
- Worsted-weight cotton yarn in lilac, about 250 g
- Worsted-weight cotton yarn in sage green, about 400 g
- Worsted-weight cotton yarn in moss green, about 300 g
- 4.0 mm crochet hook (US G/6)
- Tapestry needle for joining and weaving ends
- Sharp scissors
- Stitch markers, optional
- Blocking mats and pins
- Measuring tape
Abbreviations
chchainscsingle crochetdcdouble crochetsl stslip stitchst(s)stitch(es)spspacemrmagic ringpuffpuff stitchreprepeatbloback loop onlyInstructions
Motif Center Flower — Cream and Blue (make 1 per square)
- Round 1: With cream, make a magic ring, ch 1, work 12 sc into the ring. Join with sl st to the first sc. Pull ring snug. [12]
- Round 2: Join soft blue in any stitch. Ch 2, work 1 puff stitch in the same stitch, ch 1. Rep around so you have a round of 12 puff stitches separated by 12 ch-1 spaces. Join with sl st to the first puff. [12 puff sts, 12 ch-1 spaces]
- Round 3: Join lilac in any ch-1 space. In each ch-1 space work 1 sc, ch 2, 3 dc, ch 2, 1 sc. This forms the first flower petal round. Join with sl st to the first sc. [12 petal units]
- Round 4: Join cream in any corner between petals. Work 1 sc in the first sc, then 1 sc in each dc of the petal tip, then 1 sc in the second sc. Rep around the flower, placing 2 sc at the narrowest point between petals if needed so the circle stays flat. Join with sl st. [36]
Leaf Round — Sage and Moss Green
- Round 5: Join sage green in any stitch. Work 1 sc in the next 3 sts, then in the next stitch work 1 leaf cluster: ch 2, 3 dc, ch 2, sl st. Skip 3 sts. Rep around the flower so you form 4 leafy corners and four side sections. Join with sl st. [24]
- Round 6: Join moss green in any ch-2 corner space. Work 3 sc in each corner space, and 1 sc in each stitch along the sides between corners. Join with sl st. [40]
Square Shaping — Cream
- Round 7: Join cream in any corner stitch. Work 3 sc in the corner, then 1 sc in each stitch across to the next corner. Rep for all 4 sides, placing 3 sc in every corner to square off the motif. Join with sl st. [52]
- Round 8: Ch 2, work 1 dc in each stitch around, placing (dc, ch 2, dc) in each corner stitch group to keep the square open and neat. Join with sl st. [60]
- Round 9: Work 1 sc in each dc around, and in each corner ch-2 space work 3 sc. Join with sl st. [68]
Lace Border — Cream
- Round 10: Ch 1, work 1 sc in the first 2 sts, then in the next stitch work 5 dc in the same stitch to form a soft shell. Sk 2 sts, 1 sc in the next 2 sts. Rep around, making shells at each side section and keeping the corners flat with 5 dc in the same corner stitch. Join with sl st. [76]
- Round 11: Ch 1, work 1 sc in each st around, placing 2 sc in the center stitch of each shell so the edge stays even. Join with sl st. Fasten off. [84]
Make the Bedspread
Make 323 motifs total for a queen-size bedspread arranged 17 motifs across and 19 motifs down. Block every motif to the same size before joining so the flower centers and corner leaves line up neatly. Arrange the motifs with the same orientation throughout so the floral pattern reads like a garden of repeating squares, just like the blanket in the photo.
Join the motifs using mattress stitch or whip stitch with cream yarn for the cleanest patchwork look. Join row by row first, then connect the rows together. After joining, add a final cream border around the entire bedspread to frame the design and soften the edges.
Matching Pillow Cover
To make a pillow cover like the one shown in the image, use 4 motifs arranged in a 2 x 2 layout for a small cushion, or 9 motifs in a 3 x 3 layout for a larger square pillow. Join the motifs in the same way as the bedspread, then add a simple cream edging around the outside and finish with a back flap, buttons, or an envelope closure.
Finishing
Weave in all ends on the wrong side and trim them carefully. Block the completed blanket again after assembly so the lace border opens evenly and the flowers sit flat. If you want a softer drape, steam-block lightly instead of wet blocking, especially if you are using cotton yarn. The blanket will look best when the motifs are pressed into a clear square shape and the colors are evenly distributed across the bed.
Tips for Success
- Block every motif before joining so the finished bedspread stays square and smooth.
- Keep the cream yarn slightly relaxed; it defines the lace border and gives the blanket its airy frame.
- Use the same hook size for every motif so the flower centers stay consistent.
- Weave in ends as you go so the back stays neat and the project does not become overwhelming at the end.
- Lay several motifs on the floor before joining to check color balance across the bedspread.
- Match your joining yarn to the border color for the cleanest look.
- If your motif starts to curl, add one extra sc round before the border to flatten it.
- Take your time with the puff stitches; even puff size makes the flower centers look rich and balanced.
Common Mistakes to Avoid
- Skipping blocking — the motifs may look fine individually, but they will not line up cleanly when joined. Block each square before assembly.
- Pulling the magic ring too tight too early — this can distort the flower center. Tighten it only after Round 2 is complete.
- Uneven puff stitches — if some petals are fuller than others, the flower will look lopsided. Keep each puff stitch the same height.
- Forgetting corner stitches — corners that are too tight will make the square curl. Always place the full 3 sc in corner groups.
- Changing tension between colors — if one shade is tighter, the motif can twist. Keep your grip relaxed and even.
- Joining before checking orientation — the floral pattern depends on consistent placement. Arrange a full section first, then sew.
- Using yarn that is too fuzzy — the flower layers and lace border will lose definition. Choose smooth yarn with good stitch clarity.
Ways to Customize This Pattern
This design is easy to adapt because the motif stays the same even when the colors change. For a softer spring version, replace the blue and lilac with peach and buttercream. For a more modern look, use dusty rose, olive, and oatmeal. You can also make the motifs smaller by using a lighter yarn and a 3.5 mm hook, or larger by switching to chunky cotton and a 5.0 mm hook.
- Use a single flower color for a more minimal look.
- Swap sage and moss for denim and gray-green.
- Add an extra cream border round for a more delicate lace edge.
- Turn the motif into a tote bag panel, table topper, or cushion cover.
- Make a smaller throw by stopping at 8 x 10 motifs instead of a bedspread size.
Frequently Asked Questions
This bedspread is made from separate granny squares, then joined together. That makes the project easier to manage because you can finish one flower at a time instead of working the entire blanket all at once.
For the size shown here, plan on 323 motifs arranged 17 across and 19 down. That gives a finished bedspread around 210 x 235 cm after blocking, depending on your yarn and tension.
Yes. You can add one more round before the border or switch to thicker yarn and a larger hook. Just keep the same motif layout so the floral pattern still reads clearly across the blanket.
Cotton is the best choice for this style because it gives strong stitch definition, crisp flower shapes, and a neat border. A cotton-blend yarn also works well if you want a little more softness and drape.
Why does my square not look perfectly flat?
That usually happens when the stitch count is off or when the corner shaping is too tight. Add an extra shaping round, block the square carefully, and make sure each corner has the same number of stitches.
Yes, finished items may be sold with credit to the site; the written pattern may not be resold or redistributed. You are welcome to sell blankets, pillow covers, or throws made from the finished work.
Mattress stitch gives the cleanest result and keeps the floral panels neat. If you want a slightly softer seam, whip stitch also works well, especially when you use the same cream yarn as the border.
Absolutely. The most important part is having one light border color and several soft contrast colors in the flower and leaves. As long as the shades stay gentle and harmonious, the blanket will keep the same cottage-style charm.
When you block the motifs, join them carefully, and keep the border neat, this project turns into a soft, romantic bedspread with the same gentle floral rhythm shown in the image. The result is cozy, elegant, and full of handmade texture from edge to edge.
The finished Floral Granny Square Bedspread — Free Crochet Pattern

