Coastal Mosaic Floral Table Runner — Free Crochet Pattern
Easy to intermediate
A great pattern for all skill levels.
Weekend Project
A satisfying weekend make — start Friday, finish Sunday, enjoy forever.
Handmade Gift
A beautiful keepsake — free forever. Read online or print at home.
About This Coastal Mosaic Floral Table Runner — Free Crochet Pattern
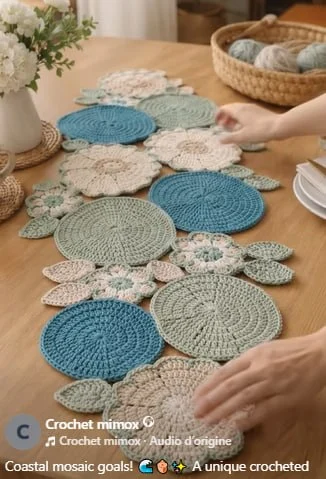
This Coastal Mosaic Floral Table Runner free crochet pattern brings the breezy, organic elegance of ocean stones and coastal blossoms directly to your dining table. Inspired by sun-drenched tide pools and smooth sea glass, the runner combines large double-crochet pebble discs in deep ocean teal and seafoam sage with delicate scalloped cream flower medallions, miniature accent blossoms, and pointed botanical leaf sprays. Instead of a rigid rectangular border, the motifs nestle together in a staggered, flowing mosaic that creates natural undulating negative spaces along the runner’s edges. The dense, durable cotton fabric protects wooden tabletops from warm serving dishes while lending a fresh, artisanal centerpiece to everyday dining or festive gatherings.
Constructed completely modularly, this project allows you to crochet individual components wherever you go before arranging them in a freeform mosaic layout and invisibly whipstitching the touching edges together on the wrong side. Rated easy to intermediate, it is wonderfully relaxing for beginners building confidence with flat circle geometry, basic shell stitches, and leaf shaping, while offering seasoned makers endless opportunities for creative placement.
Materials
- Color A — Deep Ocean Teal (Worsted #4 100% cotton, 75 g / 120 m per skein): 3 skeins (approximately 225 g / 360 m) for large solid pebble discs and small center accents.
- Color B — Seafoam Sage Green (Worsted #4 100% cotton, 75 g / 120 m per skein): 4 skeins (approximately 300 g / 480 m) for large solid pebble discs, small accent blossoms, and botanical leaves.
- Color C — Natural Linen Cream / Ecru (Worsted #4 100% cotton, 75 g / 120 m per skein): 4 skeins (approximately 300 g / 480 m) for large scalloped flower medallions, contrasting blossom petals, and neutral accent leaves.
- Crochet Hook: 4.0 mm (US G/6) ergonomic aluminum or birch hook, or size needed to obtain flat, uncurled circles.
- Notions: Bent-tip steel tapestry needle (#16) for seaming motifs and weaving in ends, locking stitch markers for securing motifs during layout, and sharp embroidery scissors.
- Blocking Tools: Interlocking foam blocking mats, rust-proof stainless steel T-pins (at least 60 pins), a ruler or measuring tape, and a garment steamer or spray bottle.
Abbreviations
chchainsl stslip stitchscsingle crochethdchalf double crochetdcdouble crochettrtreble crochetincincrease (work 2 stitches in the same stitch)decdecrease (work 2 stitches together)BLOback loop onlyFLOfront loop onlysp(s)space(s)st(s)stitch(es)skskipyoyarn overpicotch 3, sl st in front loop and left vertical bar of st just madeshell5 dc worked in the same specified stitch or spaceRSright sideWSwrong sideInstructions
Large Solid Pebble Disc — Ocean Teal (make 4) & Seafoam Sage (make 4)
- Round 1: With Color A (Ocean Teal) or Color B (Seafoam Sage) and a 4.0 mm hook, form a magic ring; ch 3 (counts as first dc here and throughout), work 11 dc into ring, pull tail firmly to close ring, join with a sl st in 3rd ch of beginning ch-3. [12 dc]
- Round 2: Ch 3, 1 dc in same st as join, work 2 dc in each st around, join with a sl st in 3rd ch of beginning ch-3. [24 dc]
- Round 3: Ch 3, 2 dc in next st, *1 dc in next st, 2 dc in next st; repeat from * 10 more times around, join with a sl st in 3rd ch of beginning ch-3. [36 dc]
- Round 4: Ch 3, 1 dc in next st, 2 dc in next st, *1 dc in each of next 2 sts, 2 dc in next st; repeat from * 10 more times around, join with a sl st in 3rd ch of beginning ch-3. [48 dc]
- Round 5: Ch 3, 1 dc in next st, 2 dc in next st, 1 dc in next st (offsetting the increases to keep the disc perfectly circular rather than hexagonal), *1 dc in each of next 3 sts, 2 dc in next st; repeat from * 10 more times around, 1 dc in last st, join with a sl st in 3rd ch of beginning ch-3. [60 dc]
- Round 6: Ch 3, 1 dc in each of next 3 sts, 2 dc in next st, *1 dc in each of next 4 sts, 2 dc in next st; repeat from * 10 more times around, join with a sl st in 3rd ch of beginning ch-3. [72 dc]
- Round 7: Ch 3, 1 dc in each of next 2 sts, 2 dc in next st, 1 dc in each of next 2 sts, *1 dc in each of next 5 sts, 2 dc in next st; repeat from * 10 more times around, 1 dc in each of last 2 sts, join with a sl st in 3rd ch of beginning ch-3. [84 dc]
- Round 8: Ch 1, 1 sc in same st as join, 1 sc in each of next 5 sts, 2 sc in next st, *1 sc in each of next 6 sts, 2 sc in next st; repeat from * 10 more times around to form a firm, tailored perimeter rim that resists curling, join with an invisible join in first sc, fasten off, and weave in tails on WS. [96 sc]
Medium Solid Pebble Disc — Ocean Teal (make 2) & Seafoam Sage (make 2)
- Round 1: With Color A or Color B and a 4.0 mm hook, form a magic ring; ch 3, work 11 dc into ring, pull tail snug, join with a sl st in 3rd ch of beginning ch-3. [12 dc]
- Round 2: Ch 3, 1 dc in same st as join, work 2 dc in each st around, join with a sl st in 3rd ch of beginning ch-3. [24 dc]
- Round 3: Ch 3, 2 dc in next st, *1 dc in next st, 2 dc in next st; repeat from * 10 more times around, join with a sl st in 3rd ch of beginning ch-3. [36 dc]
- Round 4: Ch 3, 1 dc in next st, 2 dc in next st, *1 dc in each of next 2 sts, 2 dc in next st; repeat from * 10 more times around, join with a sl st in 3rd ch of beginning ch-3. [48 dc]
- Round 5: Ch 3, 1 dc in next st, 2 dc in next st, 1 dc in next st, *1 dc in each of next 3 sts, 2 dc in next st; repeat from * 10 more times around, 1 dc in last st, join with a sl st in 3rd ch of beginning ch-3. [60 dc]
- Round 6: Ch 1, 1 sc in same st as join, 1 sc in each of next 3 sts, 2 sc in next st, *1 sc in each of next 4 sts, 2 sc in next st; repeat from * 10 more times around, join with an invisible join in first sc, fasten off, and weave in ends. [72 sc]
Large Scalloped Flower Medallion — Natural Linen Cream (make 5)
- Round 1: With Color C (Natural Linen Cream) and a 4.0 mm hook, form a magic ring; ch 3, work 15 dc into ring, pull tail snug, join with a sl st in 3rd ch of beginning ch-3. [16 dc]
- Round 2: Ch 3, 1 dc in same st as join, work 2 dc in each st around, join with a sl st in 3rd ch of beginning ch-3. [32 dc]
- Round 3: Ch 4 (counts as first dc + ch 1), sk next st, *1 dc in next st, ch 1, sk next st; repeat from * 14 more times around to form 16 open petal spoke windows radiating from the center, join with a sl st in 3rd ch of beginning ch-4. [16 dc, 16 ch-1 sps]
- Round 4: Sl st into first ch-1 sp, ch 3, 2 dc in same sp, *3 dc in next ch-1 sp; repeat from * 14 more times around to fill the petal spokes with dense texture, join with a sl st in 3rd ch of beginning ch-3. [48 dc]
- Round 5: Ch 3, 1 dc in next st, 2 dc in next st, *1 dc in each of next 2 sts, 2 dc in next st; repeat from * 14 more times around, join with a sl st in 3rd ch of beginning ch-3. [64 dc]
- Round 6: Ch 3, 1 dc in each of next 2 sts, 2 dc in next st, *1 dc in each of next 3 sts, 2 dc in next st; repeat from * 14 more times around, join with a sl st in 3rd ch of beginning ch-3. [80 dc]
- Round 7: Ch 1, 1 sc in same st as join, *sk 1 st, 5 dc (shell) in next st, sk 1 st, 1 sc in next st; repeat from * 18 more times around, sk 1 st, 5 dc in next st, sk last st, join with a sl st in first sc to create 20 elegant undulating petal scallops around the perimeter, fasten off, and weave in ends on WS. [20 shells, 20 sc]
Small Accent Blossom — Two-Tone (make 8)
- Round 1: With Color A (Ocean Teal) or Color B (Seafoam Sage), form a magic ring; ch 1 (does not count as st), work 8 sc into ring, pull tail snug, join with a sl st in first sc, fasten off center color. [8 sc]
- Round 2: With RS facing, join Color C (Natural Linen Cream) with a sl st in any sc; *ch 2, work 3 dc into same sc, ch 2, sl st into same sc, sl st into next sc; repeat from * 7 more times around to create 8 rounded cream petals radiating from the contrasting center ring, join with a sl st in base of first petal, fasten off, and weave in all tails. [8 petals, 8 sl st]
Pointed Botanical Leaves — Seafoam Sage (make 14) & Linen Cream (make 10)
- Round 1: With Color B (Seafoam Sage) or Color C (Natural Linen Cream) and a 4.0 mm hook, ch 13; work 1 sl st in 2nd ch from hook, 1 sc in next ch, 1 hdc in next ch, 1 dc in each of next 2 ch, 1 tr in each of next 3 ch, 1 dc in each of next 2 ch, 1 hdc in next ch, in last ch work (1 sc, ch 2, sl st in 2nd ch from hook for tip picot, 1 sc) to turn smoothly around the leaf apex, then rotate 180 degrees to work along the opposite side of the foundation chain: 1 hdc in next ch, 1 dc in each of next 2 ch, 1 tr in each of next 3 ch, 1 dc in each of next 2 ch, 1 hdc in next ch, 1 sc in next ch, sl st in first sl st to close. [28 sts, 1 tip picot]
- Round 2: For the sculpted center vein and ribbed edge, sl st loosely into the back loop of each st along the right leaf margin up to the tip, work (1 sc, ch 1, 1 sc) into the picot space, sl st loosely into the back loop of each st down the left margin, sl st into the leaf base, ch 3 for a small stem, sl st in 2nd and 3rd ch from hook, fasten off leaving a 20 cm seaming tail. [1 finished leaf with stem]
Finishing
- Round 1: Weave in all internal magic ring and color-change tails on the wrong side of every motif using your bent-tip tapestry needle, threading the tails in three alternating directions through the base of the stitches so ends stay anchored during laundering. [49 motifs woven]
- Round 2: Pin out all large pebble discs, medium discs, scalloped flower medallions, accent blossoms, and leaves onto foam blocking mats, steam thoroughly with a handheld garment steamer held 3 cm above the cotton fabric, and let dry completely for 12 hours so every piece lies crisp and flat. [49 blocked motifs]
- Round 3: Arrange the motifs on a clean dining table or floor in a staggered, flowing organic mosaic approximately 35 cm wide by 130 cm long: alternate large ocean teal and seafoam pebble discs with large scalloped cream flower medallions down the central spine, nestle medium discs and small accent blossoms into the recessed side curves, and tuck pairs and trios of pointed leaves angled outward along the borders to create natural trailing foliage. [1 pinned mosaic layout]
- Round 4: Using locking stitch markers to hold touching edges in place, flip the runner over in sections to the wrong side and join adjacent motifs with Color C or matching yarn using a neat whipstitch through the back loops only of touching stitches (catching 4 to 6 stitches per junction), keeping tension firm yet flexible so the runner drapes smoothly without puckering, then steam-press the joined seams flat. [1 completed Coastal Mosaic Table Runner ~35 x 130 cm]
Tips for Success
- Offset increase points on double crochet rounds: In Rounds 5 through 7 of the pebble discs, staggering increases so they do not stack directly on top of increases from previous rounds prevents the circles from developing subtle hexagonal corners, ensuring your stones look organic and round.
- Choose 100% unmercerized or mercerized worsted cotton: Cotton provides the firm, heat-resistant structure essential for a functional dining table runner. Unmercerized cotton gives a relaxed coastal matte texture, while mercerized cotton offers a polished finish with crisp stitch definition.
- Maintain consistent height on treble leaf stitches: When working the center swell of the pointed botanical leaves, draw your treble loops up smoothly so the leaf forms a graceful tapered teardrop rather than an abrupt bulge.
- Pin and steam motifs before seaming: Blocking motifs individually before joining is the secret to a perfectly flat mosaic runner. Unblocked circles may cup or wave, making it difficult to align touching contact points during assembly.
- Join motifs through back loops only: Working your whipstitch seams through the back loops on the wrong side keeps the joining stitches invisible from the right side while leaving the pretty front loop braids intact around each motif.
- Work over yarn tails where possible: Crocheting over starting tails on the solid discs saves hours of finishing time, leaving only the outer perimeter tails to weave in with the tapestry needle.
Common Mistakes to Avoid
- Ruffling edges from loose circle gauge — If your discs start to ripple like potato chips by Round 4 or 5, your stitches are too tall for the stitch count; drop down half a hook size (to 3.75 mm or 3.5 mm) or ensure you are not adding accidental extra increases at the join.
- Cupping centers from tight tension — If the center of your disc curls into a shallow bowl, your tension is too tight; pull up your double crochet loops slightly taller or move up half a hook size to keep the fabric relaxed and flat.
- Pulling assembly whipstitches too tightly — Cinched seams create unsightly puckers along the mosaic joints; keep your joining thread relaxed and lay the runner flat every three motifs to verify the surface remains smooth.
- Skipping the slip stitch rim on the leaves — Working Round 2 of the leaves adds structural stability that prevents the delicate leaf tips from curling upward when placed on the table; never skip the back-loop slip stitch rim.
- Overcrowding the mosaic layout — Packing the motifs too tightly together removes the beautiful negative spaces that give this runner its modern tide-pool mosaic character; leave small natural gaps between clusters as framed by the leaf stems.
- Joining with the wrong side facing out — Always double-check that the right side of every motif is facing upward before pinning and sewing; the right side features crisp, defined V-stitch tops and prominent leaf ribbing.
Ways to Customize This Pattern
- Adjusting Length for Any Table Size: The modular construction makes resizing effortless. For a shorter 85 cm coffee table runner, use 5 large discs, 3 scalloped flowers, and 12 leaves. For an extended 180 cm dining banquet runner, make 12 large discs, 8 scalloped flowers, and 30 leaves.
- Alternative Color Palettes: Swap the coastal palette for rich autumn tones using terracotta, mustard ochre, olive green, and warm cream, or create a serene modern monochrome centerpiece using slate charcoal, heather gray, and crisp white.
- Individual Coaster & Placemat Sets: Use the large solid pebble discs and scalloped flower medallions individually as matching 20 cm beverage coasters, trivets, or charger placemats for coordinated tablescapes.
- Wall Hanging or Window Valance: Join the motifs in a narrower vertical cascade and mount the top edge onto a piece of coastal driftwood with hanging loops for organic botanical wall art.
Frequently asked questions
Yes, you are welcome to sell finished handmade runners created from this pattern at local craft markets, art fairs, or online handmade shops. Please include design credit linking to patterns.noobcooks.com as the pattern source in your item listing or product tag. The written pattern instructions and HTML text may not be resold, copied, or redistributed in any format.
Because the runner is constructed from durable cotton, hand wash it in cool water using mild liquid detergent, or place it in a zippered mesh laundry bag on a gentle machine cycle. Reshape the damp runner flat on clean towels and let air dry completely, finishing with a light steam iron if needed to crisp the leaf tips.
Will hot serving dishes damage the runner?
Worsted weight 100% cotton is naturally heat resistant and functions wonderfully as a protective buffer between warm serving bowls and delicate wood finishes. However, avoid placing pots straight from a 200°C oven onto the runner, as extreme heat can scorch natural fibers over time.
While acrylic yarn can be used for decorative purposes, it is not recommended for dining table runners because acrylic fibers can melt or scorch under warm dishes and lack the heavy, flat drape of natural cotton. Cotton also blocks far more crisply, ensuring the circles and leaves stay perfectly flat.
How do I decide where to join each motif?
Lay out all blocked motifs on your table and take a digital photo from directly overhead with your phone. Once you are pleased with the balance of colors and shapes, pin touching edges with stitch markers and refer back to your photo as a visual guide while whipstitching on the wrong side.
Crocheting individual motifs is fast and portable: each large disc takes approximately 18 to 22 minutes, each leaf takes about 5 minutes, and each small blossom takes around 6 minutes. Working in casual evening sessions, you can easily complete and assemble the entire runner in one to two weeks.
A slight curl at Round 7 usually indicates that your hook size is slightly too small for your natural tension, or your double crochet stitches are too short. If steam blocking does not completely flatten the piece, frog Round 7 and rework it with a hook one half-size larger (4.5 mm) to give the outer stitches enough perimeter circumference.
The finished Coastal Mosaic Floral Table Runner — Free Crochet Pattern

