Classic Cream Filet Lace Bedspread — Free Crochet Pattern
Intermediate
For crocheters comfortable with the basics, ready to try new shaping and assembly techniques
Weekend Project
A satisfying weekend make — start Friday, finish Sunday, enjoy forever.
Handmade Gift
A beautiful keepsake — free forever. Read online or print at home.
About This Classic Cream Filet Lace Bedspread — Free Crochet Pattern
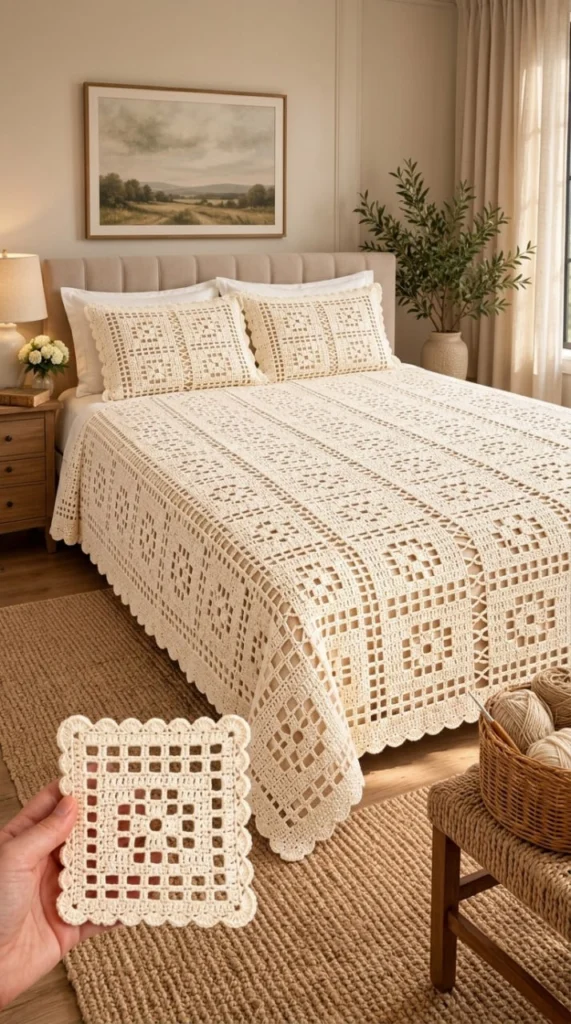
The Classic Cream Filet Lace Bedspread free crochet pattern brings a timeless vintage heirloom look to your bedroom space. Crafted in an elegant off-white cotton thread tone, this bedspread features structured square motifs worked in classic filet lace gridwork, featuring a central square window motif surrounded by radiating open mesh, framed in crisp double crochet bands and delicate scalloped picot edges. Complete with matching decorative pillow shams, this pattern blends old-world craftsmanship with crisp, modern bed styling.
This project is constructed by crocheting individual square filet lace motifs that are joined together into vertical strips separated by delicate joining lattice strips, then framed with a continuous scalloped outer border. It is ideal for an intermediate crocheter comfortable with filet mesh (blocks and open spaces), even gauge management, square framing, and precise motif assembly.
Materials
- Yarn: 100% Cotton or Cotton-Acrylic blend in DK weight (Weight 3) or Worsted weight (Weight 4) in Cream / Off-White.
- Main Color (Cream / Off-White): ~3,600 meters (~3,930 yards) for the full queen bedspread and two pillow shams.
- Crochet Hook: 4.0 mm (US G/6) crochet hook, or size required to match gauge and drape.
- Notions: Tapestry needle for weaving in ends and seaming, locking stitch markers, sharp yarn scissors, measuring tape.
- Blocking Tools: Blocking boards or foam mats, stainless steel rust-proof T-pins, and steam iron or spray bottle.
Abbreviations
chchainsl stslip stitchscsingle crochethdchalf double crochetdcdouble crochettrtreble crochetincincreasest(s)stitch(es)sp(s)space(s)ch-spchain spaceopen mesh (mesh)dc in st, ch 1, skip 1 st, dc in next stsolid block (block)2 dc worked in space or 1 dc in each stpicotch 3, sl st into 3rd ch from hookInstructions
Main Filet Square Motif — Cream (make ~80 motifs for Queen size)
Each motif is worked in concentric rounds starting from a small center ring, forming a geometric filet lattice window pattern bounded by a solid double crochet frame and scalloped outer picots.
Part 1: Central Filet Grid Core
- Round 1: With Cream yarn, make a magic ring. Ch 3 (counts as dc), work 3 dc into ring, ch 2, *4 dc into ring, ch 2; repeat from * 2 more times. Join with sl st to top of starting ch-3. [16 dc, 4 ch-2 corner sps]
- Round 2: Ch 3, dc in next 3 sts, *[2 dc, ch 2, 2 dc] in corner ch-sp, dc in next 4 sts; repeat from * 2 more times, [2 dc, ch 2, 2 dc] in last corner sp. Join with sl st. [32 dc]
- Round 3 (First Open Mesh Ring): Ch 4 (counts as dc + ch 1), skip next st, dc in next st, ch 1, skip next st, *[2 dc, ch 2, 2 dc] in corner sp, (ch 1, skip 1 st, dc in next st) across side; repeat from * around. Join with sl st. [8 open mesh sps, 16 corner dc]
- Round 4: Ch 3, dc in each ch-1 sp and dc across each side, working [2 dc, ch 2, 2 dc] in each ch-2 corner sp. Join with sl st. [64 dc]
- Round 5 (Outer Mesh Layer): Ch 4 (counts as dc + ch 1), *skip 1 st, dc in next st, ch 1; repeat from * to corner, work [2 dc, ch 2, 2 dc] in corner sp; repeat around all 4 sides. Join with sl st. [24 open mesh sps total]
- Round 6: Ch 3, work 1 dc in each st and 1 dc in each ch-1 sp across all sides, working [2 dc, ch 2, 2 dc] in each corner sp. Join with sl st. [96 dc]
Part 2: Outer Framing Band & Scalloped Picot Edge
- Round 7 (Frame Window Row): Ch 4, *skip 1 st, dc in next st, ch 1; repeat to corner, [2 dc, ch 2, 2 dc] in corner sp; repeat around. Join with sl st. [40 open mesh sps]
- Round 8 (Solid Outer Border): Ch 3, dc in each st and ch-1 sp around, working [2 dc, ch 2, 2 dc] in each corner sp. Join with sl st. [128 dc]
- Round 9 (Scalloped Edging): *Skip 2 sts, work [3 dc, picot, 3 dc] in next st, skip 2 sts, 1 sc in next st; repeat from * along each side, placing [4 dc, picot, 4 dc] into each ch-2 corner sp. Join with sl st. Fasten off and weave in ends. [Square motif size = ~22 x 22 cm]
Joining Lattice Strips
To connect the vertical rows of squares, narrow Filet Joining Strips are worked continuously between columns.
- Row 1: Attach Cream yarn to top corner of first vertical column of squares. Ch 5 (counts as tr + ch 1). *Dc in next st, ch 1, skip 1 st; repeat along the side of the motif column to the end. Turn.
- Row 2: Ch 4 (counts as dc + ch 1), dc in next dc, *ch 1, dc in next dc; repeat across. Turn.
- Row 3: Join to adjacent column using flat sl st joining method through the picot loops of the neighboring motifs. Fasten off.
Bedspread Assembly
- Arrangement: Lay out all 80 square motifs in an 8 x 10 grid (8 columns wide by 10 rows long) on a flat surface.
- Seaming: Using Cream yarn and a tapestry needle, whipstitch adjacent motif picot loops and outer border edges together through the back loops only (BLO) to keep all seam lines flat and neat.
- Attach Joining Strips: Insert the Filet Joining Strips between each vertical column to match the structural openwork pattern seen in the bedspread.
Continuous Outer Scalloped Bedspread Border
- Round 1 (Base Anchor Row): Attach Cream yarn in any corner of the assembled blanket. Ch 1, work single crochets evenly along all 4 outer edges, placing 3 sc in each outer corner. Join with sl st.
- Round 2 (Filet Window Outer Band): Ch 4 (counts as dc + ch 1), *skip 1 st, dc in next st, ch 1; repeat around entire outer perimeter, working [2 dc, ch 2, 2 dc] in outer corners. Join with sl st.
- Round 3 (Scalloped Shell Border): *Skip 2 sts, work [3 dc, picot, 3 dc] in next st, skip 2 sts, 1 sc in next st; repeat from * continuously around all 4 outer sides of the bedspread. Join with sl st, fasten off, and weave in all loose ends.
Matching Pillow Shams (make 2)
Front Sham Panel
- Join 6 main Filet Square Motifs in a 3×2 grid.
- Work Round 8 and Round 9 of the outer frame around the perimeter to square off the panel to ~45 x 65 cm.
Back Sham Panel
- Row 1: Ch 82. Dc in 4th ch from hook and in each ch across. Turn. [80 dc]
- Rows 2–35: Ch 3 (counts as dc), 1 dc in each st across. Turn. Fasten off after Row 35 [80 dc per row; panel ~45 x 65 cm].
Assembly of Shams
Place front and back panels wrong sides together. Single crochet around 3 sides using Cream yarn, insert a pillow form (~45 x 65 cm), then sc across the 4th side. Finish with the scalloped picot border around the outer edge.
Tips for Success
- Maintain Strict Tension: Filet crochet relies on precise gauge to ensure open mesh windows remain crisp and perfectly square across all 80 motifs.
- Block Individual Motifs: Steam blocking each square motif to ~22 x 22 cm before seaming makes alignment significantly easier and prevents puckering along the joining strips.
- Use Mercerized Cotton: Mercerized cotton yarn gives high stitch definition to openwork grids and resists pilling over long-term use.
- Count Mesh Windows Every Round: Missing a skipped stitch in openwork rounds will shift the geometric alignment of outer solid frames.
- Relax Seaming Stitches: Keep assembly stitches supple so the blanket lies flat without stiff seams on the bed.
Common Mistakes to Avoid
- Skipping Motif Blocking — Unblocked filet squares curl at the corners, making row-by-row seaming uneven.
- Miscounting Skipped Stitches — Skipping 2 stitches instead of 1 in open mesh rounds distorts the square dimensions into a rectangle.
- Using Too Soft/Fuzzy Yarn — Fuzzy yarns obscure the clean openwork window pattern of filet lace; stick to smooth cotton threads or yarns.
- Uneven Joining Tension — Pulling assembly threads too tightly creates puckered ridges along the joining lattice strips.
Ways to Customize This Pattern
- Pastel & Earth Tone Shades: Try working this pattern in soft sage green, pale duck-egg blue, or warm linen beige for a rustic look.
- Throw Blanket Dimension: Reduce motif count to 35 squares (5 x 7 grid) to create a smaller sofa throw (~110 x 150 cm).
- Matching Table Runner: Join a single column of 5 squares end-to-end to craft a matching filet lace dining table runner.
Frequently asked questions
This pattern is rated as intermediate. It requires familiarity with filet crochet mesh principles, counting double crochet blocks, working concentric square expansions, and seaming geometric motifs together.
How long does it take to complete this queen-size bedspread?
A full queen bedspread with matching shams typically takes between 4 and 6 weeks of regular crocheting (~12–15 hours per week).
A DK or Worsted weight 100% cotton or cotton-acrylic blend is best. Cotton provides crisp stitch definition for open mesh spaces and washes exceptionally well.
Machine wash on a gentle, cool cycle inside a large laundry bag using mild liquid detergent. Lay flat on clean dry towels to air dry to preserve its geometric lace structure.
Yes! Because this is a modular motif pattern, simply add or subtract rows of squares. Each square motif adds approximately 22 cm (~8.5 inches) to the length or width.
Can I sell finished items made from this pattern?
Yes, you are welcome to sell physical finished items created using this pattern. We kindly ask that you credit patterns.noobcooks.com as the original designer in your listings. Reselling, copying, or redistributing the written pattern text or images is strictly prohibited.
The finished Classic Cream Filet Lace Bedspread — Free Crochet Pattern

