Botanical Serpent Table Runner — Free Crochet Pattern
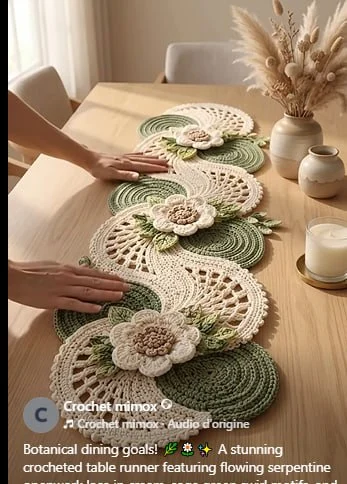
Advanced
For experienced crocheters who enjoy complex shaping, fine detail, and ambitious construction
Weekend Project
A satisfying weekend make — start Friday, finish Sunday, enjoy forever.
Handmade Gift
A beautiful keepsake — free forever. Read online or print at home.
About This Botanical Serpent Table Runner — Free Crochet Pattern
This botanical serpent table runner free crochet pattern recreates the sculptural, garden-inspired piece in the photo: a winding, S-shaped runner built from overlapping circular motifs in sage green and warm cream, dotted with dimensional flowers and leaves that make the whole piece look like a vine trailing down the table. What makes this piece special is the combination of flat spiral circles, raised flower appliqués, and layered leaves, all worked in a tight, rope-like texture that holds its shape beautifully. The serpentine layout — where each circle overlaps the next like scales — gives the runner its flowing, organic movement, while the flowers and leaves add a romantic, botanical touch that elevates it from a simple doily to a true table centerpiece. Despite its intricate appearance, the runner is built from just three repeatable elements: spiral circles, flower motifs, and leaf appliqués, joined as you go in a method that is as satisfying to watch come together as it is to use.
The construction is modular: you work a series of spiral circles in two colours, join them in an offset serpentine chain, then add flowers and leaves to the surface. The skill level is advanced — not because the stitches are difficult (they are mostly double crochet, single crochet, and chains), but because the spiral technique, the dimensional flower shaping, and the freeform joining require confidence and spatial awareness. If you have made mandalas, doilies, or garment motifs and are ready for a project that breaks out of the grid, this runner will stretch your skills in the best way.
Materials
- Sage green DK cotton or cotton-acrylic, approx 250 g (about 2.5 x 100 g balls, roughly 600 m) — used for the spiral circles, leaves, and stems
- Warm cream DK cotton or cotton-acrylic, approx 200 g (about 2 x 100 g balls, roughly 500 m) — used for the spiral circles, flower petals, and flower centres
- Soft taupe or blush DK cotton, approx 50 g — used for flower centres and accents
- 4.0 mm (US G/6) crochet hook
- Tapestry needle for seaming and weaving ends
- Scissors
- Blocking mats and rust-proof T-pins — blocking is essential for the circles to lie flat and the serpentine to hold its shape
- Stitch markers for marking the start of rounds and holding motifs together
Abbreviations
chchainscsingle crochethdchalf double crochetdcdouble crochettrtreble crochetsl stslip stitchskskipsp(s)space(s)st(s)stitch(es)reprepeatMRmagic ringinc2 sts in same stFLOfront loop onlyBLOback loop onlypicotch 3, sl st into first chInstructions
Before you begin: Work one spiral circle and one flower motif and block them. The circle should measure about 28 cm across; the flower about 8 cm across. If your circle is smaller, go up to a 4.5 mm hook; if larger, drop to a 3.5 mm hook. The runner uses 7 circles in a serpentine chain, with 3 flowers and 6-8 leaves appliquéd on top. Your exact flower and leaf count can vary — that is the beauty of a botanical design.
Spiral circle — sage green and cream (make 4 green-dominant, 3 cream-dominant)
- Round 1 (centre colour): With the dominant colour (green for green-dominant circles, cream for cream-dominant), make a MR. Ch 3 (counts as dc here and throughout), 11 dc in ring, sl st into top of beg ch-3, pull ring tight. (12 dc)
- Round 2: Ch 3, dc in same st, 2 dc in each st around, sl st into top of beg ch-3. (24 dc)
- Round 3: Ch 3, dc in same st, 1 dc in next st, *2 dc in next st, 1 dc in next st; rep from * around, sl st into top of beg ch-3. (36 dc)
- Round 4: Ch 3, dc in same st, 1 dc in each of next 2 sts, *2 dc in next st, 1 dc in each of next 2 sts; rep from * around, sl st into top of beg ch-3. (48 dc)
- Round 5: Ch 3, dc in same st, 1 dc in each of next 3 sts, *2 dc in next st, 1 dc in each of next 3 sts; rep from * around, sl st into top of beg ch-3. (60 dc)
- Round 6: Ch 3, dc in same st, 1 dc in each of next 4 sts, *2 dc in next st, 1 dc in each of next 4 sts; rep from * around, sl st into top of beg ch-3. (72 dc)
- Round 7: Ch 3, dc in same st, 1 dc in each of next 5 sts, *2 dc in next st, 1 dc in each of next 5 sts; rep from * around, sl st into top of beg ch-3. (84 dc)
- Round 8: Ch 3, dc in same st, 1 dc in each of next 6 sts, *2 dc in next st, 1 dc in each of next 6 sts; rep from * around, sl st into top of beg ch-3. (96 dc)
- Round 9: Ch 3, dc in same st, 1 dc in each of next 7 sts, *2 dc in next st, 1 dc in each of next 7 sts; rep from * around, sl st into top of beg ch-3. (108 dc)
- Round 10: Ch 3, dc in same st, 1 dc in each of next 8 sts, *2 dc in next st, 1 dc in each of next 8 sts; rep from * around, sl st into top of beg ch-3. (120 dc)
- Round 11: Ch 3, dc in same st, 1 dc in each of next 9 sts, *2 dc in next st, 1 dc in each of next 9 sts; rep from * around, sl st into top of beg ch-3. (132 dc)
- Round 12: Ch 3, dc in same st, 1 dc in each of next 10 sts, *2 dc in next st, 1 dc in each of next 10 sts; rep from * around, sl st into top of beg ch-3. (144 dc)
- Round 13: Ch 1 (does not count as st), sc in same st, 1 sc in each st around, sl st into first sc. Fasten off, leaving a 20 cm tail for joining. (144 sc)
To create the two-tone spiral effect: On Rounds 2, 5, 8, and 11, switch to the contrast colour for the last 6-12 stitches of the round, then carry the main colour up and resume with it at the start of the next round. The colour changes create the spiral stripe visible in the photo. Alternatively, work the entire circle in one colour and add the spiral effect with surface crochet afterwards.
Serpentine joining (make 1)
- Lay your 7 blocked circles on a large flat surface in a serpentine chain: circle 1 at the top left, circle 2 overlapping it slightly to the right and down, circle 3 overlapping circle 2 to the left and down, and so on, alternating sides to create the S-curve. The overlap should be about 5-6 cm — enough to join securely but not so much that the circles bunch.
- Using the tails and a tapestry needle, whip stitch the overlapping edges together with small, invisible stitches, working through both thicknesses. Join circle 1 to circle 2, circle 2 to circle 3, and so on down the chain. Keep the tension relaxed so the serpentine flows naturally.
- Alternatively, join as you go: on the final round of each circle, work the sc through both the current circle and the edge of the previous circle where they overlap. This creates a seamless join but requires careful placement.
Flower motif — cream and taupe (make 3)
- Round 1 (taupe — centre): With taupe, make a MR. Ch 1, 8 sc in ring, sl st into first sc, pull ring tight. (8 sc)
- Round 2: Ch 1, 2 sc in each st around, sl st into first sc. (16 sc)
- Round 3: Ch 1, *sc in next st, 2 sc in next st; rep from * around, sl st into first sc. (24 sc)
- Round 4 (cream — first petal round): Join cream with sl st in any st. Ch 1, *sc in next st, ch 3, 3 dc in 3rd ch from hook (petal made), sc in next st; rep from * around, sl st into first sc. You should have 12 petals. (12 sc, 12 petals)
- Round 5 (cream — second petal round): Ch 1, *sc in next sc, ch 4, 4 dc in 4th ch from hook (larger petal made), sc in next sc; rep from * around, sl st into first sc. (12 sc, 12 petals)
- Round 6 (cream — third petal round): Ch 1, *sc in next sc, ch 5, 5 dc in 5th ch from hook (largest petal made), sc in next sc; rep from * around, sl st into first sc. Fasten off, leaving a 15 cm tail for sewing. (12 sc, 12 petals)
The flower will curl naturally — do not flatten it. The dimensional curl is what gives the botanical look.
Leaf appliqué — sage green (make 6-8)
- Row 1: With green, ch 12. Sc in 2nd ch from hook, hdc in next ch, dc in each of next 8 ch, 5 dc in last ch (tip made), working along the other side of the chain: dc in each of next 8 ch, hdc in next ch, sc in last ch. (24 sts)
- Row 2: Ch 1, turn, sc in first st, hdc in next st, dc in each of next 8 sts, 2 dc in each of next 5 sts, dc in each of next 8 sts, hdc in next st, sc in last st. (29 sts)
- Row 3: Ch 1, turn, sc in first st, hdc in next st, dc in each of next 8 sts, (2 dc in next st, 1 dc in next st) 5 times, dc in each of next 8 sts, hdc in next st, sc in last st. (34 sts)
- Row 4 (picot edge): Ch 1, turn, sc in first st, *picot, sc in next st; rep from * across. Fasten off, leaving a 15 cm tail for sewing. (17 picots, 18 sc)
Finishing
- Appliqué placement: Arrange the 3 flowers and 6-8 leaves on the serpentine runner as shown in the photo — one flower near the top, one in the middle, one near the bottom, with leaves clustered around them and trailing along the curves. Pin everything in place before sewing.
- Sewing: Using the tails and a tapestry needle, sew each flower and leaf securely to the runner, working through all layers. Sew around the base of each flower and along the centre vein of each leaf, catching a few stitches of the runner fabric. The appliqués should be firmly attached but not flattened.
- Weave in ends: Run each tail through at least 5-6 stitches in different directions on the wrong side before trimming. With this many elements, take your time — a tidy wrong side makes the difference between handmade and heirloom.
- Blocking: Wet-block the finished runner on blocking mats, pinning the serpentine curves into a gentle S-shape and opening the flower petals. Cotton takes 12-24 hours to dry fully. Once dry, the runner holds its shape beautifully and the appliqués stand out in dimensional relief.
Tips for Success
- Count in groups. On every spiral circle round, the total stitch count is a multiple of 12 (12, 24, 36… 144). If your count is off, an increase got missed — the mistake is always in the previous round.
- Keep the spiral increases consistent. The classic flat circle formula (12 increases per round, spaced one stitch further apart each round) is what keeps the circles flat. Random increases make ruffles; missing ones make bowls.
- Block every circle before joining. Unblocked circles vary by several centimetres and the serpentine will pucker. Five minutes per circle saves hours of regret.
- Pin the serpentine before sewing. The S-curve is forgiving, but a pinned layout lets you step back and check the flow from across the room before committing.
- Let the flowers curl. Do not flatten the petals — the dimensional shape is the point. If they flop too much, work one fewer round of petals or use a smaller hook for the flower.
- Weave ends in as you finish each element. With 7 circles, 3 flowers, and 6-8 leaves, a giant end-weaving session at the end is miserable. Weave each tail in immediately.
- Buy all your green in one dye lot. The circles use a lot of yarn, and a lot mismatch will show as subtle striping. Check the lot numbers before you leave the shop.
Common Mistakes to Avoid
- Skipping the gauge circle — it happens when makers assume all DK yarn and a 4 mm hook behave the same. A 2 cm difference per circle becomes 14 cm across the runner; make one circle first and measure it.
- Inconsistent spiral colour changes — if the colour switches happen at random points, the spiral stripe wanders and looks messy. Change colours at the same point in every round (e.g., the last 6 stitches before the join).
- Joining unblocked circles — they differ by several centimetres and the serpentine will never lie flat. Block first, always.
- Sewing appliqués too tightly — it puckers the runner fabric and flattens the dimension. Sew firmly but with a relaxed tension, and let the blocking settle everything.
- Overcrowding the appliqués — too many flowers and leaves make the runner look cluttered rather than botanical. Less is more; the negative space between elements is part of the design.
- Forgetting the picot edge on leaves — the picots give the leaves their serrated, botanical edge. Skipping them makes the leaves look like plain ovals.
Ways to Customize This Botanical Serpent Table Runner Crochet Pattern
- Size it up or down: add two more circles for a longer runner of ~150 cm, or use only 5 circles for a shorter ~90 cm version. A single circle with one flower and two leaves makes a stunning trivet or coaster.
- Swap the palette: cream with dusty rose flowers reads romantic; sage with lavender flowers reads spring; cream with terracotta flowers reads autumn; white with silver-grey flowers reads winter frost.
- Go monochrome: work the entire runner in cream or white for a traditional heirloom look, adding texture with the spiral and appliqués rather than colour.
- Add beads: string small seed beads onto the flower yarn before starting and slide one into the centre of each flower for a subtle sparkle that catches candlelight.
- Make it a set: work smaller versions (Rounds 1-8 only) as matching placemats, or a single circle as a doily for a side table.
Frequently asked questions
Most advanced makers report 18 to 25 hours of actual hook time: roughly 10 hours for the 7 circles, 3 hours for the flowers and leaves, 3-4 hours for joining and appliqué, and 2-8 hours for blocking and finishing depending on how obsessively you pin. It is an ideal two-weekend project — work the elements the first weekend, join and finish the second.
Can I use a heavier yarn?
Yes, with a 5.0 or 5.5 mm hook and worsted cotton, the circles finish around 35 cm and the runner around 45 x 150 cm — a generous table runner or dresser scarf. The appliqués will be bolder and the fabric denser. Always make one circle first and measure before committing to the full project.
Almost always one of two things: too many increases per round (more than 12), or inconsistent tension. The flat circle formula is sacred — 12 increases per round, spaced one stitch further apart each round. If your circle ruffles, you are adding extra increases; if it cups, you are missing them. Blocking fixes minor waviness but not bad maths.
Yes, if you have made doilies or mandalas and are comfortable with dimensional shaping. The spiral circles are straightforward; the flowers and leaves are simple but fiddly; the freeform joining is the real skill-builder. Make one circle, one flower, and one leaf as practice before counting any of them toward the runner.
Cotton or cotton-acrylic versions machine wash cold on a gentle cycle; dry flat. Because of the dimensional appliqués, reshape the flowers and leaves with your fingers while damp and pin lightly if needed. A quick steam with an iron held above the fabric refreshes the piece between washes. Store it flat or rolled, never folded sharply, to keep the appliqués crisp.
Absolutely — the pattern uses cream and taupe for a soft, botanical look, but any colour combination works. Try blush pink with cream centres for a romantic version, or soft yellow with sage centres for a spring look. Keep the petals lighter than the centres for the most dimensional effect.
Can I sell finished items made from this pattern?
Yes — finished items may be sold, with credit given to the pattern source. The written pattern itself may not be resold, republished or redistributed, in full or in part, in any form.
The finished Botanical Serpent Table Runner — Free Crochet Pattern

