Autumn Mandala Table Runner — Free Crochet Pattern
Intermediate
For crocheters comfortable with the basics, ready to try new shaping and assembly techniques
Multi-Day Project
A rewarding 12+ hour journey — perfect for dedicated crafters who love detailed work.
Handmade Gift
A beautiful keepsake — free forever. Read online or print at home.
About This Autumn Mandala Table Runner — Free Crochet Pattern
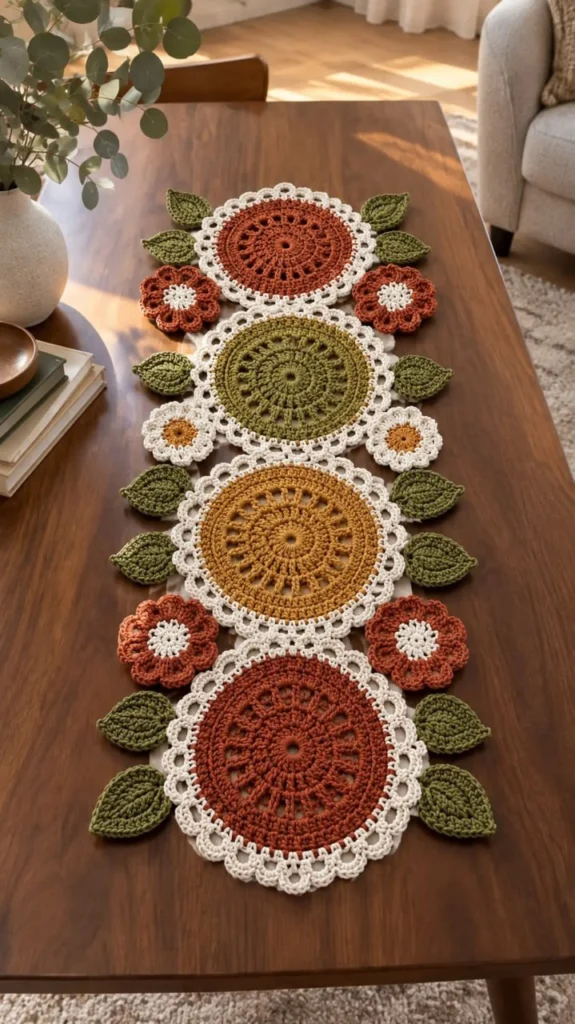
The Autumn Mandala Table Runner free crochet pattern brings the rich, comforting hues of fall right onto your dining or entryway table. Featuring four large circular mandala motifs in warm rust orange, muted olive green, and honey mustard, each motif is framed with an off-white picot scallop border and seamlessly joined in a vertical row. Vibrant floral motifs with contrast centers and textured green leaf accents adorn the sides, creating a stunning heirloom-quality centerpiece. Whether you are hosting Thanksgiving dinner or simply decorating your living space for the changing seasons, this project adds rustic elegance to any home décor.
This pattern is constructed by making individual motifs—four main circular mandalas, side flower appliqués, and leaf shapes—before joining them together using a combination of join-as-you-go technique or neat whip-stitching, followed by blocking to ensure flat, perfectly aligned edges. It is suited for an intermediate crocheter who is comfortable working in the round, creating openwork post stitches, working front-loop or back-loop stitches, and assembling separate components into a cohesive piece.
Materials
- Yarn: 100% Mercerized Cotton or Cotton-Acrylic blend in Sport weight (Weight 2) or DK weight (Weight 3).
- Color A (Rust / Terracotta): ~180 meters (~200 yards)
- Color B (Honey Mustard / Ochre): ~100 meters (~110 yards)
- Color C (Olive / Forest Green): ~150 meters (~165 yards)
- Color D (Off-White / Cream): ~220 meters (~240 yards)
- Crochet Hook: 3.5 mm (US E/4) or size required to obtain recommended gauge and drape.
- Notions: Tapestry needle for weaving in ends, stitch markers, sharp yarn scissors, measuring tape.
- Blocking Tools: Blocking board or foam mats, rust-proof stainless steel T-pins, and a steam iron or spray bottle.
Abbreviations
chchainsl stslip stitchscsingle crochethdchalf double crochetdcdouble crochettrtreble crochetdtrdouble treble crochetincincrease (work 2 stitches into the same stitch)decdecreasest(s)stitch(es)spspacech-spchain spaceFLOfront loop onlyBLOback loop onlyyoyarn overpicotch 3, sl st into 3rd ch from hookInstructions
Main Round Mandala Motif — Rust (make 2)
Work in continuous turned or joined rounds as specified. Chain 3 at the beginning of a round counts as a double crochet unless stated otherwise.
- Round 1: With Rust yarn, make a magic ring (or ch 4, sl st to first ch to form a ring). Ch 3 (counts as 1 dc), work 11 dc into the ring. Join with sl st to top of starting ch-3. [12 dc]
- Round 2: Ch 3, dc in same st as join. Work 2 dc in each st around. Join with sl st to top of starting ch-3. [24 dc]
- Round 3: Ch 3, 2 dc in next st, *1 dc in next st, 2 dc in next st; repeat from * around. Join with sl st to top of starting ch-3. [36 dc]
- Round 4: Ch 4 (counts as dc + ch 1), skip next st, *dc in next st, ch 1, skip next st; repeat from * around. Join with sl st to 3rd ch of starting ch-4. [18 dc, 18 ch-1 sps = 36 sts total]
- Round 5: Ch 3, 1 dc in first ch-1 sp, *dc in next st, 1 dc in next ch-1 sp; repeat from * around. Join with sl st to top of starting ch-3. [36 dc]
- Round 6: Ch 3, dc in same st, dc in next 2 sts, *2 dc in next st, dc in next 2 sts; repeat from * around. Join with sl st to top of starting ch-3. [48 dc]
- Round 7: Ch 5 (counts as dc + ch 2), skip next st, *dc in next st, ch 2, skip next st; repeat from * around. Join with sl st to 3rd ch of starting ch-5. [24 dc, 24 ch-2 sps]
- Round 8: Ch 3, work 2 dc in each ch-2 sp and 1 dc into each dc around. Join with sl st to top of starting ch-3. [72 dc]
- Round 9: Ch 3, dc in same st, dc in next 3 sts, *2 dc in next st, dc in next 3 sts; repeat from * around. Join with sl st to top of starting ch-3. [90 dc]
- Round 10: Ch 4 (counts as dc + ch 1), *skip next st, dc in next st, ch 1; repeat from * around. Join with sl st to 3rd ch of starting ch-4. [45 dc, 45 ch-1 sps = 90 sts]
- Round 11: Ch 3, work 1 dc in each st and 1 dc in each ch-1 sp around. Fasten off Rust yarn. [90 dc]
- Round 12 (Off-White Scalloped Frame): Attach Off-White yarn in any st. Ch 1, sc in same st, *skip 2 sts, work [3 dc, picot, 3 dc] in next st, skip 2 sts, sc in next st; repeat from * around to final st, join with sl st to first sc. Fasten off and weave in ends. [15 scalloped shells]
Main Round Mandala Motif — Olive Green (make 1)
Follow the exact round-by-round instructions for the Rust Mandala Motif above using Olive Green yarn for Rounds 1–11, and attach Off-White yarn for Round 12 (Off-White Scalloped Frame).
- Round 1: With Olive Green yarn, make a magic ring, ch 3, 11 dc into ring. Join. [12 dc]
- Round 2: Ch 3, 2 dc in each st around. Join. [24 dc]
- Round 3: Ch 3, (2 dc in next st, 1 dc in next st) around. Join. [36 dc]
- Round 4: Ch 4 (counts as dc + ch 1), skip next st, (dc, ch 1, skip 1) around. Join. [18 dc, 18 ch-1 sps]
- Round 5: Ch 3, 1 dc in each st and ch-sp around. Join. [36 dc]
- Round 6: Ch 3, (2 dc in next st, dc in next 2 sts) around. Join. [48 dc]
- Round 7: Ch 5 (counts as dc + ch 2), skip next st, (dc, ch 2, skip 1) around. Join. [24 dc, 24 ch-2 sps]
- Round 8: Ch 3, work 2 dc in ch-sp, 1 dc in each dc around. Join. [72 dc]
- Round 9: Ch 3, (2 dc in next st, dc in next 3 sts) around. Join. [90 dc]
- Round 10: Ch 4, (skip 1, dc, ch 1) around. Join. [45 dc, 45 ch-1 sps]
- Round 11: Ch 3, work 1 dc in each st and ch-1 sp around. Fasten off Olive Green. [90 dc]
- Round 12: Attach Off-White yarn. Repeat Round 12 of the main motif: *sc in next st, skip 2 sts, work [3 dc, picot, 3 dc] in next st, skip 2 sts; repeat from * around. Fasten off. [15 scalloped shells]
Main Round Mandala Motif — Honey Mustard (make 1)
Follow the exact round-by-round instructions for the Rust Mandala Motif using Honey Mustard yarn for Rounds 1–11, and attach Off-White yarn for Round 12 (Off-White Scalloped Frame).
- Round 1: With Honey Mustard yarn, make a magic ring, ch 3, 11 dc into ring. Join. [12 dc]
- Round 2: Ch 3, 2 dc in each st around. Join. [24 dc]
- Round 3: Ch 3, (2 dc in next st, 1 dc in next st) around. Join. [36 dc]
- Round 4: Ch 4 (dc + ch 1), skip next st, (dc, ch 1, skip 1) around. Join. [18 dc, 18 ch-1 sps]
- Round 5: Ch 3, 1 dc in each st and ch-sp around. Join. [36 dc]
- Round 6: Ch 3, (2 dc in next st, dc in next 2 sts) around. Join. [48 dc]
- Round 7: Ch 5 (dc + ch 2), skip next st, (dc, ch 2, skip 1) around. Join. [24 dc, 24 ch-2 sps]
- Round 8: Ch 3, work 2 dc in ch-sp, 1 dc in each dc around. Join. [72 dc]
- Round 9: Ch 3, (2 dc in next st, dc in next 3 sts) around. Join. [90 dc]
- Round 10: Ch 4, (skip 1, dc, ch 1) around. Join. [45 dc, 45 ch-1 sps]
- Round 11: Ch 3, work 1 dc in each st and ch-1 sp around. Fasten off Honey Mustard. [90 dc]
- Round 12: Attach Off-White yarn. Repeat Round 12 of main motif to create 15 scalloped shells with picot tops. Fasten off. [15 scalloped shells]
Rust Side Flowers (make 4)
These 8-petal flowers sit along the outer joins between the mandalas.
- Round 1: With Off-White yarn, make a magic ring. Ch 1, work 8 sc into the ring. Join with sl st to first sc. Fasten off Off-White. [8 sc]
- Round 2: Attach Rust yarn in any sc. Ch 1, 2 sc in each st around. Join with sl st to first sc. [16 sc]
- Round 3: *In next st work [sc, hdc, 2 dc], in next st work [2 dc, hdc, sc], sl st in space between petals; repeat from * around to form 8 rounded petals. Fasten off, leaving a 20 cm yarn tail for sewing. [8 petals]
Off-White Small Flowers (make 2)
These smaller floral accents rest between the central motifs.
- Round 1: With Honey Mustard yarn, make a magic ring. Ch 1, work 6 sc into ring. Join with sl st. Fasten off. [6 sc]
- Round 2: Attach Off-White yarn in any st. *Ch 2, work 3 dc into same st, ch 2, sl st in same st, sl st into next st; repeat from * around to make 6 compact petals. Fasten off, leaving a 20 cm yarn tail for assembly. [6 petals]
Textured Leaf Appliqués — Olive Green (make 14)
Leaves are worked in rows around a central base chain to create a classic vein structure.
- Prep Step: With Olive Green yarn, ch 13.
- Round 1 (Working around central chain): Sc in 2nd ch from hook, hdc in next ch, dc in next 2 ch, tr in next 3 ch, dc in next 2 ch, hdc in next ch, sc in next ch, [sc, ch 2, sc] in last ch (leaf tip). Rotate chain to work along opposite side: sc in next ch, hdc in next ch, dc in next 2 ch, tr in next 3 ch, dc in next 2 ch, hdc in next ch, sc in last ch. Join with sl st to first sc. [26 sts + ch-2 tip]
- Round 2 (Vein & Edging): Ch 1, sl st in BLO of each st up to the ch-2 tip sp. Work [sl st, ch 2, sl st] in ch-2 tip sp, then sl st in BLO down opposite side. Join with sl st to base. Fasten off, leaving a 25 cm yarn tail for sewing onto motifs. [28 sts]
Finishing
Follow these steps carefully to assemble all individual pieces into the completed runner:
- Layout and Alignment: Lay out the four main circular mandalas vertically on a flat surface in the following order from top to bottom: Rust, Olive Green, Honey Mustard, Rust. Ensure the off-white scalloped outer frame loops face outward uniformly.
- Joining the Mandalas: Using Off-White yarn and a tapestry needle (or sl st on the wrong side), seam adjacent picot points together where the circles touch. Connect 2 adjacent scalloped shells of each circle to hold the runner securely aligned down the central spine.
- Attaching Side Flowers: Position two Rust Flowers along the left and right sides of the top Rust motif join, two Off-White Small Flowers between the Olive and Mustard motifs, and two Rust Flowers near the lower motif join. Stitch securely to the outer picot borders using their yarn tails.
- Attaching Leaves: Pin the 14 Olive Green leaves symmetrically along the outer edges of the runner (3–4 leaves per side per mandala section, angled pointing slightly outward as shown in the photo). Hand-sew each leaf firmly by its base and lower spine to the picot borders using matching Olive Green yarn.
- Weaving Ends: Turn the completed table runner over to the wrong side. Thread all loose ends through a tapestry needle and weave securely through dense stitch clusters. Trim excess yarn.
- Wet Blocking: Submerge the runner in lukewarm water with mild wool detergent for 15 minutes. Gently press out excess water with a towel (do not wring). Lay flat on blocking mats, pin out each picot scallop and leaf tip evenly, and allow to air dry completely to achieve pristine drape and definition.
Tips for Success
- Maintain Consistent Tension: Flat table runners rely on uniform gauge throughout all motifs so that the circular sections sit flat without curling or puckering.
- Use Mercerized Cotton: Cotton yarn holds stitch definition exceptionally well and responds beautifully to steam or wet blocking, giving your runner a crisp finish.
- Block Individual Motifs First: Lightly steam-blocking the individual circular mandalas before sewing them together makes assembly faster and far more precise.
- Count Stitches Every Round: Because openwork lace relies on accurate stitch placement, taking a moment to count your double crochet stitches after every round prevents frustrating alignment errors down the line.
- Secure Leaf Bases Well: When sewing leaves to the outer scalloped frames, stitch through both the base and first 2 cm of the leaf spine to keep them lying flat on the tabletop.
- Tail Lengths Matter: Leave longer yarn tails (20–25 cm) when finishing small flower and leaf pieces to avoid adding extra knots during assembly.
Common Mistakes to Avoid
- Incorrect Hook Size Selection — Using a hook that is too large will cause loose stitches that make the mandala motifs sag, while a hook that is too small makes the fabric stiff and difficult to block flat.
- Ruffling or Cupping on Mandalas — If your circular motifs cupped (curled inward like a bowl), your tension is too tight or increases were missed; if they ruffle, too many increases were added in a single round.
- Twisting Leaf Base Chains — Working into a twisted foundation chain for the leaves will produce misshapen leaf edges. Ensure your starting chain is completely straight before working Round 1.
- Skipping Blocking — Unblocked lace motifs often look bunchy and uneven. Blocking is an essential final step that opens up the lace stitches and flattens seam lines.
- Over-tightening Assembly Stitches — Pulling assembly yarn too tightly while joining motifs causes puckering along the center line. Keep join stitches relaxed and matching the natural tension of the lace.
Ways to Customize This Pattern
- Color palette variations: Swap out the fall tones for pastel hues (blush pink, sage green, cream, lavender) for a gentle springtime aesthetic, or go all-white and ivory for a classic bohemian wedding table runner.
- Adjusting the length: You can easily shorten or extend the length of this table runner by decreasing or adding main round mandala motifs. Adding 1–2 extra motifs extends the overall length by ~25–50 cm.
- Matching Coasters & Placemats: Make single Rust or Mustard mandala motifs (stopping at Round 12) to serve as matching round placemats or decorative mug rugs for your table setting.
- Monochrome Elegance: Craft the entire runner using a single neutral shade (such as natural linen or unbleached ecru) for a textured, minimalist look.
Frequently asked questions
This pattern is rated as intermediate. While individual stitches used (single crochet, double crochet, treble crochet) are basic, the construction involves reading round-by-round instructions, creating lace openwork, managing multiple color changes, and sewing multiple decorative components together neatly.
100% mercerized cotton yarn in Sport or DK weight is ideal for table runners. Cotton provides excellent stitch definition, does not pill easily under dinnerware, handles washing well, and holds its shape after blocking better than acrylic or wool yarns.
How do I clean and care for my finished crochet table runner?
Hand wash the runner gently in cool water using mild detergent. Press out excess water between clean dry towels without wringing or twisting. Lay the piece flat on blocking mats, gently pin out the picot edges, and let it air dry completely. Steam iron lightly on a low cotton setting if needed.
Yes! To increase the length of the runner, simply crochet additional circular mandala motifs in your desired color sequence. Each additional motif adds approximately 22–25 cm (9–10 inches) to the total length. Remember to prepare extra side flowers and leaves to match the added sections.
Curling or cupping usually happens if your tension is too tight or if stitch increases were miscounted. Make sure your hook size matches your yarn weight and that you verify your stitch count at the end of every round. Wet blocking with T-pins will also smooth out minor tension discrepancies.
Yes, you are welcome to sell finished handmade physical items created using this crochet pattern. We appreciate it if you credit patterns.noobcooks.com as the original designer in your online listings or tags. However, reselling, copying, translating, or redistributing the written pattern text or images is strictly prohibited.
The finished Autumn Mandala Table Runner — Free Crochet Pattern

