3D Purple Daisy & Cream Cylindrical Bag Dispenser — Comprehensive Crochet Pattern
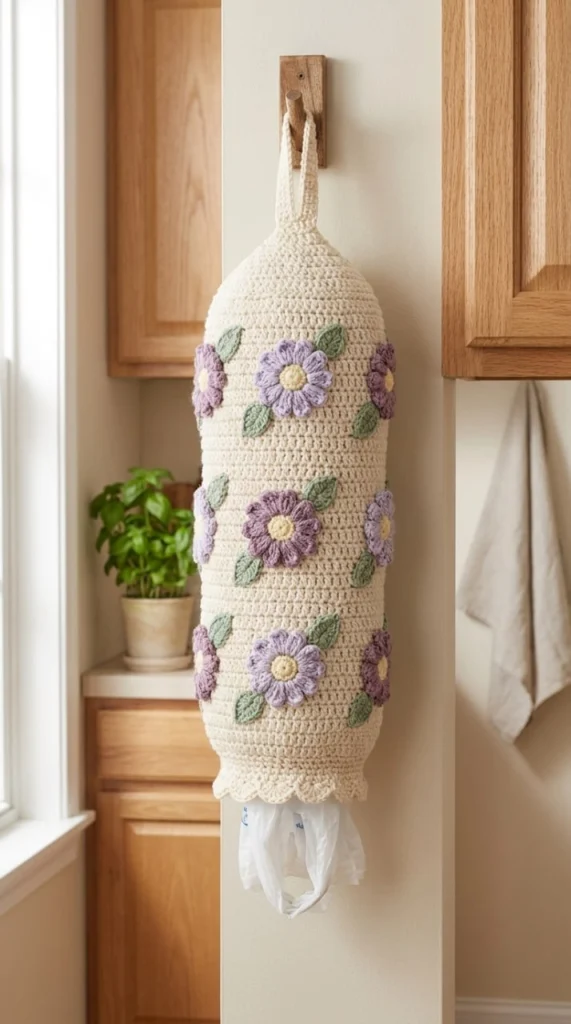
Intermediate
For crocheters comfortable with the basics, ready to try new shaping and assembly techniques
Weekend Project
A satisfying weekend make — start Friday, finish Sunday, enjoy forever.
Handmade Gift
A beautiful keepsake — free forever. Read online or print at home.
About This 3D Purple Daisy & Cream Cylindrical Bag Dispenser — Comprehensive Crochet Pattern
The 3D Purple Daisy Bag Dispenser elevates a strictly utilitarian household item into a piece of dimensional, handcrafted kitchen decor[cite: 15]. Constructed as a sturdy, top-loading cylindrical tube, this organizer is designed to neatly compress and dispense standard plastic grocery bags[cite: 15]. The warm cream background provides a neutral, highly textured canvas of continuous double crochet stitches, allowing the dimensional floral appliqués to serve as the visual focal point[cite: 15]. Each floral cluster features a pale yellow center surrounded by highly textured, raised soft lavender petals, flanked by delicately structured sage green leaves[cite: 15]. The dispenser hangs from a heavily reinforced, integrated top loop and finishes at the base with an elasticized, scalloped opening that firmly holds stored bags in place until pulled[cite: 15]. Constructing this functional art piece requires strict tension control for structural integrity, alongside precision appliqué attachment to ensure the flowers remain crisp and upright during daily use.
Working this pattern involves three distinct phases: engineering the primary load-bearing cylinder, crocheting the individual botanical appliqués, and executing a meticulous assembly process. Because the dispenser will experience frequent downward pulling, 100% non-mercerized kitchen cotton is strongly recommended over acrylic yarns; cotton eliminates unwanted stretch and maintains the crisp, tubular architecture over time. The cylinder is worked seamlessly from the bottom-up, beginning with a clever elastic encapsulation technique to form the dispenser mouth, building through straight repeating rounds, and culminating in a sharply decreased conical top. The floral elements utilize multi-loop cluster stitches to achieve their thick, pillowy relief, requiring a smaller hook to force a tight, rigid gauge.
Materials & Structural Tools
- Yarn: Worsted weight (Category 4) 100% cotton (e.g., Lily Sugar’n Cream or Dishie).
- Main Color (Warm Cream): ~250 meters (~275 yards) for the main body cylinder, the top conical decrease, the hanging loop, and the bottom scalloped edging[cite: 15].
- Contrast Color A (Soft Lavender): ~75 meters (~82 yards) for the dimensional daisy petals[cite: 15].
- Contrast Color B (Sage Green): ~40 meters (~44 yards) for the textured leaf appliqués[cite: 15].
- Contrast Color C (Pale Yellow): ~20 meters (~22 yards) for the flat floral centers[cite: 15].
- Crochet Hooks:
- 4.5 mm (US 7) for the main cream cylinder to ensure a dense but pliable fabric.
- 3.5 mm (US E/4) for all floral and leaf appliqués to lock the 3D stitches into a rigid, non-drooping shape.
- Hardware/Notions: One thick, seamless elastic hair tie (approx. 5 cm / 2 inches in diameter) to structure the bottom dispenser opening. Tapestry needle, stitch markers, and precision scissors.
Special Stitch Definitions
- Tr-Cluster (Treble Crochet Cluster): Used for the purple petals. *Yarn over twice, insert hook into designated stitch, pull up a loop, yarn over, pull through 2 loops, yarn over, pull through 2 loops (2 loops remain on hook). Repeat from * three more times in the exact same stitch (5 loops on hook). Yarn over and pull tightly through all 5 loops. Chain 1 tightly to lock the cluster in place and push the bulk of the stitch forward.
- Hdc2tog (Half Double Crochet Two Together): Used to sharply taper the top of the bag holder. Yarn over, insert hook into next st, pull up a loop, yarn over, insert hook into subsequent st, pull up a loop. Yarn over and pull through all 5 loops on hook.
- Picot: Ch 3, sl st in the 1st chain made. Used at the tips of the leaves for a sharp, natural point.
Part 1: The Main Cylindrical Dispenser (4.5 mm hook, Cream Yarn)
The main body is crocheted continuously from the bottom opening upward toward the hanging loop. The foundation round encapsulates an elastic hair tie to provide a self-closing dispenser mouth that will not stretch out of shape[cite: 15].
- Round 1 (The Elastic Foundation): Hold the seamless elastic hair tie in your non-dominant hand. Attach the Warm Cream yarn around the elastic with a slip stitch. Ch 1, and work 36 sc completely encapsulating the elastic ring. The stitches should be packed tightly together so the elastic is entirely invisible. Join with a sl st to the first sc.
- Round 2 (Establishing the Cylinder): Ch 2 (does not count as a stitch here and throughout), work 1 dc in the same stitch. Work 1 dc in each of the remaining 35 sts. Join with a sl st to the first dc. [36 dc].
- Round 3 (Expansion): Ch 2, *2 dc in the first st, 1 dc in the next 5 sts; repeat from * 5 more times around. Join with sl st. [42 dc].
- Rounds 4 – 28 (The Main Body): Ch 2, work 1 dc in every stitch around. Join with a sl st at the end of each round. Maintain even, moderate tension. This repetitive section builds the primary storage capacity of the tube[cite: 15]. The piece should measure approximately 35 cm (14 inches) from the starting elastic.
- Round 29 (First Taper Decrease): The top of the holder tapers inward to secure the bags[cite: 15]. Ch 2. *Hdc2tog, 1 hdc in the next 5 sts; repeat from * around. Join with sl st. [36 sts].
- Round 30 (Second Taper Decrease): Ch 2. *Hdc2tog, 1 hdc in the next 4 sts; repeat from * around. Join with sl st. [30 sts].
- Round 31 (Third Taper Decrease): Ch 2. *Hdc2tog, 1 hdc in the next 3 sts; repeat from * around. Join with sl st. [24 sts].
- Round 32 (Final Collar): Ch 1, work 1 sc in every stitch around. Join with sl st. Do not fasten off; proceed directly to the hanging loop.
Part 2: The Integrated Hanging Loop (4.5 mm hook)
The hanging strap must be structural enough to support the weight of 30+ compressed plastic bags without stretching or snapping.
- Row 1: From the sl st join of Round 32, ch 1. Work 1 sc in the next 6 sts. Turn.
- Rows 2 – 25: Ch 1, sc in each of the 6 sts across. Turn. (This creates a dense, non-stretching strap approximately 15 cm / 6 inches long[cite: 15]).
- Anchoring the Loop: Fold the strap over to form a loop. Slip stitch the 6 stitches of Row 25 directly into the next 6 unworked stitches of the Round 32 collar, working from the inside out to hide the seam. Fasten off and weave in the tail securely.
Part 3: The Scalloped Dispenser Rim (4.5 mm hook, Cream Yarn)
Turn the dispenser upside down to work into the bottom side of the initial foundation round, creating a decorative edge that flares slightly below the elastic[cite: 15].
- Round 1: Attach Warm Cream yarn to any exposed bottom loop of Round 1. Ch 1, sc in the same st. *Skip 2 sts, work 5 dc into the next st (creating a scallop shell), skip 2 sts, sc in the next st; repeat from * entirely around the elasticized opening. [6 scallop shells total].
- Finishing the Scallop: Join with a sl st to the first sc. Fasten off and weave in the end to complete the flared decorative edge[cite: 15].
Part 4: The 3D Lavender Daisies (Make 5 – 3.5 mm hook)
Switching to a smaller hook creates a rigid flower that stands away from the background fabric[cite: 15].
- Round 1 (The Yellow Core): With Pale Yellow, create a magic ring. Ch 1, work 10 sc into the ring. Pull tight to close completely. Join with a sl st to the first sc. Fasten off Yellow, leaving a short tail[cite: 15].
- Round 2 (The Lavender Petals): Attach Soft Lavender yarn to any sc. Ch 3. Work a Tr-Cluster in the same stitch. *Ch 2, work a Tr-Cluster in the next stitch; repeat from * 8 more times. Ch 2, join with a sl st to the top of the first Tr-Cluster. [10 thick purple petals][cite: 15]. Fasten off, leaving a long 30 cm (12 inch) tail for sewing.
Part 5: The Sage Green Leaves (Make 10 – 3.5 mm hook)
Two leaves will be attached adjacent to each lavender flower[cite: 15].
- The Central Vein: With Sage Green, ch 8.
- Shaping the Leaf: Working in the back bumps of the chain, sl st in the 2nd ch from hook. Sc in next ch, hdc in next ch, dc in next 2 chs, hdc in next ch, sc in final ch.
- The Point and Opposite Side: Ch 2, sl st in the 2nd ch from hook (creates the sharp tip). Rotate the work to crochet up the unworked loops of the foundation chain. Sc in first st, hdc in next, dc in next 2 sts, hdc in next, sc in next, sl st in the final st. Fasten off, leaving a long tail for sewing. The resulting leaf is symmetrical, pointed, and deeply textured[cite: 15].
Part 6: Meticulous Appliqué Assembly
The visual success of this pattern relies on an asymmetrical but balanced layout of the botanical elements. Do not apply the flowers in straight, vertical rows.
- Grid Planning: Lay the cream cylinder flat. You will apply the 5 flowers in a staggered zigzag formation around the circumference[cite: 15]. Pin the first flower roughly 7 cm (3 inches) above the bottom scalloped edge. Pin the second flower on the opposite side, slightly higher. Pin the third flower in the center, higher still[cite: 15]. Continue spacing the 5 flowers evenly to cover the body of the cylinder.
- Leaf Placement: Tuck the base of two Sage Green leaves beneath the outer edge of each Lavender flower’s petals, angling them outward in opposing directions[cite: 15]. Pin securely.
- Sewing Protocol: Using the tapestry needle and the long yarn tails, stitch the leaves down first. Sew exclusively through the central vein of the leaf to allow the outer edges to lift slightly off the cylinder. Next, thread the lavender tail and whipstitch the outer perimeter of the flower to the cylinder, passing the needle through the ch-2 spaces between the petals. Finally, using a small piece of Pale Yellow yarn, anchor the very center of the flower to the cream background to prevent the heavy 3D petals from drooping forward under their own weight.
- Finishing: Turn the dispenser inside out. Tie off all appliqué tails securely and weave them through the dense sc stitches of the flower backings to ensure no loose threads catch on the plastic bags during use. Turn right-side out and gently steam the appliqués to finalize their shape.
The finished 3D Purple Daisy & Cream Cylindrical Bag Dispenser — Comprehensive Crochet Pattern

