3D Pink Peony & Cream Lace Fan Bedspread — Comprehensive Crochet Masterclass
Advanced
For experienced crocheters who enjoy complex shaping, fine detail, and ambitious construction
Multi-Day Project
A rewarding 12+ hour journey — perfect for dedicated crafters who love detailed work.
Handmade Gift
A beautiful keepsake — free forever. Read online or print at home.
About This 3D Pink Peony & Cream Lace Fan Bedspread — Comprehensive Crochet Masterclass
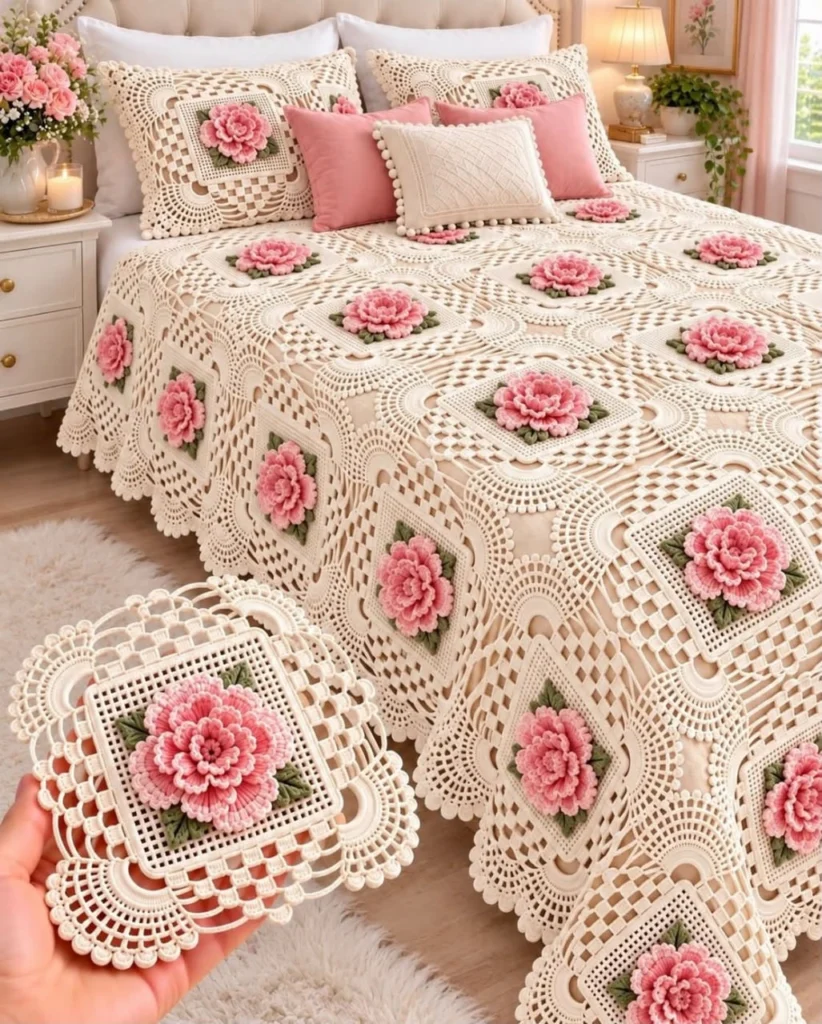
The 3D Pink Peony & Cream Lace Fan Bedspread represents a pinnacle of heirloom crochet design, merging high-relief floral architecture with expansive, geometric lace[cite: 13]. This monumental project is defined by its striking square motifs, each centering a hyper-dimensional, multi-layered pink peony that erupts from a base of subtle green foliage[cite: 13]. These intricate floral cores are stabilized within a solid cream inner frame before exploding outward into dramatic, radiating corner fans and wide filet lattice borders[cite: 13]. When joined, the intersecting corner fans create secondary circular lace medallions across the surface of the bedspread, ending in a heavily scalloped, draped outer border[cite: 13]. Complete with coordinating floral pillow shams, this advanced-level project requires dedication, strict gauge management, and advanced blocking techniques to achieve its breathtaking structural precision[cite: 13].
Constructing this bedspread is a masterclass in varied crochet disciplines. You will utilize tight amigurumi-style tension for the rigid 3D flower petals, transition to post-stitches for the leafy foliage, and finally switch to a looser, draped tension for the delicate cream openwork lace[cite: 13]. This design demands an advanced crocheter who is comfortable working behind existing layers, managing complex corner increases to build the radiating fans, and executing flawless invisible seaming[cite: 13]. The following comprehensive guide breaks down the complex anatomy of the peony motif, providing exhaustive row-by-row instructions, professional assembly schematics, and specialized blocking protocols required to tame the multidimensional fabric.
Materials & Specialized Tools
- Yarn: DK weight (Category 3) 100% mercerized cotton. Mercerization is non-negotiable for this project; the chemical treatment prevents the heavy 3D flowers from drooping and ensures the cream lattice fans retain their crisp, architectural blocking over decades of use.
- Color A (Warm Cream): ~4,500 meters (~4,920 yards) for the solid frames, radiating corner fans, background lattice, seaming, and the massive scalloped perimeter border[cite: 13].
- Color B (Soft Rose Pink): ~2,200 meters (~2,400 yards) for the four-layer 3D central peonies and matching pillow sham florals[cite: 13].
- Color C (Deep Moss Green): ~600 meters (~650 yards) for the peek-a-boo leaf clusters anchoring the flowers[cite: 13].
- Crochet Hooks:
- 3.5 mm (US E/4) ergonomic hook for the Pink Peony and Green Leaves to force a tight, rigid gauge so the petals stand upright.
- 4.0 mm (US G/6) hook for the Warm Cream lace sections to allow for better drape and wider blocking expansion.
- Notions: Fine-tip metal tapestry needle for weaving in hundreds of color-change tails, color-coded locking stitch markers (essential for marking the fan expansion corners), precision thread snips.
- Professional Blocking Setup: Interlocking high-density foam mats, at least 300 stainless steel rust-proof T-pins, blocking wires (for the outer bedspread edges), and a heavy-duty garment steamer. Cold-water blocking will not suffice for the dense floral centers.
Special Stitch Anatomy & Architectural Techniques
- Surface Slip Stitch (Surf-sl-st): Used to anchor the base of the petals tightly to the underlying mesh without adding bulk.
- Front Post Single Crochet (FPsc) & Back Post Single Crochet (BPsc): Critical for establishing the foundational chain arches behind the active petal layers so that subsequent petal rounds push outward sequentially.
- Peony Petal Shell (PPS): The core stitch group for the flower. A standard Layer 3 PPS consists of [1 hdc, 5 dc, 1 hdc] worked entirely around a single chain-arch from the previous round.
- Extended V-Stitch Leaf (Ext-V): [1 tr, ch 3, 1 tr] worked into the same anchor point using green yarn to create a sharp, pointed leaf silhouette beneath the rounded pink petals[cite: 13].
- Lace Fan Increase (LFI): A complex corner maneuver used in the cream lattice. Consists of [3 dc, ch 2, 3 dc] stacked upon each other round-by-round, fanning out into 9-dc shells by the final motif round[cite: 13].
The 3D Pink Peony & Fan Lace Motif (Make ~72 motifs for Queen Size)
Each motif requires 14 rounds. Switch hooks precisely as indicated to ensure the flower remains rigid while the lace remains fluid.
Part 1: The Dimensional Peony Core (3.5 mm hook, Pink Yarn)
- Round 1 (The Stigma Base): With Soft Rose Pink, make a magic ring. Ch 1, work 8 sc into the ring. Pull tightly to close the hole completely. Join with a sl st to the first sc. [8 sc].
- Round 2 (Layer 1 Anchor Arches): Working in the Front Loops Only (FLO), *sc in next st, ch 3, skip 1 st; repeat from * 3 more times. Join with sl st. [4 ch-3 arches].
- Round 3 (Layer 1 Petals): In each ch-3 arch work [1 sc, 3 hdc, 1 sc]. Sl st into the sc between arches. [4 small, tightly curled center petals][cite: 13].
- Round 4 (Layer 2 Anchor Arches): Working *behind* Round 3, BPsc around the first skipped sc from Round 1. *Ch 4, BPsc around the next skipped sc from Round 1; repeat from * 3 more times. [4 ch-4 arches located behind the first petal layer].
- Round 5 (Layer 2 Petals): In each ch-4 arch work [1 sc, 1 hdc, 3 dc, 1 hdc, 1 sc]. Sl st between arches. [4 medium petals, staggered behind the first layer][cite: 13].
- Rounds 6-7 (Layer 3 Expansion): Behind Round 5, work (FPsc around next post, ch 5) 8 times to create 8 anchor arches. In Round 7, work [1 hdc, 5 dc, 1 hdc] into every ch-5 arch. [8 large, overlapping petals][cite: 13].
- Rounds 8-9 (Layer 4 Jumbo Petals): Behind Round 7, work (FPsc, ch 6) 8 times. In Round 9, work [1 hdc, 2 dc, 3 tr, 2 dc, 1 hdc] in each arch to create the massive outer bloom[cite: 13]. Fasten off Pink securely.
Part 2: The Green Foliage (3.5 mm hook, Green Yarn)
- Round 10 (Leaf Foundations): Attach Deep Moss Green to any back-post behind the final pink petal layer. *Work [1 sc, ch 5, 1 sc] in the post (corner established), ch 4, sc in the next post, ch 4; repeat from * 3 more times to square off the circular flower[cite: 13].
- Round 11 (Pointed Leaves): In the corner ch-5 space, work the Ext-V [1 tr, ch 3, 1 tr] to create the sharp leaf tips peeking out from the corners[cite: 13]. Work 4 dc in each side ch-4 space. Fasten off Green.
Part 3: The Solid Cream Frame & Radiating Lace Fans (4.0 mm hook, Cream Yarn)
You must switch to the larger hook now to prevent the lace from buckling the rigid flower.
- Round 12 (Solid Inner Frame): Attach Warm Cream yarn to any corner ch-3 leaf tip space. Ch 3 (counts as dc), work [1 dc, ch 2, 2 dc] in the corner. Work 1 solid dc into every stitch across the side. This locks the motif into a perfect square[cite: 13].
- Round 13 (Establishing the Corner Fans): Sl st to the corner ch-2 space. Ch 3, [4 dc, ch 2, 5 dc] in the corner space to initiate the heavy corner fan[cite: 13]. Across the sides, begin the lattice mesh: *ch 2, skip 2 sts, 1 dc; repeat across to the next corner.
- Round 14 (Expanding the Lace & Fans): In the corner ch-2 space, work a massive [7 dc, ch 2, 7 dc] cluster[cite: 13]. This creates the distinct ribbed fan effect in the corners. Across the sides, work standard filet lattice (1 dc in each dc, ch 2 over the ch-2 spaces) until the motif measures exactly 25 x 25 cm. Fasten off Cream.
Advanced Motif Integration & Assembly
The visual impact of this bedspread relies entirely on the precise alignment of the corner fans. When four motifs meet at a corner, their individual 7-dc fans merge to form a magnificent, continuous 28-dc circular lace medallion[cite: 13].
- Aggressive Steam Blocking: Pin every single motif face-down onto foam mats. Pin the corners tightly to stretch the fans open, and pin the sides to ensure the lattice lines are perfectly straight. Blast heavily with hot steam, hovering 2 inches above the fabric. Do NOT press the iron into the pink peony, or you will crush the 3D relief. Let dry for 24 hours.
- The Zig-Zag Slip Stitch Join: Arrange the blocked motifs right-side up in an 8 x 9 grid. Using Cream yarn and the 4.0 mm hook, attach the yarn to the corner of two adjacent squares. Drop the loop off the hook, insert the hook into the corresponding corner of the opposite square, pick up the loop, and pull it through. Ch 1, move to the next stitch on the first square, sl st, drop loop, pull through the opposite square. This creates a beautifully flat, flexible, and virtually invisible seam that allows the lace patterns to flow uninterrupted[cite: 13].
The Massive Perimeter Scallop Border
To finish the heirloom piece, the outer edge must mimic the dense corner fans to create a cohesive drape[cite: 13].
- Foundation Round: Attach Cream yarn. Work a solid round of sc entirely around the bedspread, placing 3 sc in the 4 extreme outer corners.
- Lattice Expansion (Rounds 2-4): Work 3 rounds of (1 dc, ch 2, skip 2) to build a wide filet mesh border that separates the motifs from the final edging.
- The Jumbo Scallop Arch (Round 5): *Skip 3 mesh spaces. In the 4th mesh space, work [12 tr]. Skip 3 mesh spaces, sc in the next space; repeat from * continuously around the perimeter. This creates the heavy, sweeping scallops visible on the finished drape[cite: 13]. Fasten off and weave in all remaining ends.
Coordinating Floral Pillow Shams (Make 2)
The matching pillow shams utilize the exact same central peony motif but omit the expanding lattice border to fit a standard decorative cushion[cite: 13].
- Sham Front Construction: Crochet the Pink Peony and Green Foliage (Rounds 1-11) exactly as detailed above[cite: 13].
- Square Padding: Switch to Cream yarn and the 4.0 mm hook. Work Rounds 12 as written. Instead of breaking into the fan lace, work 6 additional rounds of solid double crochet, placing [2 dc, ch 2, 2 dc] in the corners, until the square measures 45 x 45 cm.
- Piping Detail (Optional but Recommended): Once the 45 cm square is complete, surface slip-stitch a round of Warm Cream yarn directly over the boundary line between the green leaves and the solid cream background to create a raised piping effect[cite: 13].
- Sham Back & Assembly: Crochet a solid Cream 45 x 45 cm square of standard double crochet. Place the front and back wrong-sides together. Sc around three sides, insert a plush 45 cm euro pillow form, and sc the final side closed. Finish by working Round 5 (The Jumbo Scallop Arch) directly around the perimeter of the pillow to match the bedspread[cite: 13].
The finished 3D Pink Peony & Cream Lace Fan Bedspread — Comprehensive Crochet Masterclass

