3D Crimson Poppy & Botanical Granny Square Bedspread — Comprehensive Crochet Masterclass
Advanced
For experienced crocheters who enjoy complex shaping, fine detail, and ambitious construction
Multi-Day Project
A rewarding 12+ hour journey — perfect for dedicated crafters who love detailed work.
Handmade Gift
A beautiful keepsake — free forever. Read online or print at home.
About This 3D Crimson Poppy & Botanical Granny Square Bedspread — Comprehensive Crochet Masterclass
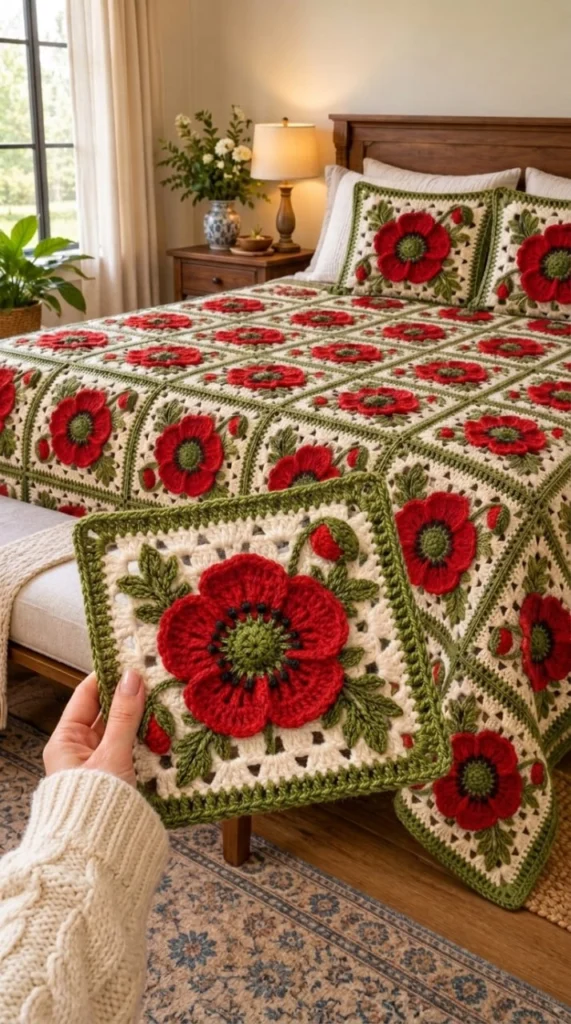
The 3D Crimson Poppy & Botanical Granny Square Bedspread is a breathtaking testament to structural crochet design, transforming standard granny squares into dynamic floral art[cite: 14]. The centerpiece of this heirloom project is a high-relief, bright crimson poppy flower that bursts from a warm cream openwork background[cite: 14]. Unlike traditional symmetrical floral blocks, this motif introduces an organic, asymmetrical botanical element: an elegant, curving green stem terminating in a tightly closed red poppy bud, framed by intricately textured, fern-like green leaves[cite: 14]. The vibrant red petals are anchored by a textured olive green center, surrounded by a dramatic ring of jet-black stamens that provide striking visual contrast[cite: 14]. Each cream square is sharply encapsulated by a thick, solid olive green structural frame, which, when joined, creates a crisp grid pattern across the expanse of the bedspread[cite: 14]. With matching decorative pillow shams completing the set, this pattern requires advanced crochet techniques, including surface embroidery, multidimensional petal layering, and asymmetrical background squaring[cite: 14].
Constructing this bedspread is an exercise in varied stitch textures and spatial awareness. The central poppy relies on densely stitched, overlapping layers to achieve its rigid, ruffled petal structure, while the contrasting jet-black details require delicate surface slip stitching or bullion knots to mimic natural floral anatomy[cite: 14]. Creating the asymmetrical stem and bud demands precise stitch placement to seamlessly transition the organic shape into a perfectly geometric square[cite: 14]. The open-lattice cream background provides vital negative space, allowing the dense floral elements to stand out, while the solid green perimeter ensures the final blanket maintains its shape and drape without sagging[cite: 14]. The following comprehensive guide breaks down the complex anatomy of the poppy motif, providing exhaustive row-by-row instructions and specialized assembly protocols.
Materials & Specialized Tools
- Yarn: Worsted weight (Category 4) 50/50 premium cotton-acrylic blend. The cotton provides crisp stitch definition for the leaves and frame, while the acrylic adds lightness to prevent the massive blanket from becoming impractically heavy.
- Color A (Warm Cream): ~3,500 meters (~3,820 yards) for the background openwork lattice[cite: 14].
- Color B (Crimson Red): ~2,500 meters (~2,730 yards) for the large poppy petals and the secondary closed buds[cite: 14].
- Color C (Olive Green): ~1,800 meters (~1,960 yards) for the flower centers, stems, leaves, and the rigid outer square frames[cite: 14].
- Color D (Jet Black): ~200 meters (~218 yards) for the delicate stamen details ringing the flower center[cite: 14].
- Crochet Hooks:
- 4.0 mm (US G/6) hook for the floral elements (center, petals, leaves, and bud) to force a tight, dense gauge, ensuring the 3D elements remain stiff[cite: 14].
- 4.5 mm (US 7) hook for the cream background and green framing to allow for a softer, more traditional blanket drape[cite: 14].
- Notions: Fine-tip metal tapestry needle for the black embroidery work, locking stitch markers, precision yarn snips.
- Blocking Tools: High-density blocking mats, rust-proof T-pins, and a garment steamer. Steam blocking is required to relax the cream lace without flattening the 3D poppy petals.
Special Stitch Anatomy & Architectural Techniques
- Surface Slip Stitch (Surf-sl-st): Utilized with the black yarn to embroider the radiating lines of the poppy stamen directly onto the completed flower center[cite: 14].
- French Knot / Bullion Stitch: Used at the tip of the black surface slip stitches to create the textured anthers of the poppy[cite: 14].
- Front Post Treble Crochet (FPtr): Used in the green foliage rounds to create the raised, ribbed texture of the leaves extending from the flower[cite: 14].
- Puff Stitch Bud: A dense cluster of 6-7 half-double crochets worked into a single space, popped forward, and secured tightly to form the plump, unbloomed red poppy bud[cite: 14].
- Asymmetrical Corner Expansion: A technique used in the cream lattice rounds to build up the corners at different rates, accommodating the space taken by the stem and bud while maintaining a perfect outer square[cite: 14].
The Crimson Poppy Botanical Motif (Make ~72 motifs for Queen Size)
Each motif is built in multi-colored stages, requiring careful hook sizing and tension management to balance the 3D relief against the flat lace background.
Part 1: The Seed Pod & Stamens (4.0 mm hook, Green & Black Yarn)
- Round 1 (The Green Core): With Olive Green, create a magic ring. Ch 1, work 12 sc into the ring. Pull tight to close. Join with sl st[cite: 14].
- Round 2 (Textured Seed Pod): Working in both loops, ch 1, *1 sc, 1 bobble stitch in next st; repeat from * around. Join with sl st and fasten off Green[cite: 14].
- The Black Stamen Details: Thread a tapestry needle with Jet Black yarn. Surface embroider straight, radiating lines emerging from the center of the green pod outwards[cite: 14]. At the end of each line, work a small French knot to mimic the poppy’s dark anthers[cite: 14]. Secure all ends neatly on the back.
Part 2: The Ruffled Crimson Petals (4.0 mm hook, Red Yarn)
- Round 3 (Petal Foundations): Attach Crimson Red to the back loops of Round 1. Ch 1, work 2 sc in each st around to create 24 anchor points.
- Round 4 (Inner Petal Layer): *Ch 2, work 3 tr in next 3 sts, ch 2, sl st in next st; repeat from * 5 more times to create 6 distinct, overlapping inner petals[cite: 14].
- Rounds 5-6 (Outer Jumbo Petals): Working into the remaining front loops of Round 3 and behind the inner petals, establish larger chain-arches (ch-5). In Round 6, work [1 sc, 2 hdc, 5 dc, 2 hdc, 1 sc] into each arch. The tight spacing will force the broad crimson petals to ripple and overlap, creating the signature 3D poppy ruffle[cite: 14]. Fasten off Red.
Part 3: Botanical Framing – Leaves, Stem & Bud (4.0 mm hook, Green & Red Yarn)
- Round 7 (Leaf Foundations & Stem Arch): Attach Olive Green behind the bottom right quadrant of petals. Work standard sc arches around three sides of the flower. On the top right quadrant, ch 12 to create the long, curving stem[cite: 14].
- Round 8 (Fern Leaves & Bud Base): Work FPtr clusters into the bottom and left-side arches to build out the pointed green leaves[cite: 14]. Along the ch-12 stem, sl st back down 3 chains, then work 2 sc to create the receptacle for the bud[cite: 14].
- The Red Bud Drop-in: Switch temporarily to Crimson Red. Work a massive 7-loop puff stitch directly into the receptacle on the green stem to form the closed bud[cite: 14]. Fasten off Red and switch back to Green to finish the remaining leaf structures around the left side[cite: 14]. Fasten off Green.
Part 4: The Cream Lattice Background (4.5 mm hook, Cream Yarn)
Switch to the larger hook to ensure the background drapes beautifully around the stiff botanical elements.
- Round 9 (Squaring the Asymmetry): Attach Warm Cream yarn to any top-left leaf point. You must now transition from a round/asymmetrical shape to a square. Work [tr, ch 2, tr] in the corners, using dc and hdc across the flatter sides of the flower, and sc over the protruding stem and bud to level the height[cite: 14].
- Rounds 10-12 (Openwork Granny Lattice): Ch 3, *skip 1 st, dc in next st, ch 1; repeat around, placing [2 dc, ch 2, 2 dc] in the four corners[cite: 14]. This creates the delicate, airy cream background that isolates the heavy poppy[cite: 14]. Ensure the motif measures approximately 23 x 23 cm by the end of Round 12. Fasten off Cream.
Part 5: The Structural Green Frame (4.5 mm hook, Green Yarn)
- Round 13 (The Solid Border): Attach Olive Green yarn to any corner. Work 1 hdc into every dc and ch-1 space of the previous cream round[cite: 14]. In the corners, work [2 hdc, ch 2, 2 hdc]. This final solid green ring provides the visual grid and structural stability for the entire blanket[cite: 14]. Fasten off Green and block the square heavily.
Master Assembly & Grid Construction
The striking visual impact of this bedspread relies on the continuous, unbroken green grid lines running between the cream backgrounds[cite: 14].
- Orientation: Arrange all blocked motifs in an 8 x 9 grid. Ensure every single block is oriented identically, with the green stem and red bud pointing toward the top right corner of its respective square[cite: 14].
- Invisible Seaming: Thread a tapestry needle with Olive Green yarn. Place two squares right sides together. Whipstitch through the back loops only (BLO) of the final green hdc round. This prevents a raised ridge on the front and makes the two green borders look like a single, thick, cohesive band[cite: 14].
The Continuous Bedspread Edging
To finish the piece, the outer edge must reflect the structural integrity of the inner grid[cite: 14].
- Round 1 (Cream Transition): Attach Warm Cream. Work one round of standard single crochet entirely around the joined blanket to smooth out the junctions between the squares.
- Round 2-3 (Outer Green Frame): Attach Olive Green. Work two solid rounds of double crochet around the entire perimeter, working 3 dc into the extreme outer corners to allow the heavy border to lay flat[cite: 14].
- Round 4 (Picot Finish): For a subtle refined edge, work [sc, ch 3, sl st in first ch, skip 1 st] completely around the final green border. Fasten off and weave in all ends.
Coordinating Botanical Pillow Shams (Make 2)
The matching pillow shams utilize the identical botanical motif, scaled to fit standard decorative bed cushions[cite: 14].
- Front Motif Panel: Crochet the Poppy Botanical Motif (Rounds 1-13) exactly as written above[cite: 14].
- Sham Expansion: To scale the 25 cm square to fit a standard cushion, attach Warm Cream yarn and work 4 additional rounds of the openwork lattice (dc, ch 1)[cite: 14]. Finish with two solid rounds of Olive Green double crochet to match the bedspread framing[cite: 14].
- Back Panel & Assembly: Using Warm Cream yarn, crochet a solid granny-stripe square to match the dimensions of the front panel. Place right sides together, whipstitch around three edges with Olive Green yarn, insert the pillow form, and whipstitch the final side closed.
The finished 3D Crimson Poppy & Botanical Granny Square Bedspread — Comprehensive Crochet Masterclass

